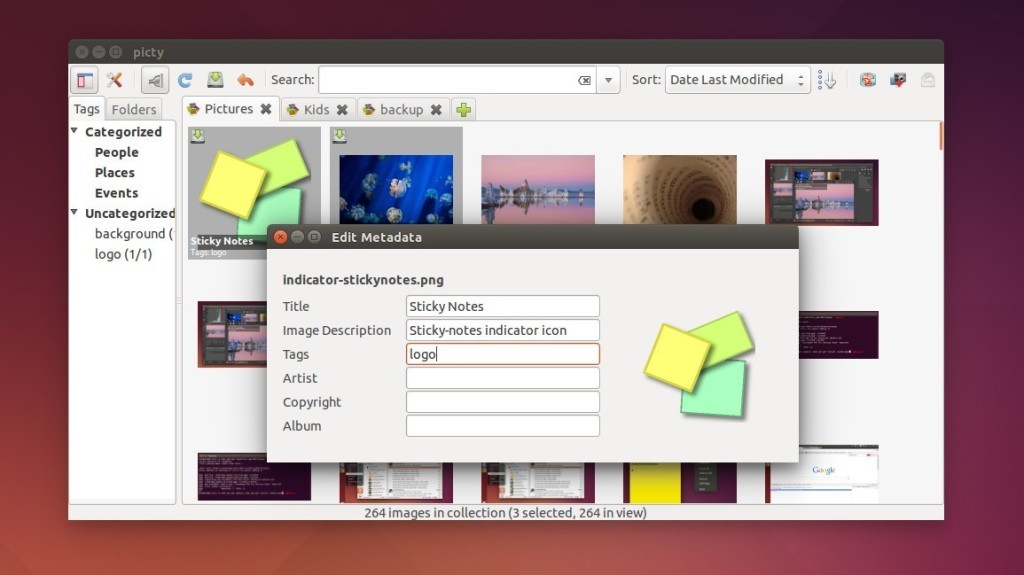
Archives For App Review

This tutorial is going to show you a simple and stylish Facebook browser for your PC. This app provides native Facebook experience in a Facebook styled window plus a system tray icon for providing notifications. This app doesn’t disturbs you by popping out notifications, but it notifies you silently by changing the system tray icon color.

facebook desktop app

This app uses a simple approach for delivering notifications in the system tray. It reads the number of notifications, messages and friend requests directly from the facebook page, using Javascript calls, without using any components from Facebook SDK.

facebook app indicator

Install Facebook Desktop App:

This app works on Windows, Mac and Ubuntu (64-bit only). I’ve tested on Ubuntu 13.04 Raring, unfortunately the indicator applet didn’t work for Unity Desktop.

Download the Deb:

For Windows & Mac user, download it from qt-apps.org

Want to annotate PDF file in Linux systems? Well, Mendeley Desktop is one of the best choice. Besides being able to highlight & add note to text / rectangle of PDF, it can also display definition of selected text from en.wikipedia.org, share the document via E-mail and sync library with Mendeley Web.

Mendeley Desktop

Features:

Mendeley is available as a basic free version, and also in premium payable versions.

  • Mendeley Desktop, based on Qt, runs on Windows, Mac and Linux.
  • Automatic extraction of metadata from PDF papers.
  • Back-up and synchronization across multiple computers and with a private online account.
  • PDF viewer with sticky notes, text highlighting and full-screen reading.
  • Full-text search across papers.
  • Smart filtering, tagging and automatic PDF file renaming.
  • Citations and bibliographies in Microsoft Word, OpenOffice.org and LibreOffice.
  • Import of documents and research papers from external websites (e.g., PubMed, Google Scholar, Arxiv) via browser bookmarklet.
  • BibTeX export/file sync
  • Private groups to collaboratively tag and annotate research papers.
  • Public groups to share reading lists.
  • Social networking features (newsfeeds, comments, profile pages, etc.).
  • Usage-based readership statistics about papers, authors and publications.
  • iPhone app
  • iPad app
  • Install Mendeley Desktop in Ubuntu & Other Linux OSs

    For Ubuntu 13.10, Ubuntu 13.04, Ubuntu 12.04, Linux Mint, Elementary OS and others, download the DEB from the link below:

    Mendeley Desktop for Ubuntu 32-bit | Ubuntu 64-bit

    You may check your system type (32-bit or 64-bit) via System Settings ->Details utility. Once downloaded, install it via below command in terminal (Ctrl+Alt+T).

    sudo dpkg -i ~/Downloads/mendeleydesktop_*-stable_*.deb

    During installation, the Mendeley Ubuntu repository will be added to your list of software sources. You can then use the standard Ubuntu/Debian software update tools to keep Mendeley up to date.

    For other Linux, Windows, and Mac, download Mendeley Desktop installer from this page.

    Use Foto Image Viewer and Album Manager on Ubuntu

    Last updated: September 9, 2013

    Foto is a very simple image viewer and album manager written in Vala using Gtk3, Clutter, Cairo and Granite. Here are the screenshots:

    foto image viewer

    foto album manager

    foto album images

    Foto is a new project, and it’s still in early development stage. If you are interested, install it in Ubuntu 13.04, Ubuntu 12.10, Ubuntu 12.04 and Linux Mint via PPA (press Ctrl+Alt+T to open terminal):

    sudo add-apt-repository ppa:erasmo-marin/foto-daily-builds
    
    sudo apt-get update
    
    sudo apt-get install foto

    Or download the DEB from this page

    youtube ustream livestreamWant to watch live streams on Ubuntu via your favorite video player? Well, here’s how to do it using Livestreamer which supports most of the big streaming services such as Dailymotion, Livestream, Twitch/Justin.tv, YouTube Live, UStream.

    Livestreamer is a Command Line Interface that pipes video streams from various services into a video player, such as VLC, Mplayer. The main purpose of Livestreamer is to allow the user to avoid buggy and CPU heavy flash plugins but still be able to enjoy various streamed content.

    There is also an API available for developers who want access to the video stream data.

    It’s very easy to use this tool. Let’s say you want to watch the stream located on http://twitch.tv/day9tv, just run below command in terminal (press Ctrl+Alt+T to open it).

    livestreamer twitch.tv/day9tv

    [cli][info] Found matching plugin justintv for URL twitch.tv/day9tv
    Found streams: 240p, 360p, 480p, 720p (best), mobile_high, mobile_low (worst)

    It will find out what streams are available and print them out for you to choose from. Simply give livestreamer the stream as the second argument and playback will start in your video player of choice.

    In this case the best stream is a reference to the stream that is considered to be of highest quality, e.g 720p. The –player argument will specify the video player (It will open VLC as the default player if not specified).

    livestreamer twitch.tv/day9tv best --player mplayer

    live streams ubuntu

    Install Livestreamer in Ubuntu, Linux Mint

    Press Ctrl+Alt+T on your keyboard to open terminal. When it opens run below commands to install pip installer:

    sudo apt-get install python-pip

    Then install Livestreamer via pip:

    sudo pip install livestreamer

    This will work on all current supported Ubuntu releases, include Ubuntu 13.10, Ubuntu 13.04, Ubuntu 12.10, Ubuntu 12.04, Ubuntu 10.04 and their derivatives such as Linux Mint and Elementary OS.

    Terra is a drop-down terminal emulator based on GTK+3.0. It has a tranparent background and supports multiple terminals with splitting screen horizontally or vertically.

    It’s a good alternative to Yakuake terminal. Here are the screenshots:

    terra terminal in gnome

    terra terminal in xfce

    terra terminal in unity

    Install Terra in Ubuntu & its derivatives

    For Ubuntu 13.04 Raring, Ubuntu 12.04 Precise, Ubuntu 12.10 Quantal, Linux Mint and Elementary OS. Press Ctrl+Alt+T on your keyboard to open terminal. When it opens, run below commands one by one to install it:

    sudo add-apt-repository ppa:ozcanesen/terra-terminal
    
    sudo apt-get update
    
    sudo apt-get install terra

    Download and install the DEB from this page if you don’t want to add the ppa.

    Catfish is a versatile file searching tool. It is a search GUI powered by locate and find behind the scenes, with autocompletion from Zeitgeist and locate. The advanced options allow filtering by date and file type. The interface is intentionally lightweight and simple, using only GTK+.

    catfish file search ubuntu

    Features:

    • search files anywhere on your computer, include mounted partitions.
    • search hidden files
    • search files by modified time
    • search files by type

    Install Catfish File Search:

    You can install Catfish file searching tool in Ubuntu 13.04 Raring, Ubuntu 12.10 Quantal, Ubuntu 12.04 Precise and their derivatives, such as Linux Mint and Elementary OS.

    Press Ctrl+Alt+T on your keyboard to open terminal. When it opens, run below commands one by one to install the tool:

    sudo add-apt-repository ppa:catfish-search/catfish-stable
    
    sudo apt-get update
    
    sudo apt-get install catfish

    Once done, you can open it from Unity Dash:

    catfish file search ubuntu unity

    Indicator-terminal is an applet in Ubuntu top panel that shows a terminal window for running commands when you click on the icon.

    terminal indicator

    Install Indicator-terminal in Ubuntu:

    NOTE: This project is still in early development. It has bugs and may break you system. Use it at your own risk!

    There’s a PPA for Ubuntu 13.10 Saucy, Ubuntu 13.04 Raring, Ubuntu 12.10 Quantal. Press Ctrl+Alt+T to open terminal, when it opens, run below commands one by one:

    sudo add-apt-repository ppa:erasmo-marin/indicator-terminal
    
    sudo apt-get update
    
    sudo apt-get install indicator-terminal

    Once installed, restart you machine.

    To remove this indicator, run below commands in terminal:

    sudo apt-get install ppa-purge
    
    sudo ppa-purge ppa:erasmo-marin/indicator-terminal
    
    sudo apt-get remove indicator-terminal

    TV capture cards.TVPVRD is a highly flexible and configurable server daemon that acts as an advanced digital TV recorder using one or several installed TV capture cards.

    The server manages scheduled recordings and provides an efficient command language interface on a dedicated TCP/IP port. As an alternative interface the daemon also comes with a basic WEB-interface through the daemons built in micro-web-server. To keep the WEB-interface simple only the most common commands are available through this interface.

    The goal with this project is to provide an advanced recording and transcoding (using ffmpeg) server without the need to configure complex databases or GUI. The daemon sits unobtrusively in the background.

    The server is self-contained and uses a plain text database (in XML format) to store and manage recordings. In addition, the server has built-in intelligence to make it as easy as possible to manage and use. Examples are highly flexible commands to specify future recordings and automatic load assessment on the server to avoid starting too many parallel transcoding jobs. The server is completely self-contained and has a small footprint.

    Install TVPVRD in Ubuntu:

    The GetDeb repository provides the latest packages for Ubuntu 13.04 Raring, Ubuntu 12.04 Precise, and a little old versions for Ubuntu 12.10, Ubuntu 11.10 and their derivatives, such as Linux Mint and Elementary OS.

    To Add GetDeb repository, just download and double-click to install the package below (For Linux Mint users, read this post).

    getdeb package

    Once done, install TVPVRD by running below commands in terminal (Ctrl+Alt+T):

    sudo apt-get update; sudo apt-get install tvpvrd

    Use TVPVRD:

    There are two main ways to use tvpvrd:

    1. via command line shell, run man tvpsh to get details
    2. via the built in Webserver (http://localhost:9301/)

    You need to enable the config file by running below command:

    cd /etc/tvpvrd; sudo mv tvpvrd.conf.full.template tvpvrd.conf

    Then edit the file by:

    sudo gedit /etc/tvpvrd/tvpvrd.conf

    There you can change the port, enable web interface by “enable_webinterface=yes” and many other settings.

    tvpvrd ubuntu

    For more, see tvpvrd manual.

    As you may know, Brackets is an open-source editor for web design and development built on top of web technologies such as HTML, CSS and JavaScript. The project was created and is maintained by Adobe, and is released under an MIT License.

    brackets in ubuntu

    What makes Brackets different from other web code editors?

  • Tools shouldn’t get in your way. Instead of cluttering up your coding environment with lots of panels and icons, the Quick Edit UI in Brackets puts context-specific code and tools inline.
  • Brackets is in sync with your browser. With Live Development, Brackets works directly with your browser to push code edits instantly and jump back and forth between your real source code and the browser view.
  • Do it yourself. Because Brackets is open source, and built with HTML, CSS and JavaScript, you can help build the best code editor for the web.
  • Try out Brackets:

    The official download page provides the DEB packages for Debian / Ubuntu and their derivatives, such as Linux Mint, Elementary OS, and so forth.

    Just download and double click the DEB to bring up Ubuntu Software Center and install it. Or run below commands instead once downloaded:

    sudo dpkg -i ~/Downloads/brackets-sprint-*.deb; sudo apt-get -f install

    Once installed, you can find it in Unity Dash.

    brackets in ubuntu unity

    Microsoft Silverlight in UbuntuPipelight is a special browser plugin allows to run your favorite Silverlight application directly inside your Linux browser. The project combines the effort by Erich E. Hoover with a new browser plugin that embeds Silverlight directly in any Linux browser supporting the Netscape Plugin API.

    Pipelight consists out of two parts: A Linux library which is loaded into the browser and a Windows program started in Wine. The Windows program, called pluginloader.exe, simply simulates a browser and loads the Silverlight DLLs. When you open a page with a Silverlight application the library will send all commands from the browser through a pipe to the Windows process and act like a bridge between your browser and Silverlight. The used pipes do not have any big impact on the speed of the rendered video since all the video and audio data is not send through the pipe. Only the initialization parameters and (sometimes) the network traffic is send through them. As a user you will not notice anything from that “magic” and you can simply use Silverlight the same way as on Windows, like you can see on the following screenshot:

    silverlight chrome ubuntu

    Install Pipelight on Ubuntu

    Warning: Before you continue the installation you should note that:

  • It is strongly recommended to close your browser before installing! Some browsers try immediately to load the plugin which might fail or crash the browser when the installation is not complete!
  • Silverlight might contain (like all other browser plugins) security issues – You may want to enable click-to-play for this plugin to prevent an undesired start of Silverlight.
  • Pipelight needs to start Wine to execute the pluginloader. This may slow down the start of your browser.
  • The Pipelight PPA is available for Ubuntu 13.10, Ubuntu 13.04, Ubuntu 12.10, Ubuntu 12.04 and their derivatives. You can easily install it by running below commands in terminal (Ctrl+Alt+T) one by one:

    sudo add-apt-repository ppa:pipelight/stable
    sudo apt-get update
    sudo apt-get install pipelight

    You may need to accept a license agreement for a set of fonts during the installation. After it’s done just start your browser, type about:plugins in the addressbar and hit enter – if the installation went well you should now see Silverlight in your plugin list and everything is ready to run! Pipelight will install Silverlight on the first start of your browser, this may freeze the interface for several minutes (and you may just see a blank page without any progress). There might appear some dialog asking if Mono or Gecko should be installed during the Silverlight installation – you can safely choose no, as this is not necessary to get Pipelight running. After this step, the overall performance of your browser shouldn’t be affected any more.

    More at Pipelight Homepage