Archives For Howtos

Install Simplenote Desktop App in Ubuntu

Last updated: March 31, 2016

Simplenote App for Ubuntu

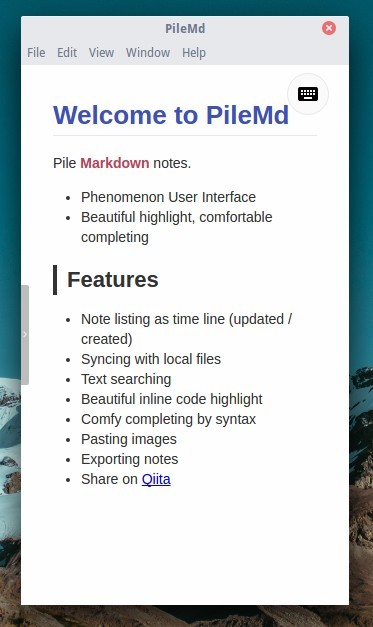
Simplenote, one of the most popular note-taking apps which was first started on iOS, now is available for Linux Desktops.

Simplenote blog announced the release of Simplenote for Linux (and Windows) on Tuesday. It’s an open-source application that is built with React and runs on Electron.

Features:

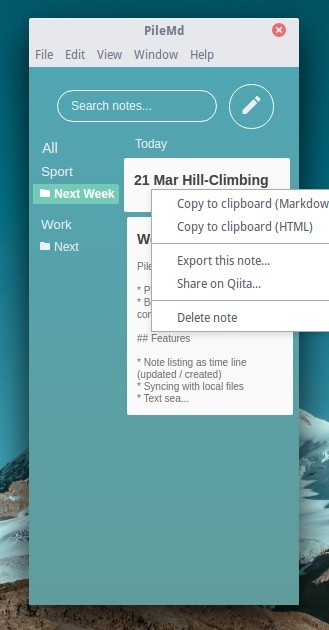
  • History: drag the History slider to view previous versions.
  • Collaboration: share your note with others and allow them to edit.
  • Publishing: make your note public with its own URL.
  • Tags: organize your notes effectively with tags.
  • Pinning: pin notes right from the note list so they’re easy to find.
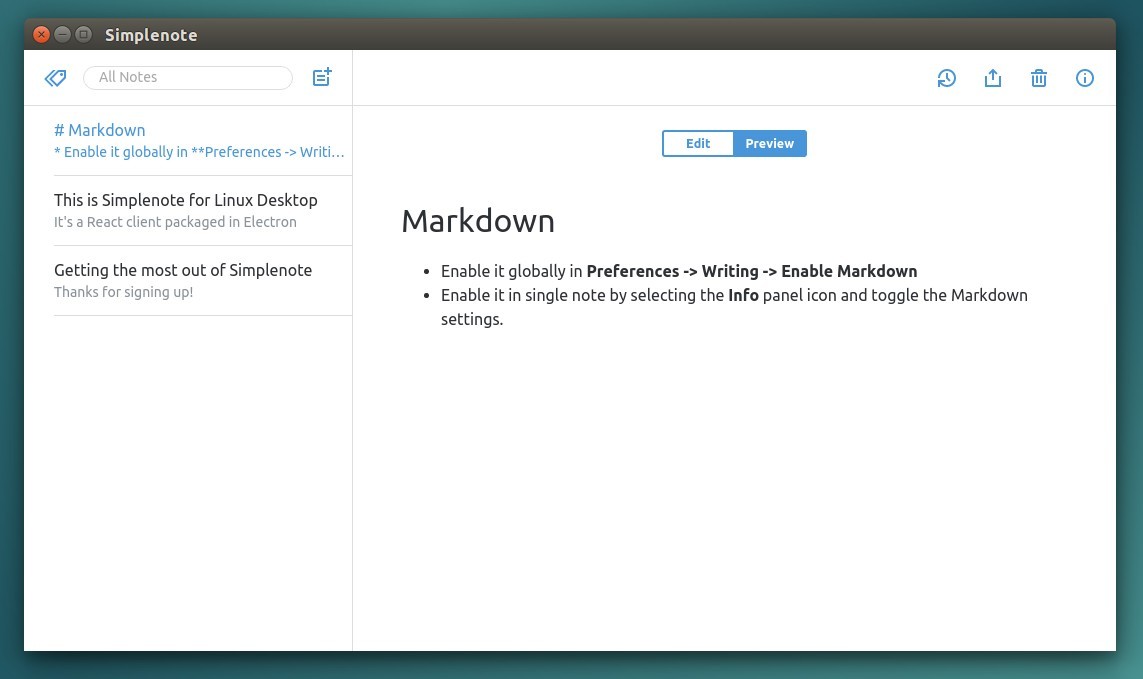
  • Markdown support:
    • Enable globally in Preferences -> Writing -> Enable Markdown.
    • Enable in single note by selecting the Info panel icon and toggle the Markdown setting.

Simplenote for Linux

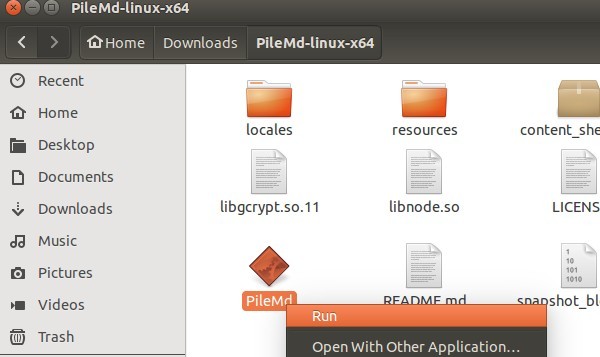
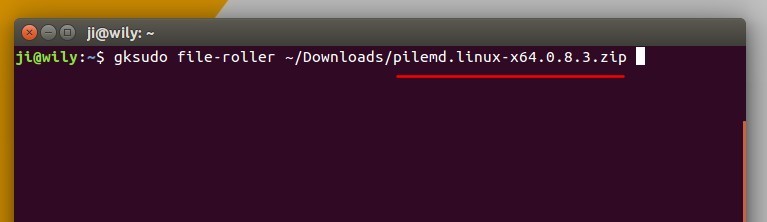
Install Simplenote in Ubuntu:

Download the .deb package from its website, then click install via Software Center.

Download for Linux (.deb)

Simplenote for Linux now is in 1.0.0 release. Report bugs and ask requests at github.com/Automattic/simplenote-electron/issues

Ubuntu 16.04 Xenial Xerus

Want to try the new Ubuntu 16.04 LTS? Here’s how to upgrade to Ubuntu 16.04 Beta 2 from your Ubuntu 15.10 desktop. You can then update to the final release a few weeks after, on April 21st.

NOTE:

1. This beta has numbers of bugs, don’t do this and wait for the final release if you want a stable system.

2. DON’T upgrade from Ubuntu 14.04 LTS. There’s a known bug upgrading from 14.04.

Preparation:

1. Always first backup your bookmarks, documents, and other data.

2. If you have the proprietary video driver installed, uninstall it and switch back to the open-source driver.

For Nvidia, depends on how you installed the driver, use the official .run from Nvidia website via --uninstall option:

sudo ./NVIDIA-Linux-x86_64-xx.xx.run --uninstall

or remove nvidia-current via command:

sudo apt-get purge nvidia-current

You may also re-install the open-source driver via PPA:

sudo apt-get install xserver-xorg-video-nouveau && sudo rm /etc/X11/xorg.conf

3. Remove/Disable third-party PPAs by going to Software & Updates -> Other Software tab.

Disable  Remove PPAs

4. In Updates tab, enable Proposed repository:

Enable Proposed repository

Upgrade Ubuntu:

1. Open terminal (Ctrl+Alt+T) and update your system by running below command:

sudo apt-get update && sudo apt-get dist-upgrade

Type in your password (no visual feedback when typing) when it asks and hit Enter to continue.

You may need to restart your computer to complete installing updates.

2. Once your system is up to date. Launch Software Updater with -d option, so it checks if upgrading to the latest devel release is possible:

sudo update-manager -d

After checking for updates, it prompts that Ubuntu 16.04 LTS is available.

upgrade-ubuntu1604

3. Click Upgrade and confirm in next window to start the upgrade process. At the end you’ll be prompted to restart your computer if everything goes well.

Tip: Once Ubuntu 16.04 final is released, run commands in step 1 to update this beta to the final release.

install f.lux in Ubuntu

F.lux changes your computer display’s color temperature according to location and time of day. It was designed to reduce eye strain during night-time use and disruption of sleep patterns.

The f.lux for Linux is a command line daemon and the GUI is an indicator applet created by Kilian Valkhof. Though Kilian’s repository does not update anymore, you can still get the applet for Ubuntu 16.04, and Ubuntu 15.10 via below steps.

F.lux indicator in Ubuntu

How to Install f.lux in Ubuntu via PPA:

The Linux f.lux GUI is now available in Nathan Rennie-Waldock’s PPA for all current Ubuntu releases.

1. Launch terminal (Ctrl+Alt+T) and run below commands one by one to get it from PPA:

sudo add-apt-repository ppa:nathan-renniewaldock/flux

Type in your password when it asks (no visual feedback when typing) and hit Enter to continue.

fluxgui-ppa

2. Then update and install the GUI along with xflux daemon via commands:

sudo apt-get update

sudo apt-get install fluxgui

For those who don’t want to add PPA, download the .deb package for your Ubuntu release from HERE

3. (Optional) To remove the software, use Synaptic Package Manager or just run below command:

sudo apt-get remove fluxgui

The PPA repository can be removed by going to Software & Updates -> Other Software.

Ubuntu 16.04 Xenial Xerus

Finally the default Unity Desktop’s left launcher panel can be moved to the bottom of screen in Ubuntu 16.04 LTS Xenial Xerus.

Ubuntu 16.04 has reached its final beta today. One of the great new features is that the left launcher panel now is movable: to Left or to Bottom.

Unity Launcher in Left

Unity Launcher in Left

Unity Launcher in Bottom

Unity Launcher in Bottom

How to Move Unity Launcher in Ubuntu 16.04:

For those prefer Linux commands, this can be done via a single command in terminal:

gsettings set com.canonical.Unity.Launcher launcher-position Bottom

gsettings-launcher-position

To revert back, run:

gsettings set com.canonical.Unity.Launcher launcher-position Left

For graphical way, do:

Unity Tweak Tool, a graphical configuration tool for Unity desktop, now has an option to move the Unity Launcher. Install it via Gnome Software, launch the tool and navigate to Unity -> Launcher:

move unity launcher via unity tweak tool

1. Launch Gnome Software from Launcher, search for and install dconf editor.

dconf-editor-gnomesoftware

2. Launch dconf editor after installation, and navigate to “com -> canonical -> unity -> launcher”. Finally change the value of “launcher-position” to select Unity Launcher position.

launcher-position

To make the bottom panel fit your screen, go to System Settings -> Appearance and change the value of Launcher icon size.

Blender

The Blender Foundation finally announced the stable release for Blender 2.77 this weekend.

The new release features:

  • Cycles Rendering has better Subsurface Scattering, GPU support for Smoke/Fire and Point Density, and a few other features and optimizations.
  • User Interface has faster OpenGL rendering and better Anti-Aliasing, and other improvements
  • Modeling now has an edit-mode boolean tool, better decimate modifier, selection tools
  • Sequencer has a Gaussian Blur effect speedup, and other strip and modifier improvements
  • Sculpting/Painting has better extruding and weight painting tools
  • Animation has a new constraint interpolation method, and improvements in graph editor, dope sheet, armatures and motion paths
  • Grease pencil now has stroke sculpting, and several other workflow improvements
  • Library handling has been improved to better manage missing and deleted datablocks
  • Game Engine has a few new small features
  • A new Add-on supports packing .blend files and their dependencies, some other IO Add-on was improved, and Python was upgraded
  • OpenVDB caching is now supported for smoke/volumetric simulations, multithreading is now massively
  • supported, and also 2D stabilization node, Image editor, Cubemap and spotlights were improved
  • Support for Windows XP was removed, and the SCons build system too.
  • And, as usual, a massive bug fixing!
  • Read more at its features page.
Blender 2.77 Splash

Blender 2.77 Splash

How to Install Blender 2.77 in Ubuntu:

Blender 2.77 can be installed via either the official Linux binary, or a third-party PPA for better Ubuntu integration.

1. See this how-to to install blender via official Linux binary. Need to remove the previous installation first.

2. To install Blender 2.77 from PPA.

There may be a little delay before the current release being made into PPA. Check out the PPA webpage, and read the PPA description before doing below steps.

1.) Open terminal from App Launcher, or via Ctrl+Alt+T keys. When it opens, paste below command and hit run:

sudo add-apt-repository ppa:thomas-schiex/blender

blender-ppa

2.) Then upgrade Blender by launching Software Updater.

Or install it by running the commands one by one in terminal:

sudo apt-get update

sudo apt-get install blender

classic gnome icon

ClassicMenu Indicator 0.10 has been released. Now it’s based on GTK3 and supports Ubuntu 16.04.

ClassicMenu Indicator is a system tray area applet provides classic GNOME-style application menu for those who prefer this over the Unity dash menu.

Since the last was released two years ago, ClassicMenu Indicator 0.10 brings following changes:

  • ported to GTK3, Python3
  • Ubuntu Software Center in main menu
  • custom logo icon support
  • new preference window allows to change menu definitions, icons, and other settings.
  • show wine applications, and even Android apps for me.
  • various fixes and translation updates

ClassicMenu Indicator 0.10

classicmenu-definitions

classicmenu-settings

Download and Install ClassicMenu 0.10:

Download the “classicmenu-indicator_0.10_all.deb” package from either

ClassicMenu Indicator Webpage

or

the Official PPA

Then click install it via Software Center. Works for all current Ubuntu releases and based systems, though it’s built against Ubuntu 16.04.

Finally launch ClassicMenu indicator from the Unity Dash menu. Or just log out, it’ll start automatically at next login.

pilemd-markdown

Still looking for a Markdown Editor for your Ubuntu Linux? Try PileMd, a modern new app created a few days ago.

PileMd is an open-source note app that features:

  • Light Weight
  • Like rich editor it has Undo/Redo histories, open link in editors, keymaps
  • Sync data with locall files
  • Note and Text searching
  • Beautiful inline code highlight
  • manage notes with drag and drop
  • paste images, export notes, share on Qiita, and more..
PileMd Markdown Editor in Elementary OS Freya

PileMd Markdown Editor in Elementary OS Freya

pilemd-preview pilemd-manage

Install PileMd Markdown Editor in Ubuntu:

At the moment, there’s only portable version available. Just download the Linux package, extract and RUN EXECUTABLE FILE in the result folder.

Download PileMd for Linux

start-pilemd

To create a shortcut, follow the steps below:

1. Open terminal from App Launcher, and run command to open downloaded package with super user privilege:

gksudo file-roller ~/Downloads/pilemd.linux-x64.0.8.3.zip

Depends on downloaded package name, replace pilemd.linux-x64.0.8.3.zip in the command. Install gksu via Software Center if not work.

archive-manager

2. When archive manager opens, extract it to Computer -> opt folder for global use.

extract2opt

Finally launch file browser and navigate to Computer -> opt. There you should see the PileMd folder. Mine is PileMd-linux-x64

3. To create a launcher, run command in terminal:

gksudo gedit /usr/share/applications/pilemd.desktop

It will open gedit text editor with a blank file, paste below content and save it.

[Desktop Entry]
Name=PileMd
Categories=GNOME;Office;
Exec=PATH-TO-EXECUTABLE %U
Icon=PATH-TO-ICON-FILE
Terminal=false
Type=Application
MimeType=text/x-markdown;text/plain;asdas/dkwodw;

For me, the executable file path is /opt/PileMd-linux-x64/PileMd.

For icon, get it from the source code in release page. Put the icon in the installation folder /opt/PileMd-linux-x64 or user’s local icons folder .local/share/icons(press Ctrl+H to view hidden folders).

Selection_063

When everything’s done, you should be able to launch PileMd from App Launcher.

Linux Kernel

The Linux Kernel has reached the new stable 4.5 release. Linus Torvalds yesterday announced:

    So this is later on a Sunday than my usual schedule, because I just couldn’t make up my mind whether I should do another rc8 or not, and kept just waffling about it. In the end, I obviously decided not to,
    but it could have gone either way.

    We did have one nasty regression that got fixed yesterday, and the networking pull early in the week was larger than I would have wished for. But the block layer should be all good now, and David went through all his networking commits an extra time just to make me feel comfy about it, so in the end I didn’t see any point to making the release cycle any longer than usual.

    And on the whole, everything here is pretty small. The diffstat looks a bit larger for an xfs fix, because that fix has three cleanup refactoring patches that precedes it. And there’s a access type
    pattern fix in the sound layer that generated lots of noise, but is all very simple in the end.


Download and Install Linux Kernel 4.5:

NOT recommended for “normal” users! You MUST know what you’re going to do and how to revert the changes.

Ubuntu Kernel Team has made the binary packages for this kernel release, available for download at the link below:

Download Kernel 4.5 (DEBs)

First check out your OS type, 32-bit, 64-bit, then select install below packages one by one:

  1. linux-headers-4.5.0-xxx_all.deb
  2. linux-headers-4.5.0-xxx-generic_xxx_i386/amd64.deb
  3. linux-image-4.5.0-xxx-generic_xxx_i386/amd64.deb

If you need a low latency system (e.g. for recording audio) then download & install below packages instead:

  1. linux-headers-4.5.0-xxx_all.deb
  2. linux-headers-4.5.0-xxx-lowlatency_xxx_i386/amd64.deb
  3. linux-image-4.5.0-xxx-lowlatency_xxx_i386/amd64.deb

For command line, download and install the kernel debs via:

For 64-bit system:

cd /tmp/

wget http://kernel.ubuntu.com/~kernel-ppa/mainline/v4.5-wily/linux-headers-4.5.0-040500_4.5.0-040500.201603140130_all.deb

wget http://kernel.ubuntu.com/~kernel-ppa/mainline/v4.5-wily/linux-headers-4.5.0-040500-generic_4.5.0-040500.201603140130_amd64.deb

wget http://kernel.ubuntu.com/~kernel-ppa/mainline/v4.5-wily/linux-image-4.5.0-040500-generic_4.5.0-040500.201603140130_amd64.deb

sudo dpkg -i *.deb

For 32-bit system:

cd /tmp/

wget http://kernel.ubuntu.com/~kernel-ppa/mainline/v4.5-wily/linux-headers-4.5.0-040500_4.5.0-040500.201603140130_all.deb

wget http://kernel.ubuntu.com/~kernel-ppa/mainline/v4.5-wily/linux-headers-4.5.0-040500-generic_4.5.0-040500.201603140130_i386.deb

wget http://kernel.ubuntu.com/~kernel-ppa/mainline/v4.5-wily/linux-image-4.5.0-040500-generic_4.5.0-040500.201603140130_i386.deb

sudo dpkg -i *.deb

Uninstall Kernel 4.5:

Reboot computer and select boot with previous kernel (under Advanced Options) entry when you’re at Grub bootloader. Finally remove kernel 4.5 via command:

sudo apt-get remove linux-headers-4.5.0-* linux-image-4.5.0-*; sudo update-grub

MakeMKV icon

MakeMKV is tool converts video clips from DVD / Blu-ray disc into a set of MKV files, preserving most information, so that it can be played on your favorite OS with VLC or MPlayer.

MakeMKV is proprietary software with a free 30-day trial. It’s free to use while in beta, and it’s been in beta for a few years. The software features:

  • Reads DVD and Blu-ray discs
  • Reads Blu-ray discs protected with latest versions of AACS and BD+
  • Preserves all video and audio tracks, including HD audio
  • Preserves chapters information
  • Preserves all meta-information (track language, audio type)
  • Fast conversion – converts as fast as your drive can read data.
  • No additional software is required for conversion or decryption.
  • Available for Windows, Mac OS X and Linux
  • Functionality to open DVD discs is free and will always stay free.
  • All features (including Blu-ray decryption and processing) are free during BETA.

How to Install MakeMKV (Beta) in Ubuntu via PPA:

Besides building MakeMKV from source, an Ubuntu PPA for Ubuntu 16.04, Ubuntu 15.10, Ubuntu 14.04, and Ubuntu 12.04 is available to make it much easier to install.

1. Add PPA

Launch terminal (Ctrl+Alt+T) and paste below command and run to add PPA:

sudo add-apt-repository ppa:heyarje/makemkv-beta

Type in your password (no visual feedback when typing) when it asks and hit Enter to continue.

MakeMKV Beta PPA

2. Update and install the tool via:

sudo apt-get update

sudo apt-get install makemkv-oss makemkv-bin

For those who don’t want to add PPA, grab the .deb packages for both makemkv-bin and makemkv-oss from THIS PAGE.

Once installed, launch it and register the software by going to Help -> Register. Get the Beta key from this forum post.

You can now select your Blu-ray disc drive in MakeMKV window, and click the Steam icon on the toolbar.

MakeMKV

Wait the converting process to be finished, or play the given url (looks like below) while it’s being decoded in background using VLC or MPlayer:

http://localhost:51000/stream/title0.ts

vlc-open-network-stream

Spotify Client for Linux

Linux Spotify client 1.x finally goes stable! The stable Linux repository added support for Ubuntu 16.04 LTS, and Ubuntu 15.10.

Due to lack of developers working on the Linux client, Spotify 1.x takes 9 months of development to be made into stable repository,

In June 2015 we released version 1.x of the client for Linux in the testing repository.

The intention was to fix a few of the bigger issues and then quickly move this to stable. That never happened, since after September, we have had no developers working on the linux client. There are still lots of problem with this version of the client for linux, but we are now seeing much more problems with the old client.

Read the community announcement for more details.

Spotify Client 1.0.24

How to Install Spotify Client 1.x in Ubuntu:

The client now is available for all current Ubuntu releases. Ubuntu 16.04 and Ubuntu 15.10 does not longer need to manually install the libgcrypt11 library.

If you’ve the testing repository added in your system, disable/remove it first via Software & Updates -> Other Software tab.

1. Launch terminal from App Launcher, or via Ctrl+Alt+T shortcut key. When it opens, paste below command and run to add the stable Spotify repository for Linux:

echo deb http://repository.spotify.com stable non-free | sudo tee /etc/apt/sources.list.d/spotify.list

Stable Spotify Repository for Linux

Type in your password (no visual feedback when typing) when it asks and hit Enter.

2. Add the key so that your Ubuntu will trust the packages from that repository:

sudo apt-key adv --keyserver hkp://keyserver.ubuntu.com:80 --recv-keys BBEBDCB318AD50EC6865090613B00F1FD2C19886

3. Finally install the client via Synaptic Package Manager (after clicked Refresh button), or by running below commands in terminal one by one:

sudo apt-get update

sudo apt-get install spotify-client