Archives For Howtos

Microsoft Silverlight in Ubuntu

Pipelight, a browser plugin allows to use Microsoft Silverlight in your Linux browser now get a NEW PPA which includes the required Wine packages.

The PPA supports Ubuntu 14.04 Trusty, Ubuntu 13.10 Saucy, Ubuntu 13.04 Raring, Ubuntu 12.10 Quantal, Ubuntu 12.04, Linux Mint and their derivatives.

What’s Pipelight

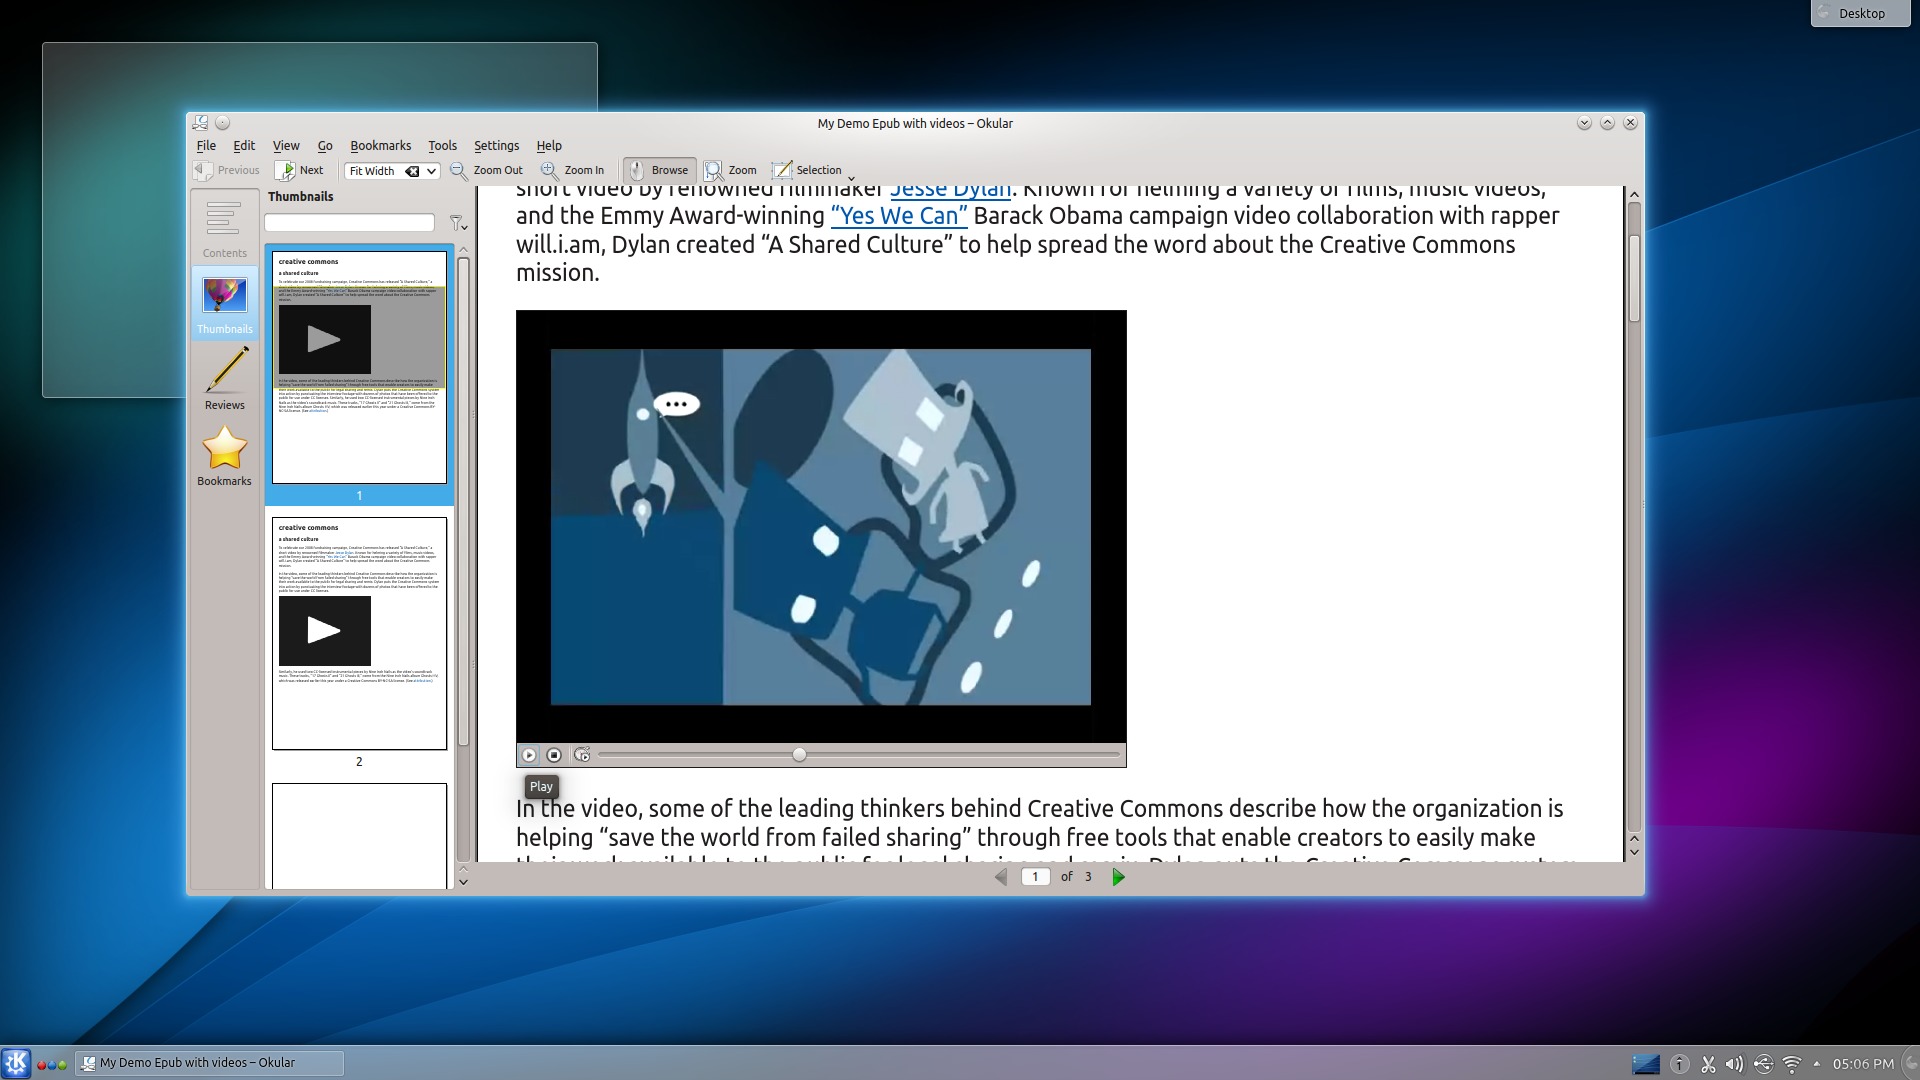
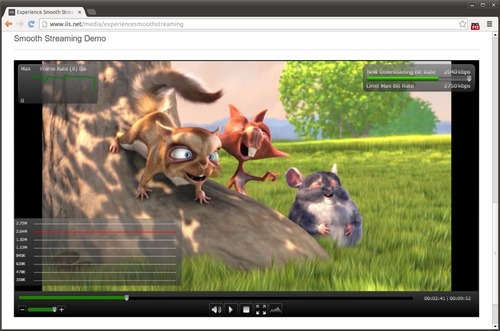
Pipelight consists out of two parts: A Linux library which is loaded into the browser and a Windows program started in Wine. The Windows program, called pluginloader.exe, simply simulates a browser and loads the Silverlight DLLs. When you open a page with a Silverlight application the library will send all commands from the browser through a pipe to the Windows process and act like a bridge between your browser and Silverlight. The used pipes do not have any big impact on the speed of the rendered video since all the video and audio data is not send through the pipe. Only the initialization parameters and (sometimes) the network traffic is send through them. As a user you will not notice anything from that “magic” and you can simply use Silverlight the same way as on Windows, like you can see on the following screenshot:

silverlight chrome ubuntu

Install Pipelight on Ubuntu

NOTE: It is strongly recommended to close your browser before installing! Some browsers try immediately to load the plugin which might fail or crash the browser when the installation is not complete!

For those who have already installed previous version of Pipelight. It’s recommended to remove the earlier PPAs (Ctrl+Alt+T to open teminal and run):

sudo add-apt-repository -r ppa:mqchael/pipelight

sudo add-apt-repository -r ppa:ehoover/compholio

Then add the NEW PPA:

sudo add-apt-repository ppa:pipelight/stable

Update package lists and install the plugin:

sudo apt-get update; sudo apt-get install pipelight

Once installed, start (or restart) your browser and go to the bottom of www.iis.net/media/experiencesmoothstreaming to see the result.

For user agent or blank screen problem, take a look at this FAQ

Pipelight on launchpad

Linux Kernel 3.10.25

The Linux Kernel 3.10 (Long Term Support) now is at 25th maintenance release. Linux Kernel 3.10.25 is a big released which brings several x86 improvements, numerous updated drivers (Radeon, i915, hwmon, ALSA, wireless, USB), various fixes (KVM, PowerPC, ARM, Btrfs), as well as other changes. See the changelog for details.

All users of 3.10 Kernel series are urged to upgrade as soon as possible, here’s how to do it in Ubuntu, Linux Mint and their derivatives.

Install / Upgrade Kernel 3.10.25:

The DEBs are available in Ubuntu Kernel page. Follow the steps below to download & install them if you’re on familiar with command line:

1. Download the DEB:

For 32 bit system:

cd ~/Downloads/ && wget http://kernel.ubuntu.com/~kernel-ppa/mainline/v3.10.25-saucy/linux-headers-3.10.25-031025-generic_3.10.25-031025.201312201135_i386.deb

wget http://kernel.ubuntu.com/~kernel-ppa/mainline/v3.10.25-saucy/linux-headers-3.10.25-031025_3.10.25-031025.201312201135_all.deb

wget http://kernel.ubuntu.com/~kernel-ppa/mainline/v3.10.25-saucy/linux-image-3.10.25-031025-generic_3.10.25-031025.201312201135_i386.deb

For 64 bit system:

cd ~/Downloads/ && wget http://kernel.ubuntu.com/~kernel-ppa/mainline/v3.10.25-saucy/linux-headers-3.10.25-031025-generic_3.10.25-031025.201312201135_amd64.deb

wget http://kernel.ubuntu.com/~kernel-ppa/mainline/v3.10.25-saucy/linux-headers-3.10.25-031025_3.10.25-031025.201312201135_all.deb

wget http://kernel.ubuntu.com/~kernel-ppa/mainline/v3.10.25-saucy/linux-image-3.10.25-031025-generic_3.10.25-031025.201312201135_amd64.deb

2. Install the DEBs:

cd ~/Downloads/ && sudo dpkg -i linux-headers-3.10.25-*.deb linux-image-3.10.25-*.deb

Restart your computer and done.

If you’re using proprietary video driver, you may need to re-build or re-install to get it work with new kernel.

If for some reason this kernel release doesn’t work properly for you, reboot into previous kernel (Grub -> Advanced -> select previous kernel) and run commands to remove Linux Kernel 3.10.25:

sudo apt-get remove linux-headers-3.10.25-* linux-image-3.10.25-*

Linux Kernel 3.12.6

The sixth maintenance release of Linux kernel 3.12 has been released recently, which brings several ARM and x86 improvements, numerous updated drivers (Radeon, i915, HID, hwmon, md, Ethernet, wireless, DVB, USB), various filesystem improvements (Btrfs, XFS, NFS), as well as sound and networking fixes. See the changelog for details.

Linux Kernel 3.12.6 is a very big release, Greg Kroah-Hartman recommended users of 3.12 kernel series upgrade to this release as soon as possible.

Install / Upgrade Kernel 3.12.6:

Users of Ubuntu 13.10, Ubuntu 12.04, Ubuntu 13.04, Linux Mint, and their derivatives can easily get the DEBs of this kernel from Ubuntu Kernel page. Or follow the steps below:

1. Download the Kernel DEBs:

For 32 bit:

cd ~/Downloads/ && wget http://kernel.ubuntu.com/~kernel-ppa/mainline/v3.12.6-trusty/linux-headers-3.12.6-031206-generic_3.12.6-031206.201312201218_i386.deb

wget http://kernel.ubuntu.com/~kernel-ppa/mainline/v3.12.6-trusty/linux-headers-3.12.6-031206_3.12.6-031206.201312201218_all.deb

wget http://kernel.ubuntu.com/~kernel-ppa/mainline/v3.12.6-trusty/linux-image-3.12.6-031206-generic_3.12.6-031206.201312201218_i386.deb

For 64 bit:

cd ~/Downloads/ && wget http://kernel.ubuntu.com/~kernel-ppa/mainline/v3.12.6-trusty/linux-headers-3.12.6-031206-generic_3.12.6-031206.201312201218_amd64.deb

wget http://kernel.ubuntu.com/~kernel-ppa/mainline/v3.12.6-trusty/linux-headers-3.12.6-031206_3.12.6-031206.201312201218_all.deb

wget http://kernel.ubuntu.com/~kernel-ppa/mainline/v3.12.6-trusty/linux-image-3.12.6-031206-generic_3.12.6-031206.201312201218_amd64.deb

2. Install the DEBs:

cd ~/Downloads/ && sudo dpkg -i linux-headers-3.12.6-*.deb linux-image-3.12.6-*.deb

Restart your computer and done.

If you’re using proprietary video driver, you may need to re-build or re-install to get it work with new kernel.

If for some reason this kernel release doesn’t work properly for you, reboot into previous kernel (Grub -> Advanced -> select previous kernel) and run commands to remove Linux Kernel 3.12.6:

sudo apt-get remove linux-headers-3.12.6-* linux-image-3.12.6-*

Lock Keys indicator ubuntu


For Ubuntu laptops that don’t have LED indicators, indicator applet on panel that displays Lock Keys status as well as notifications may be helpful.

Indicator-keylock is the applet for Ubuntu Linux, which displays Lock Keys status on panel and notifications when status changed.

Screenshots:

Caps Lock on

Caps Lock off

num lock on

num lock off

By default the indicator will be used only when the Caps Lock key is on, it can be easily changed by the Preferences settings.

lock key indicator

Install indicator-keylock

Press Ctrl+Alt+T on keyboard to open terminal. When it opens, run commands below one by one:

sudo add-apt-repository -y ppa:tsbarnes/indicator-keylock

sudo apt-get update

sudo apt-get install indicator-keylock

Works on Unity, Xfce, Gnome Shell (only notifications), Gnome Classic for Ubuntu 13.10, Ubuntu 13.04, Ubuntu 12.10, Ubuntu 12.04, Ubuntu 11.10, Ubuntu 11.04, Ubuntu 10.04.

LXDE_Razor-Qt

LXQt or LXDE-Qt is a NEW lightweight desktop environment, the mergence of LXDE and Razor-Qt. It uses Openbox window manager, PCManFM-Qt (qt port of PCManFM) file manager, razor-panel desktop panel, as well as other qt items as its core components. (See more at wiki page)

This project is still in development and this simple tutorial is going to show you how to install the development version of LXQt in Ubuntu 14.04, Ubuntu 13.10 via PPA.

LXDE-qt DE preview

LXDE-qt DE preview

To get started, press Ctrl+Alt+T on keyboard to open terminal. When it opens, run commands below one by one:

sudo apt-get install software-properties-common

sudo add-apt-repository ppa:lubuntu-dev/lubuntu-daily 

sudo add-apt-repository ppa:gilir/q-project

sudo apt-get update

sudo apt-get upgrade

sudo apt-get install lxqt-metapackage

Once installed, log out and select “LXDE-Qt Desktop” to log in.

LXDE-Qt desktop in Unity Login Screen

Note that after installed LXDE-Qt, your LightDM login screen will be changed. To revert back to original:

1. Run command to edit the config file:

sudo gedit /etc/lightdm/lightdm.conf

2. Change value of greeter-session to unity-greeter

Windows-List indicator


Window-List is an application indicator to display a list of all current open windows. Each window can be activated by selecting from the list.

This indicator applet works on Gnome Classic, Unity, Xfce. Here are the screenshots:

window-list on unity panel

window-list on unity panel

screen-list on Xfce panel

screen-list on Xfce panel

window-list on Gnome Classic panel

window-list on Gnome Classic panel

Install Window-List indicator:

This applet can be installed from PPA in Ubuntu 13.10 Saucy, Ubuntu 13.04 Raring, Ubuntu 12.10 Quantal, Ubuntu 12.04 Precise, Ubuntu 11.10 Oneiric, Ubuntu 11.04 Natty, Linux Mint and their derivatives.

To add the PPA, press Ctrl+Alt+T on keyboard to open terminal and run command below:

sudo add-apt-repository ppa:jwigley/window-list

Then update package lists and install the applet via 2 commands:

sudo apt-get update

sudo apt-get install window-list

KDE 4.12 ubuntu

The KDE community has announced KDE Software Compilation 4.12 recently. This tutorial shows you how to install / upgrade to KDE 4.12 via PPA in Ubuntu 13.10, Ubuntu 12.04 and their derivatives.

According to the announcement, KDE Applications 4.12 bring huge step forward in personal information management and improvements all over.

  • Kate added several features including initial Vim-macro support, and games and educational applications bring a variety of new functionality.
  • Document viewer Okular now takes printer hardware margins into account, has audio and video support for epub.
  • KWebKit adds the ability to automatically scale content to match desktop resolution.
  • For KMail, there is now AdBlock support (when HTML is enabled) and improved scam detection support by extending shortened URLs.
  • See the announcement for the KDE Applications 4.12 for more information.
Kate added initial Vim-macro support

Kate added initial Vim-macro support

okular advanced matching code, handling abbreviation and partial matching in classes

okular advanced matching code, handling abbreviation and partial matching in classes

Dolphin performance improvements,  reduce memory usage and speed things up

Dolphin performance improvements, reduce memory usage and speed things up

This release of KDE Platform 4.12 only includes bugfixes and minor optimizations and features. About 20 bugfixes as well as several optimizations have been made to various subsystems, including KNewStuff, KNotify4, file handling and more.

Install KDE 4.12 via PPA:

This release has been made into KUbuntu PPA for (K)Ubuntu 13.10, (K)Ubuntu 12.04 and their derivatives.

To install or upgrade to KDE SC 4.12, press Ctrl+Alt+T on keyboard to open terminal and run commands below one by one:

sudo add-apt-repository ppa:kubuntu-ppa/backports

sudo apt-get update

sudo apt-get install kde-standard kubuntu-desktop

If you already have KDE, you may replace the last command with:

sudo apt-get dist-upgrade

That’s it. Enjoy!

cross stitch app ubuntu

KXStitch is a KDE program that lets you create cross stitch patterns and charts.

Patterns can be created from scratch on a user defined size of grid, which can be enlarged or reduced in size as your pattern progresses. Alternatively you can import images from many graphics formats which will allow you to reduce the number of colours and to restrict the conversion to full stitches or optionally use fractional stitches.

You may also use an image as a background. These imported images can then be modified using the supplied tools to produce your final design.

KX Stitch PPA for Ubuntu

Features:

  • Creation of new patterns
  • Editing of existing patterns – KXStitch is also capable of reading PC Stitch 5 files.
  • Use of various floss pallets, DMC, Anchor, Madeira, JP Coates
  • Creation of custom palettes and colours.
  • Use of standard stitches
  • Free use of backstitching
  • Importing of various picture formats
  • Printing of patterns and floss keys

Install KXStitch:

I’ve created a PPA that contains latest build of KXStitch (so far, it’s 1.0.0). So far, the PPA supports for Ubuntu 14.04 Trusty, Ubuntu 13.10 Saucy, Ubuntu 13.04 Raring, Ubuntu 12.04 Precise, Linux Mint, Elementary OS Luna and other derivatives.

To add the PPA, press Ctrl+Alt+T on keyboard to open terminal and run:

sudo add-apt-repository ppa:ubuntuhandbook1/kxstitch

Then install the app after checking for updates:

sudo apt-get update; sudo apt-get install kxstitch

Once installed, open the cross stitch app from Menu or Dash and enjoy!

xtreme download manager

Want a super fast download manager? Well, Xtreme Download Manager is the good choice for you.

Xtreme Download Manager is a advanced and powerful tool to increase download speed up-to 500%, resume broken/dead downloads, capture videos from YouTube, Metacafe, DailyMotion, Google Video or any other website and schedule downloads.

Xtreme Download Manager uses sophisticated dynamic segmentation algorithm, data compression and connection reuse to speed up the download process.

Features:

  • Download files at maximum possible speed. (5-6 times faster)
  • Sophisticated dynamic file segmentation algorithm,data compression & connection reuse.
  • Download FLV,MP4,HTML5 videos from YouTube, MySpaceTV, Google Video or Any Other site
  • Capture download from any browser (Firefox,Chrome,Internet Explorer,Opera,Safari or any other program trying to download a file from Internet)
  • Supports HTTP,HTTPS,FTP protocols with Authentication,Proxy Servers, Cookies, Redirection etc.
  • Resumes broken/dead downloads caused by connection problem,power failure or session expiration
  • Built in YouTube downloader, HTTP Traffic monitor, Batch downloader.
  • Can be configured to perform Automatic Antivirus checking, System shutdown on download completion
  • From version 4.0 XDM supports automatic proxy configuration scripts, so it can operate within corporate proxy/firewall

The first running this tool, you’ll get a window teaches you how to integrate the download manager with Firefox, Chrome or other web browsers.

xtreme browser integrate

I have a 4 mbps plan, XDMan downloads files in 1000 KB/sec which is the maximum possible speed. The usual speed is between 250 and 500 KB/sec.

Xtreme downloading

Install Xtreme Download Manager:

Xtreme Download Manager (XDMan) works in Linux and Windows. To install it in Ubuntu Linux, just download and install the DEB from the links below:

xdman_mint_ubuntu.deb

Source code and EXE file is available in Sourceforge.net

install xnoise ubuntu ppa

Xnoise is a media player for GTK+ with an intuitive user interface, great speed and lots of features. It allows listening to music and playing video in a very intuitive way: You can easily search the library and drag each artist, album or title to the tracklist (to any position in any order).

The latest Xnoise 0.2.20 was released recently with real-time monitor media folders for changes, GUI improvements, bug fixes. See the changelog:

  • Redo the import dialog
  • Real-Time Monitor media folders for changes
  • Check media folders for changes that happened during the time xnoise wasn’t running
  • GUI improvements/changes
  • Change drawing of album art
  • Trim Settings dialog
  • Use application menu, only
  • Remove title-to-decoration plugin
  • Automatically activate some of the plugins
  • Use new libtaginfo API for tag reading/writing
  • Update tag editing mechanism
  • Many Bug fixes
  • update translations

Screenshots:

Xnoise Music Player in Ubuntu

Xnoise Music Player in Ubuntu

Xnoise Music Player in Ubuntu

Install Xnoise:

The latest release can be easily installed in Ubuntu 13.10, Ubuntu 13.04, Ubuntu 12.10 and their derivatives via PPA.

To get started, press Ctrl+Alt+T on keyboard to open terminal. When it opens, run commands below to add the PPA:

sudo add-apt-repository ppa:shkn/xnoise

Then install the player after checking for updates:

sudo apt-get update; sudo apt-get install xnoise