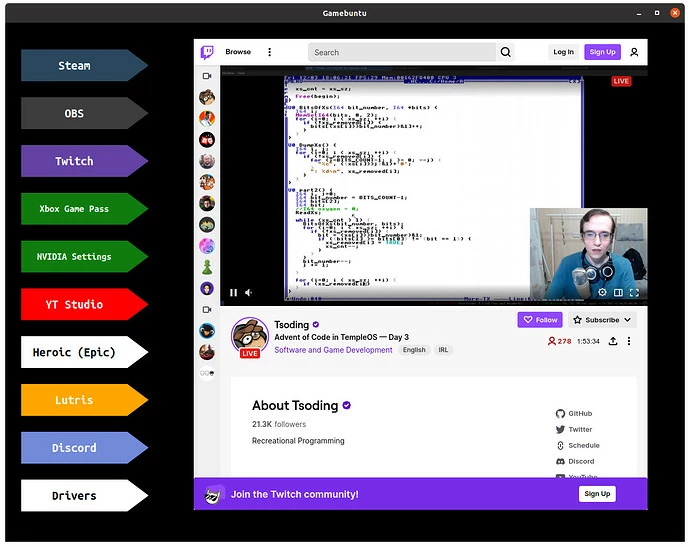
Archives For Howtos

My Ubuntu laptop recently runs into a power-off issue. Every time when I shutdown or reboot the machine, it stuck at blank screen with text message “systemd-shutdown[1]: waiting for process: crond” for more than a minute.

According to the keyword ‘crond‘, it has something to do with the cron schedule job. And, thanks to this thread, user may run the command below to list all current schedule cron jobs:

find /etc/cron* -type f | xargs  ls -ltr

And there you’ll find that the schedule job ‘/etc/cron.d/collect‘ tries to run an unknown crond binary under ‘/var/tmp’ every 10th minute (e.g., 5:10, 5:20, 5:30 …). So the problem may not occur when shutdown/reboot within a few minutes after login.

The /var/tmp directory stores temporary files or folders that are preserved between system reboots. According to @bird7676 in that thread, the files were probably created by Free Download Manager.

Solution:

If you don’t use and have removed the Free Download Manager, simply remove these temporary files as well as the schedule job.

To do so, either use a system cleaner (e.g., BleachBit), or press Ctrl+Alt+T on keyboard to open terminal and run command below to remove the files:

sudo rm /etc/cron.d/collect /var/tmp/crond /var/tmp/bs

If the app is important for you, you may run ‘mv‘ command to move the files to another location or backup unfinished downloads before deleting them.

NOTE: while the binary may be still running though you have removed the file, you may need to shutdown/reboot twice to check if the problem is fixed.

Vivaldi web browser released version 5.0 today with exciting new features.

The release makes it easy to change the app UI appearance via themes. Vivaldi comes with some themes with different colors, background image, blur, transparency and other settings. User may edit or create new theme easily with the built-in editor.

Vivaldi built-in themes & editor

And in ‘Themes’ setting page, it provides option to export theme into zip archive. So your friends may easily get the same Vivaldi appearance by opening the Zip archive in settings.

The browser now has built-in translation support powered by Lingvanex. By clicking on the icon from left panel, user may translate any text selection to the native language automatically by enabling ‘Auto-translate selected text’ option.

And according to the release note, only Vivaldi servers are involved, meaning you don’t have to share what you read with Big Tech’s ‘prying eyes’.

Other change in Vivaldi 5.0 include:

  • Additional way of showing downloads.
  • Provide rpm packages for ARM / ARM64.
  • Two-Level Tab Stacks on mobile and tablets.
  • Handle page actions as commands
  • Add parameter to search with selection command: to specify search engine
  • Add option to not show Calendar notifications.
  • Add Oauth support for Office365/Outlook in built-in Mail.

How to get Vivaldi:

The official download page offers Linux DEB for both 64-bit PC and arm64 machines (e.g., Raspberry Pi).

Vivaldi also has an official apt repository, with it you can install the browser and get future updates through Software Updater utility.

Open terminal either via Ctrl+Alt+T keyboard shortcut or by searching for terminal from application menu. When it opens, run following commands one by one:

1. Download and install the repository key:

wget -qO- https://repo.vivaldi.com/archive/linux_signing_key.pub | sudo apt-key add -

Typer user password when it prompts and hit Enter to continue.

2. Add Vivaldi repository via command:

sudo add-apt-repository 'deb https://repo.vivaldi.com/archive/deb/ stable main'

3. Finally check updates and install the web browser via command:

sudo apt update && sudo apt install vivaldi-stable

Or upgrade from an old version via Software Updater utility.

Adding an app shortcut icon to the Desktop in Ubuntu is not that easy for beginners by default. User has to first open the folder that stores the app shortcut files (usually /usr/share/applications). Then drag and drop the .desktop files into user’s “Desktop” folder. Make executable in file properties dialog and finally select ‘Allow Launching‘ via context menu option.

To make life easier, a Gnome extension is available to make the process to create a desktop shortcut for apps as easy as few clicks. Since Ubuntu uses full-screen app launcher, it’s not Windows 10/11 style drag and drop adding desktop icons. Instead, it adds ‘Add to Desktop‘ option to app icon’s context menu.

Like in Linux Mint and/or Zorin OS, user just needs to search the app in ‘Show Applications’ or ‘Activities’ overview screen, right-click on the app icon, and finally click ‘Add to Desktop’ to pin to desktop.

Install ‘Add to Desktop’ Extension:

1. To install a Gnome extension, first press Ctrl+Alt+T on keyboard to open terminal and run command to make sure the ‘chrome-gnome-shell‘ package is installed.

sudo apt install chrome-gnome-shell

2. Next go to extension web page via the link button below and turn on the toggle icon to install it:

Don’t see the toggle icon? Install browser extension via ‘Click here to install browser extension‘ link and refresh the web page.

NOTE: The extensions support for all recent Gnome versions, so it works on all current Ubuntu releases including Ubuntu 18.04, Ubuntu 20.04, Ubuntu 21.10. For other Linux with GNOME (e.g., Debian, Fedora), user needs to enable desktop icon support first (e.g., using Desktop Icon NG).

The extension should work immediately after installation. If not, try restarting Gnome Shell by either logging out and back in, or pressing Alt+F2, type r and hit Enter in ‘Run a Command’ box.

That’s all. Enjoy!

This is a step by step guide shows how to install the Lazarus IDE in Ubuntu 18.04, Ubuntu 20.04, Ubuntu 22.04 and their derivatives, e.g., Linux Mint, Elementary OS and more.

Lazarus is a free Delphi compatible cross-platform IDE for rapid application development using the Free Pascal compiler. User may install the project either from Ubuntu repository or by using the official DEB packages.

Lazarus IDE in Ubuntu

Option 1: Install Lazarus via Ubuntu repository:

Ubuntu includes Lazarus in its own repositories, but it does not provide updates for the package. So the package will always be old, though Ubuntu 21.10 has v2.0.12, most recent release at the moment.

The good side is that user may install the package on 64-bit modern PC, old 32-bit PC on Ubuntu 18.04, and/or arm64/armhf devices (e.g., Apple silicon and Raspberry Pi).

To install the package, press Ctrl+Alt+T on keyboard to open terminal. When it opens, paste the command below and hit Enter:

sudo apt install lazarus

This command will install Lazarus, fpc compiler, as well as all other required packages:

Once installed, search for and open the IDE from activities overview and enjoy!

Option 2: Install Lazarus via its official DEB packages:

The IDE provides official Linux packages available to download at the sourceforge.net. You can always get the latest version from the link button below, though it’s only provides packages for modern 64-bit and old 32-bit PC.

The official deb packages are made up of:

  • fpc-laz – the Compiler, some command line tools, base units and non visual components like database access
  • fpc-src – the sources of fpc and its packages, needed for code browsing
  • lazarus-project – the IDE, visual components and help files

Grab all the 3 packages. Then, open file manager and go to ‘Downloads‘ folder, right-click and choose ‘Open in Terminal‘ to open terminal with that folder as working directory. Finally, run command to install them:

sudo apt install ./fpc*.deb ./lazarus-project*.deb

NOTE: the official package conflicts with the one in Ubuntu own repository. Though the IDE supports for having multiple package versions in same system, installing Lazarus via either way in this tutorial will remove another (if any) automatically.

And it will prompt to either upgrade or downgrade configuration when switching between different app versions on first startup.

Uninstall Lazarus:

To remove the Lazarus IDE, run command below in terminal will do the trick for the software installed via both methods.

sudo apt remove --autoremove lazarus lazarus-project fpc-*

That’s all. Enjoy!

Running applications via Docker in Ubuntu Linux? Dockeye is a free open-source tool to manage your containers and images via a graphical user interface.

Dockeye is written in Rust programming language. It provides a dark UI (light mode is also available) that list Docker containers and images in tabs. For each container, it provides options to control start, stop, pause, and remove operations.

User may also check the detailed information about a container, including ID, image, maintainer, labels, environment, network info, CPU, Memory and other system resource usage. And, app running log is available in tab for debugging purpose.

Also, it lists images with information about creation time, architecture, size, docker version, as well as delete and save as tar archive options. And, it offers the option to pull an image from a registry.

Toggle Dark and Light via top right corner button under title bar(min, max, close)

How to Get Dockeye in Ubuntu Linux:

Dockeye is a new project. It provides package for Arch Linux via AUR. User may use command to get it:

paru -S dockeye

For other Linux including Ubuntu, grab the package from the github releases page:

So far (Nov 2021), it provides only Linux tarball. Extract and navigate to the folder that contains the app executable. Finally, right-click on blank area and select ‘Open in Terminal‘ and then run command below to start it:

sudo ./dockeye

As new project, it may have bugs. To help improving it, please report issues at this page.

In Windows 10, user may right-click on the ‘File Explorer’ icon on panel to access pinned folders (e.g., Desktop, Downloads and Documents) quickly.

Ubuntu has first implemented this feature in Ubuntu 21.10, though it seems to be not working properly due to bug. Ubuntu 20.04 may manually add the context (right-click) menu options so user can right-click on the ‘Files’ icon to choose open favorite folders quickly.

Step 1: Copy File Manager .desktop file to local folder:

The file manager’s shortcut icon is handled by the relative .desktop file located in “/usr/local/applications” directory. It’s recommended to copy the file to local user directory, so the changes will function for current user only.

1. Press Ctrl+Alt+T on keyboard to open terminal. When it opens, copy the file to local directory via command:

sudo cp /usr/share/applications/org.gnome.Nautilus.desktop ~/.local/share/applications/

2. The file pasted into local directory is still owned by root. You may change the ownership by running command:

sudo chown $USER:$USER ~/.local/share/applications/org.gnome.Nautilus.desktop

Here $USER returns your current username.

Step 2: Edit the .desktop file and add more actions:

Now edit the .desktop file by running command in terminal:

gedit ~/.local/share/applications/org.gnome.Nautilus.desktop

This command will open the file in Gedit text editor. When it opens, do following steps one by one:

1.) First, comment the “DBusActivatable=true” line by adding ‘#‘ at the beginning to disable it. Or, the ‘Exec’ value will be overrided.

2.) Add more values to “Actions“, such as downloads, documents, videos and whatever as you prefer. And, separate them via ‘;‘ without blank space.

Accordingly, add the “[Desktop Action downloads]”, “[Desktop Action documents]”, “[Desktop Action videos]” segments in the bottom. And, each segment has:

  • Name” to display in the right click menu.
  • Exec” command to open the desired folder, usually nautilus /home/USERNAME/folder

Step 3: Restart Gnome Shell to apply change:

After saving the file, restart Gnome Shell. In Ubuntu 20.04 default Xorg session, simply press Ctrl+Alt+F2, then try r in pop-up dialog and hit Enter.

The ‘Files‘ icon in left dock panel should now take use of the .desktop file in user directory and provide the quick access folders you set via right-click menu.

That’s all. Enjoy!

For people with dyslexia, scopic sensitivity, and related conditions, GNOME has an extension to adds a a translucent colored overlay over your desktop that may help.

It’s ‘ColorTint’ that adds an indicator applet in system tray area. User may click the drop down menu options to enable/disable the overlay, change the color via RGB slider bar, and adjust transparency via the Alpha slider.

How to Install ColorTint:

The extension works on GNOME 40 (Ubuntu 21.10) and GNOME 3.32 (Ubuntu 18.04), however lacks Ubuntu 20.04 support

1.) Firstly, press Ctrl+Alt+T on keyboard to open terminal. When it opens, run command to install the ‘chrome-gnome-shell’ package to enable ability to install Gnome Extension via web broser:

sudo apt install chrome-gnome-shell

2.) Next, go to the link below and turn on the slider icon to install the extension:

Don’t see the toggle icon? Try installing the browser extension via the link in the page and then refresh it.

NOTE: The pre-installed Firefox in Ubuntu 21.10 is a Snap package that so far does not support for installing Gnome Extensions, use another browser or install Firefox as native Deb package via command:

sudo apt install firefox

And, to manage all installed extensions, install ‘Gnome Extensions‘ app either from Ubuntu Software or by running command in terminal:

sudo apt install gnome-shell-extension-prefs

That’s all. Enjoy!

Designers and website developers may sometimes need to check WCAG color contrast to make web content more accessible to people with disabilities.

Without using an online website each time, Linux has a stylish GTK4 app “Contrast” which allows to check whether the contrast between two colors meet the WCAG requirements.

The app has a simple user interface that displays one color as background and another as font color of the text. By clicking on the double arrow icon between two color codes, it reverses background color as text font and font color as background.

User may select color either by clicking on the circle icon before hex code (e.g., #F3F6F9), or by using the color picker tool after the code.

Contrast Select Color

The app will display color contrast result with text, such as “Awesome, Pretty Good, Not Bad, and Nope, along with short description tells whether the color combination will properly work.

It also displays a score bar tells that if the color contrast meets the 3 WCAG Levels: A, AA and AAA. And, a contrast ratio is displayed at the bottom.

Reversed colors

How to Install Contrast in Ubuntu Linux:

As a GTK4 app, Contrast so far only available to install as Flatpak which runs in sandbox.

1. Firstly, press Ctrl+Alt+T on keyboard and open terminal. When it opens, run command to install the Flatpak daemon:

sudo apt install flatpak

For Ubuntu 18.04 and Ubuntu 16.04, the flatpak PPA is required to get the package.

2. Next, run command to install the WCAG color contrast app:

flatpak install https://dl.flathub.org/repo/appstream/org.gnome.design.Contrast.flatpakref

Note: If you’re first time installing a Gnome app as Flatpak, it will install the required GNOME 41 platform as shared runtime libraries, which take hundreds of megabytes disk space.

Once installed, search for and open the app from activities overview screen.

How to Remove Contrast Flatpak app:

To remove the software package, press Ctrl+Alt+T and run command in terminal:

flatpak uninstall --delete-data org.gnome.design.Contrast

And use flatpak uninstall --unused command may remove useless run-times if any.

The beautiful Debian based Linux distribution Deepin 20.3 was released. Features Kernel 5.15, new features and optimizations for its core apps.

The stable Linux kernel has been updated to v5.15 with better support for Intel 12th Gen processors and NTFS file systems. Though the iso image by default boots with 5.10 LTS kernel, user have to select the new kernel to install from ‘Advanced’ menu in Grub boot-loader.

The Deepin screen capture can now take scrolling screenshots via the ‘Scrollshot‘ option. After selecting an app window to capture, a ‘Scrollshot’ option is available in tool-bar. By clicking on it, you may scroll the page to take a continuous screenshot with real-time preview. Also OCR is supported in this mode to extract text from image.

Deepin Scrollshot

In the extended mode, you may now set how to display the Dock on multiple displays via its right-click context menu.

Other changes in Deepin 20.3 include:

  • Video search, preview, and management in the Album app.
  • Add support for 2K hard decoding of OLAND chips.
  • Add shortcut for Global Search, which also supports searching markdown files.
  • Add the print entrance in Document Viewer.
  • Improve the file manager, movie, music, as well as other core apps.

Get Deepin 20.3

Compare to other Linux, Deepin somehow requires too much disk space now: 64 GB at least and 128 GB recommended. And it does not provide a live system to try out before installing into disk.

To get it, go to the link button above. And see the release note at this page.

Free and open-source clone of Paint.Net 3.0, Pinta, released version 1.7.1 a few days ago with improvements and bug-fixes.

The release is the final version based on GTK2, as the GTK3 / .NET 6 version is nearly ready!

Pinta 1.7.1 is a small release with minor new features to improve user experience. For image with large resolution (or zoomed in), you may use mouse wheel to scroll up / down. Now by holding Shift + mouse wheel, the canvas can be scrolled horizontally.

Same to GIMP, user may now press X to exchange background and foreground palette colors quickly in Pinta since v1.7.1. And, zooming in and out can now be done without pressing the Ctrl key

The release also improved the pop-up dialog when you trying to open an unsupported file format. The file open dialog by default shows only supported images, including ani, png, bmp, jpg, gif, icns, ico, jpeg, ora, pnm, qtif, svg, tga, tif, tiff, xbm, xpm. If you chose show “All files” and selected an unsupported file, it will prompt that file not support and show you all supported file formats.

Error when opening unsupported file and display all supported formats

Other changes in Pinta 1.7.1 include:

  • Use arrow keys to move per pixel in Move Selected Pixels and Move Selection tools
  • Use Shift to constrain to a uniform scale when scaling using Move Selected Pixels tool
  • Text in ‘About’ is selectable to copy version for use to report bugs.
  • Improve handling of memory allocation failures for large images
  • And various bug-fixes.

How to Install Pinta 1.7.1 in Ubuntu Linux:

Option 1: Install Pinta via Snap:

The app is easy to install in Ubuntu using the Snap package, by simply searching for and installing from Ubuntu Software (Snap Store):

Pinta Snap app in Ubuntu Software.

Option 2: Install Pinta via Ubuntu PPA:

NOTE: the PPA package crashes randomly due to outdated Mono library in Ubuntu. It’s highly to upgrade mono library if you want to install Pinta in native deb package.

The app has an official Ubuntu ppa that contains the latest packages for Ubuntu 18.04, Ubuntu 20.04, Ubuntu 21.04, and Ubuntu 21.10 so far.

Firstly, press Ctrl+Alt+T on keyboard to open terminal. Then run command to add the PPA:

sudo add-apt-repository ppa:pinta-maintainers/pinta-stable

Secondly, run command to update system cache if you’re still running Ubuntu 18.04:

sudo apt update

Finally, install Pinta via command:

sudo apt install pinta

Or, upgrade the app if an old version present in your system using Software Updater:

In addition, Pinta is also available to install as Flatpak package. Check in Flathub if you’re interested in it.

How to Remove Pinta from Ubuntu:

To remove Pinta installed via PPA package, run command in terminal (Ctrl+Alt+T):

sudo apt remove --autoremove pinta

And remove the PPA either via ‘Software & Updates‘ utility under Other Software tab, or by running command:

sudo add-apt-repository --remove ppa:pinta-maintainers/pinta-stable

For Pinta snap package, remove it either via Ubuntu Software or by using command:

snap remove --purge pinta