Archives For November 30, 1999

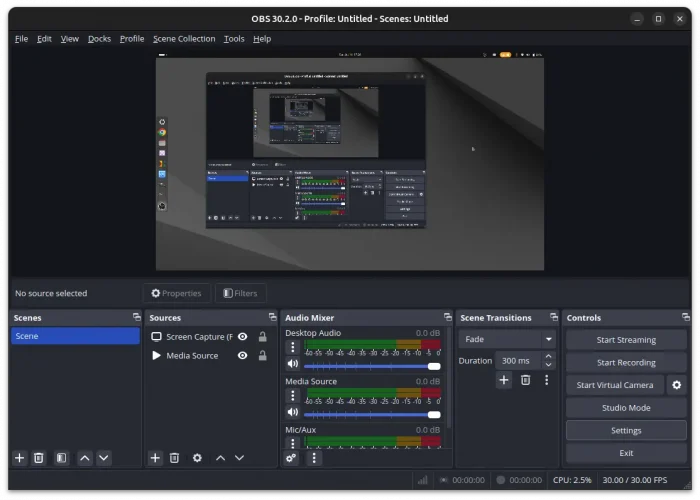
OBS Studio 26.0, free open-source streaming and recording program, was released with many new features, improvements, and numerous bug-fixes.

The new released added Virtual Camera feature, allowing you to use the OBS output as a camera in other apps. So far, it’s only for Windows.

Other changes include:

  • Add a Source Toolbar to access to relevant controls for selected source.
  • Add media controls on the source toolbar.
  • Ability to take screenshots of the previews, sources, or scenes with hotkeys
  • Add percentage toggle to the volume controls in advanced audio properties
  • Add more audio capture support for BSD operating systems
  • Add option to disable antialiasing for text sources
  • Add a right-click context menu option to projectors.
  • See here for more details.

How to Install OBS Studio 26.0 in Ubuntu 20.04, 18.04:

The official PPA offers the latest release packages for Ubuntu 18.04 and Ubuntu 20.04:

1. Open terminal either by pressing Ctrl+Alt+T on keyboard or by searching for “terminal” from app launcher. When it opens, run command to add the PPA:

sudo add-apt-repository ppa:obsproject/obs-studio

Type user password (no asterisk feedback) when it prompts and hit Enter.

2. Then either upgrade OBS Studio from an existing version via Software Updater, or run command in terminal to install the software:

sudo apt-get update

sudo apt-get install obs-studio

Once installed, launch the software from your system application launcher and enjoy!

Uninstall:

To remove the software, either use Synaptic package manager or run command in terminal:

sudo apt-get remove --autoremove obs-studio

To remove PPA repositories, launch Software & Updates and navigate to ‘Other Software’ tab.

HP Linux Imaging and Printing

HPLIP 3.20.9, HP print, scan, and fax drivers for Linux, now is available to download.

Though the release note is not ready at the moment of writing, HPLIP 3.20.9 package is already available to download in its website.

New printers supported in the release:

  • HP LaserJet MFP M234dw
  • HP LaserJet MFP M234dwe
  • HP Color LaserJet Managed MFP E57540dn
  • HP Color LaserJet Managed Flow MFP E57540c
  • HP Color LaserJet Enterprise MFP M578dn
  • HP Color LaserJet Enterprise MFP M578f
  • HP Color LaserJet Enterprise Flow MFP M578c
  • HP Color LaserJet Enterprise Flow MFP M578z
  • HP Color LaserJet Managed E55040dw
  • HP Color LaserJet Managed E55040dn
  • HP Color LaserJet Enterprise M554dn
  • HP Color LaserJet Enterprise M555dn
  • HP Color LaserJet Enterprise M555x

This release also added support Linuxmint 20, OpenSuse 15.2, and Debian 10.4

How to Get HPLIP 3.20.9:

1. To install the software, download the package “hplip-3.20.9.run” from the link below:

HPLIP Download Page

2. Then open terminal either via Ctrl+Alt+T or by searching for “terminal” from app launcher. When it opens, run command to give executable permission:

chmod +x ~/Downloads/hplip-3.20.9.run

3. Finally run command to start installing the driver:

./Downloads/hplip-3.20.9.run

Follow the terminal output and answer some questions. If everything goes OK, plug or re-plug your HP devices and enjoy!

Sadly, HPLIP 3.20.9 still does not install on Ubuntu 20.04 due to requirement of old pyqt5 libraries.

Free-software planetarium Stellarium 0.20.3 was released a day ago with numerous changes. Here’s how to install it in Ubuntu 18.04, Ubuntu 20.04 via PPA.

Stellarium 0.20.3 fixed nutation and, with it, season beginning times, included many changes in AstroCalc tool, Oculars and Satellites plugins, and updated DSO catalog.

Changes in the new release include:

  • Add B pass band for compute photometric values of nebulae
  • Add show standard magnitude and RCS info for satellites in the GUI of Satellites plugin
  • Add new filters for satellites
  • Add GUI buttons to define object information font color at daylight and for overwrite mode
  • Add 2 new columns for AstroCalc/Positions tool
  • Add editable keyboard shortcut for buttons in AstroCalc tools
  • Add new initial time steps in AstroCalc/Phenomena tool
  • Add option to use on the screen star designations only
  • Add option in the GUI to define color of text in Equation of Time plugin
  • Add new button into Shortcut Editor and Add new tool to restoring defaults
  • Add action to restart trails
  • Add “current vertical” line
  • Add support custom time steps for ephemeris in AstroCalc/Ephemeris tool
  • Add ability to show several objects’ ephemerides in AstroCalc/Ephemeris tool
  • Add using texture for satellite, when he crossing of the Moon or the Sun
  • Add new groups of satellites: all new groups of satellites based on their orbital properties
  • Add pixel grid for sensors to Ocular plugin
  • Add show a binning info for CCD to Oculars GUI Panel
  • Add option into GUI to toggle drawing halo around the Moon
  • Add new names for planetary features
  • Add star names for Western (O. Hlad) sky culture
  • Add CLI option to start Stellarium in scaling GUI mode
  • Add note to S&T sky culture
  • Add support of new type of labels (labelEquatorial) for scripting engine
  • Add 3 new groups of satellites
  • Add buttons to define special colors for satellites in Satellites plugin
  • Add International Designator info into the GUI of Satellites plugin
  • Add epoch of the TLE info into GUI of Satellites plugin

How to Install Stellarium 0.20.3 in Ubuntu:

The official Stellarium PPA contains the latest packages for Ubuntu 18.04 and Ubuntu 20.04

1. Open terminal either by pressing Ctrl+Alt+T on keyboard or by searching for ‘terminal’ from application menu. When it opens, run command to add the PPA:

sudo add-apt-repository ppa:stellarium/stellarium-releases

Type user password (no asterisk feedback) when it prompts and hit Enter.

2. Then either upgrade Stellarium from an old version with Software Updater utility:

Or run following commands to install or upgrade the software from terminal:

sudo apt update

sudo apt install stellarium

Uninstall:

To remove the software, either use your system package manager or run command:

sudo apt-get remove --autoremove stellarium

And remove the PPA via “Software & Updates” utility under Other Software tab.

Kid3 audio tag editor 3.8.4 was released a day ago with bug-fixes and usability improvements. Here’s how to install it in Ubuntu 16.04, Ubuntu 18.04, and Ubuntu 20.04.

Kid3 3.8.4 release highlights according to the change-log:

  • Ability to customize the section and file list shortcuts
  • Ctrl + Up/Down to activate parent/current folder
  • Left arrow key to go to parent item in file list
  • Header context menu options for custom or automatic column widths.
  • Add flatpak package support.
  • Show more details (type, bits, bitrate) for M4A, FLAC, AIFF, WAV.
  • Other improvements and bug-fixes.

How to Install Kid3 3.8.4 in Ubuntu:

The official Kid3 PPA has been updated with the new packages for all current Ubuntu releases, Linux Mint and derivatives.

1. Open terminal either from application launcher or by pressing Ctrl+Alt+T on keyboard. When it opens, run command to add the PPA:

sudo add-apt-repository ppa:ufleisch/kid3

Type user password (no asterisk feedback) when it prompts and hit Enter to continue.

2. If an old version was installed, upgrade Kid3 using Software Updater:

upgrade kid3 via software updater

or run commands one by one in terminal to install or upgrade to the latest tag editor:

sudo apt update

sudo apt install kid3-qt

You may replace kid3-qt with kid3 in the code for KDE integration, or with kid3-cli for the command-line interface

Uninstall

To remove the PPA repository, either open Software & Updates -> Other Software tab, or run command:

sudo add-apt-repository --remove ppa:ufleisch/kid3

To remove the audio tag editor, either use your system package manager or run command:

sudo apt remove --auto-remove kid3 kid3-*

Calibre, cross-platform open-source comprehensive e-book software, released version 5.0 with some great new features.

Calibre 5.0 features highlighting in the E-book viewer. Simply select text and click the Highlight selection button. It can be colors, underlines, strikethrough, etc. and has added notes. All highlights can be both stored in EPUB files and centrally in the Calibre library.

The new release also feature Dark mode support. On Windows and Mac, it is activated automatically based on OS settings. In Ubuntu Linux, launch the software in dark mode via CALIBRE_USE_DARK_PALETTE=1 environment variable.
Other features in the release include:

  • Python 3 port. Some third-party plugins will no longer work, until they are also ported to Python 3.
  • Support both vertical and right-to-left text.
  • Enhanced search in the E-book viewer
  • Support bookmarking in content server’s in-browser viewer

How to Install Calibre 5.0 in Ubuntu Linux:

Open terminal (Ctrl+Alt+T) and run command to download & install the official installer script:

sudo -v && wget -nv -O- https://download.calibre-ebook.com/linux-installer.sh | sudo sh /dev/stdin

Once installed, open it from system application launcher and enjoy!

Enable Calibre Dark Mode in Ubuntu:

To temporarily open the e-book reader in dark mode, simply run command:

export CALIBRE_USE_DARK_PALETTE=1 && calibre

To make it permanent, run command to edit the .desktop file and do:

  • add env CALIBRE_USE_DARK_PALETTE=1 at the beginning of the values of “TryExec” and “Exec”.
  • remove --detach flag, or the shortcut icon will disappear.

How to Remove Calibre E-book software in Linux:

To remove the software, open terminal and run command:

sudo calibre-uninstall

Mozilla Firefox 81.0 was released a day ago with new features and security fixes.

Firefox 81.0 release highlights:

  • Pause and play audio or video in Firefox from your keyboard or headset
  • New Alpenglow theme
  • Save, manage, and auto-fill credit card information for users in US and Canada.
  • AcroForm support allows to fill in, print, and save supported PDF forms
  • The PDF viewer got a new fresh look.
  • Pocket recommendations for Austria, Belgium and Switzerland users with German version.
  • Important fixes to HTML5 audio/video controls
  • Extended file types support.
  • Picture-in-Picture got new iconography.
  • Security fixes.

How to install Firefox 81 in Ubuntu:

The latest packages will be made into security & updates repositories for all current Ubuntu releases in a few days.

At that time, you can upgrade Firefox through the Software Updater utility:

If you can’t wait, download the Linux package from mozilla website.

Flameshot, powerful yet simple to use screenshot tool, released version 0.8.0 with new editing tools, improvements, and many fixes.

Flameshot 0.8.0 added the popular requested circle counter tool. It added a button in left-side of screen to open the sidebar, which was previously only accessible by hitting Space on keyboard.

The blur tool has been replaced by pixelate tool. If the “thickness” is 0 or 1, the old blur behavior is preserved. If the thickness is increased past 1 the image will pixelate by the thickness.

Other changes include:

  • Allow enter key to copy image to clipboard
  • Add support for saving as JPG and BMP files.
  • Add line thickness to side panel
  • Add option to close after capture (buggy at the moment.)
  • Add option to auto copy URL after upload
  • Fix capture after pressing ctrl + S during textarea input
  • Add more translations.
  • Add Snap and Flatpak packages

How to Install Flameshot 0.8.0 in Ubuntu 20.04 / 18.04:

Go to the release page at the link below, scroll down, and select download an installer package:

Flameshot Releases

For Ubuntu 20.04, grab the “flameshot_ubuntu_0.8.0-1_amd64.deb” package. Then install it by either GDebi, or running command in terminal:

cd ~/Downloads && sudo apt install ./flameshot_ubuntu_0.8.0-1_amd64.deb

For older Ubuntu releases, grab the .Appimage – single executable to launch the screenshot tool, .snap or .flatpak – universal Linux packages run in sandbox.

Celluloid, formerly Gnome MPV, released version 0.20 a few hours ago. Here’s how to install it in Ubuntu 20.04 via PPA.

Celluloid is a simple GTK+ frontend for mpv media player. The latest 0.20 release features:

  • Make it possible to activate context menu when the playlist is empty.
  • Prevent constant resizing of the seek bar due to timestamp label resizing as its value changes.
  • Only show a single error dialog when a large number of errors occurs in rapid succession.
  • Add menu item for opening folders.
  • Adjust position of UI elements of modal dialogs in non-CSD mode to be more consistent with CSD mode.
  • Add support for loading external video tracks.
  • Make playlist shuffle toggleable.
  • Make arrow key bindings work with arrow keys on numpad.

How to Install Celluloid 0.20 in Ubuntu 20.04:

Celluloid media player is available to install via Flatpak package in Flathub repository.

For those prefer apt repository, the formerly Gnome MPV PPA has made the new release packages for Ubuntu 20.04, Linux Mint 20.

1.) Open terminal either by pressing Ctrl+Alt+T on keyboard or by searching for ‘terminal’ from application menu. When it opens, run command to add the PPA:

sudo add-apt-repository ppa:xuzhen666/gnome-mpv

Type user password (no asterisk feedback) when it prompts and hit Enter to continue.

2.) Then install the media player via command:

sudo apt install celluloid

For Ubuntu derivatives, you may need to run sudo apt update to refresh package cache first.

Uninstall Celluloid:

To remove the media player, open terminal and run command:

sudo apt remove celluloid

And remove the PPA repository via command:

sudo add-apt-repository --remove ppa:xuzhen666/gnome-mpv

opera web browser

Opera web browser 71 was released one day ago. The new version features more options for tab searching and history searching, custom shortcuts for Messengers & Workspaces.

Opera 71 release highlights:

  • Add Show more (Show less) button in ‘Search in tabs’ result.
  • Add date filtering to the history searching options.
  • Add Delete History Below button to delete history items you’ve found.
  • Ability to create your own keyboard shortcut for each messenger or workspace.
  • Updated to Chromium 85, see changelog for more.

How to Install Opera 71 in Ubuntu:

Snap Package:

The Opera team offers official snap package (runs in sandbox), available to install directly from Ubuntu Software:

Deb package:

Also the native Ubuntu .deb package is available for downloading at the link below:

Download Opera for Linux

Grab the .deb package, and double-click to install it.

You may also add the official apt repository via following steps to receive future software updates.

1. Open terminal (Ctrl+Alt+T) and run command to add the opera repository:

sudo sh -c 'echo "deb http://deb.opera.com/opera-stable/ stable non-free" >> /etc/apt/sources.list.d/opera.list'

2. Get the key:

wget -O - http://deb.opera.com/archive.key | sudo apt-key add -

Finally either install Opera via following command or upgrade the browser via Software Updater:

sudo apt update

sudo apt install opera-stable

Uninstall:

For the Opera snap package, simply remove it from Ubuntu Software.

For the Opera apt repository, launch Software & Updates and navigate to Other Software tab.

To remove traditional opera package, either use your system package manager or run command in terminal:

sudo apt remove --autoremove opera-stable

Battle For Wesnoth in Ubuntu

Battle for Wesnoth 1.14.14 was released one day ago as the latest maintenance release for the turn-based strategy game.

In the new release, translations for add-on titles and descriptions now are used in Add-on client when available, and provided via Add-on server at upload time in the .pbl.

Other changes in Wesnoth 1.14.14 include:

  • Translation updates.
  • 5p – The Wilderlands: Player 5’s units are sorted when cycling through them with the »n« key.
  • Fixed disabled buttons using the pressed highlight color.
  • Made wmllint recognize [remove_time_area] in order to avoid spurious warnings about unit ids.
  • Files created by the scenario editor include a boilerplate warning about hand-editing them.

How to Install Wesnoth 1.14.14 in Ubuntu:

The latest Wesnoth package is available as Flatpak package for Ubuntu 18.04 and higher, and most other Linux desktops.

1.) If you’re first time installing a Flatpak package in Ubuntu, setup your system by running commands in terminal (Ctrl+Alt+T):

  • Install flatpak framework via command:
    sudo apt install flatpak

  • Add Flathub repository via command:
    flatpak remote-add --if-not-exists flathub https://flathub.org/repo/flathub.flatpakrepo

2.) Then you can install Battle for Wesnoth flatpak package by running command:

flatpak install flathub org.wesnoth.Wesnoth

To update the package, simply run flatpak update org.wesnoth.Wesnoth command.

Uninstall Wesnoth:

To remove the flatpak package, simply run command in terminal:

flatpak uninstall org.wesnoth.Wesnoth