Archives For November 30, 2012

peazip-logoThis tutorial shows how to install PeaZip 5.1 in Ubuntu 13.04 and fix the dependency problem. PeaZip depends on libgmp3c2, but it’s no longer available in Ubuntu 13.04 Raring and Ubuntu 13.10 Saucy.

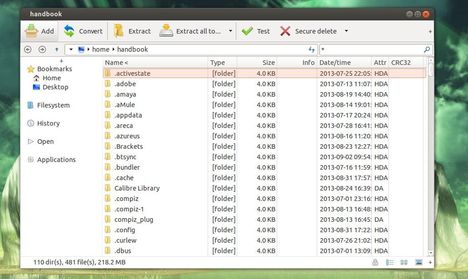
As you may know, PeaZip is a free Zip files utility which supports 150+ archive formats. With it, you can compress, convert, split, encrypt, secure delete, open RAR TAR 7Z ZIP ZIPX CAB ISO files.

To get started, first download and install the libgmp3c2 package from the below links. You may check 32-bit or 64-bit by System Settings -> Details.

libgmp3c2 32-bit deb

libgmp3c2 64-bit deb

NOTE: I don’t know why this package is removed from Ubuntu repository. It may conflict with other packages on your system and cause problem. Use it at your own risk!

Now, download and install the peazip_5.1.0.LINUX.GTK2-2_all.deb from Sourceforge.net

peazip ubuntu

You may need a restart to see the PeaZip icon in Unity Dash.

As you may know, the digital photo editor Fotoxx updates every month. Here I’ll show you how to install and keep the latest version in Ubuntu 13.04 Raring, Ubuntu 12.04 Precise and their derivatives via PPA.

So far, the latest release is 13.09. With it, you can edit photos and manage a large collection. Includes thumbnail image browser and navigator, RAW file import, a comprehensive set of edit functions working in deep color, fast full-image feedback, multiple undo/redo, select/copy/paste, file versioning, batch transforms, HDR and panorama composites, metadata edit, fast search and display, named image subsets (views). Read the changelog.

fotoxx ubuntu

Install Latest Fotoxx:

The getdeb repository provides Fotoxx packages for Ubuntu 12.04 and Ubuntu 13.04. You can add the repository by downloading and installing the Debs from the below link:

download gedeb package

After that, you can install fotoxx and receive updates by Synaptic Package Manager or by running below commands in terminal (Ctrl+Alt+T):

sudo apt-get update; sudo apt-get install fotoxx

For other Ubuntu editions, such as Ubuntu 13.10, Ubuntu 12.10, Ubuntu 10.04, etc. Download the deb packages from the official site.

avidemux video editorThe Avidemux video editor has reached version 2.6.5 with improvements and bug fixes. This tutorial shows how to install or upgrade it in Ubuntu 13.04, Ubuntu 12.04 via PPA.

As you may know, Avidemux is a free video editor designed for simple cutting, filtering and encoding tasks. It supports many file formats, including AVI, DVD compatible MPEG files, ASF and MP4 using a variety of codecs.

Avidemux 2.6.5 has below changes:

  • libva hardware decoding
  • xvba hardware decoding, ported from xbmc, experimental
  • Re-enabled 64bits windows build using octave
  • Only lock job database when adding a job
  • Fixed the doubled fps bug on mpeg ts
  • Fixed positive and negative audio shift having the same effect
  • Windows : Better drag n drop support
  • Added back save/load video filter set
  • Dv encoding
  • Fast, superfast and ultrafast x264 preset by bernd_b
  • Support for 10bits h264 decoding
  • Much improved speed for downmixing
  • Updated libav*
  • Plenty of bugs fixed

Intall Avidemux via PPA:

For Ubuntu 13.04 Raring, Ubuntu 12.04 Precise and their derivatives such as Linux Mint 13 Maya, 15 Olivia, Elementary OS 0.2 Luna. Press Ctrl+Alt+T on your keyboard to open terminal. When it opens, run below commands one by one to add the ppa:

wget http://archive.getdeb.net/install_deb/getdeb-repository_0.1-1~getdeb1_all.deb

sudo dpkg -i getdeb-repository_0.1-1~getdeb1_all.deb

For Linux Mint users, you can read this post to add the GetDeb repository

To install the editor, run below command:

sudo apt-get update; sudo apt-get install avidemux2.6

This tutorial will show you how to install SmartGit/HG easily via PPA in Ubuntu 13.10, Ubuntu 13.04, Ubuntu 12.04, Ubuntu 12.10 and Linux Mint.

As you may know, SmartGit/Hg is a graphical Git and Mercurial client which can also connect to SVN repositories. SmartGit/Hg runs on Linux, Mac OS X (10.5 or newer) and Windows (XP or newer). Git and Mercurial (Hg) are distributed version control system (DVCS). Read Smartgit documentation

smartgit/hg ubuntu

SmartGit/Hg depends on Java Runtime Environment. So before get started, install OpenJDK from Ubuntu Software Center or install Oracle Java via PPA.

UPDATE-2015: For Ubuntu 14.04, 14.10, 15.04 and their derivatives, run below commands instead:

sudo add-apt-repository ppa:eugenesan/ppa

sudo apt-get update

sudo apt-get install smartgit

Once Java properly installed, press Ctrl+Alt+T on your keyboard to open terminal. When it opens, run below commands one by one to install the git client:

sudo add-apt-repository ppa:eugenesan/ppa

sudo apt-get update

sudo apt-get install smartgithg

smartgit/hg ubunt unity

Terra is a drop-down terminal emulator based on GTK+3.0. It has a tranparent background and supports multiple terminals with splitting screen horizontally or vertically.

It’s a good alternative to Yakuake terminal. Here are the screenshots:

terra terminal in gnome

terra terminal in xfce

terra terminal in unity

Install Terra in Ubuntu & its derivatives

For Ubuntu 13.04 Raring, Ubuntu 12.04 Precise, Ubuntu 12.10 Quantal, Linux Mint and Elementary OS. Press Ctrl+Alt+T on your keyboard to open terminal. When it opens, run below commands one by one to install it:

sudo add-apt-repository ppa:ozcanesen/terra-terminal

sudo apt-get update

sudo apt-get install terra

Download and install the DEB from this page if you don’t want to add the ppa.

The Grub Customizer PPA now is available for Ubuntu 13.10 Saucy Salamander and its derivatives.

grub customizer

As you may know, Grub Customizer is a graphical interface to configure the GRUB2/BURG settings and menu entries. It allows to move, remove, rename and edit the bootloader menu entries, set the default operating system, reinstallation of the bootloader to MBR, etc.

Install Grub Customizer:

Press Ctrl+Alt+T on your keyboard to open terminal. When it opens, run below command to add the PPA:

sudo add-apt-repository ppa:danielrichter2007/grub-customizer

add grub customizer ppa

Then update package lists and install grub-customizer:

sudo apt-get update; sudo apt-get install grub-customizer

Once installed, open it from Unity Dash and enjoy!

grub customizer ubuntu

The simple Medical Records Manager Clinica released version 0.3 with backup import/export functionality, network sharing service, as well as other improvements and bug fixes.

clinica medical manager

As you may know, Clinica is a simple tool for the desktop to mantain medical records. With it, you can:

  • Search, edit and save patients
  • Manage doctors associated with them
  • Keep track of your scheduled visits and various events using the builtin calendar
  • Search for medicines online and many more with the plugins

The new release Clinica 0.3 add below changes:

  • Reworked the UI to fix some usability issues
  • Moved the CMake build system
  • Added an abstraction to the DataProvider to allow integration with external data sources.
  • Added a Network service to share data across LAN
  • Added a DBus service to ease integration in the desktop environment.
  • Added Backup and Import/Export functionality
  • Gtk+-3.0 only
  • Various fixes
  • Added integration of files in the visits
  • Added a local medicine database
  • Allow to search medicines in more than one database

Install Clinica

For Windows user, download Clinica from Launchpad page.

For Ubuntu 13.10, Ubuntu 13.04, Ubuntu 12.10, Ubuntu 12.04 and Linux Mint. Press Ctrl+Alt+T to open terminal, run below commands one by one to install it from PPA:

sudo add-apt-repository ppa:phcteam/clinica

sudo apt-get update

sudo apt-get install clinica

Once installed, you can open it from Unity Dash home. Enjoy!

As you may know, RabbitVCS is a graphical front-end for version control systems which supports Nautilus and Thunar. Here’s how to install Nemo extension for RabbitVCS in Linux Mint Cinnamon.

rabbitvcs for nemo

To get started, press Ctrl+Alt+T on your keyboard to open terminal. When it opens, run below command to add the ppa, which supports Linux Mint 13 Maya, 14 Nadia, 15 Olivia, 16 Petra and also Ubuntu 13.10 Saucy, 13.04 Raring, 12.10 Quantal, 12.04 Precise.

NOTE: This PPA contains nightly builds (unstable) for the Cinnamon desktop environment. Use it at your own risk!

sudo add-apt-repository ppa:gwendal-lebihan-dev/cinnamon-nightly

After that, you can install this extension by below commands:

sudo apt-get update; sudo apt-get install nemo-rabbitvcs

Once installed, you may need to log out and back in to get it work.

Gnome Subtitles is a subtitle editor for the GNOME desktop (also works in Unity). It supports the most common text-based subtitle formats, video previewing, timings synchronization and subtitle translation.

Some supported subtitle formats are: Advanced Sub Station Alpha, FAB Subtitler, MicroDVD, Mplayer 1/2, MPSub, SubRip, SubViewer 1/2.

Gnome Subtitles

The latest version has reached 1.3 which allows to set the gap between subtitles, to be used when inserting or splitting subtitles. Also there are a lot of bug fixes and other improvements.

Install Gnome Subtitles 1.3 via PPA

For Ubuntu 13.04, Ubuntu 12.04, Ubuntu 12.10 and their derivatives, such as Linux Mint and Elementary OS. Press Ctrl+Alt+T and run below commands one by one in pop-up terminal:

sudo add-apt-repository ppa:pedrocastro/ppa

sudo apt-get update

sudo apt-get install gnome-subtitles

For Ubuntu 13.10 Saucy, run below commands instead:

sudo add-apt-repository ppa:nilarimogard/webupd8

sudo apt-get update

sudo apt-get install gnome-subtitles

Once installed, open it from Unity Dash and Enjoy!

Are you using the Elementary OS instead of Ubuntu? Well, here I’ll show you how to add the ‘Open in terminal’ option to the Pantheon file manager right-click menu. So that you can quickly open terminal and automatically navigate to the current directory in Pantheon.

open in terminal for pantheon

To get started, use your favorite editor to create the config file /usr/share/contractor/openinterminal.contract and edit it. I prefer Gedit, so I install it and edit the file via below commands:

sudo apt-get install gedit

sudo gedit /usr/share/contractor/openinterminal.contract

Copy and paste below lines into the file and save it.

[Contractor Entry]
Name=Open in terminal
Icon=terminal
Description=Open in terminal
MimeType=inode;application/x-sh;application/x-executable;
Exec=pantheon-terminal -d %U
Gettext-Domain=pantheon-terminal

Log out and back in and done! Or you need a restart if it doesn’t work properly.