Python programming language 3.9.0 was released with new features and optimizations. Here’s how to install it in Ubuntu 16.04, Ubuntu 18.04, and Ubuntu 20.04 via PPA.
Python 3.9.0 is the first version default to the 64-bit installer on Windows. Windows 7 is unsupported.
Python 3.9.0 release highlights:
- Module State Access from C Extension Methods
- Union Operators in dict
- Type Hinting Generics In Standard Collections
- Flexible function and variable annotations
- Python adopts a stable annual release cadence
- Relaxing Grammar Restrictions On Decorators
- Support for the IANA Time Zone Database in the Standard Library
- String methods to remove prefixes and suffixes
- New PEG parser for CPython
- Garbage collection does not block on resurrected objects;
- os.pidfd_open added that allows process management without races and signals;
- Unicode support updated to version 13.0.0;
- when Python is initialized multiple times in the same process, it does not leak memory anymore;
- A number of Python built-ins (range, tuple, set, frozenset, list, dict) are now sped up using PEP 590 vectorcall;
- A number of Python modules (_abc, audioop, _bz2, _codecs, _contextvars, _crypt, _functools, _json, _locale, operator, resource, time, _weakref) now use multiphase initialization as defined by PEP 489;
- A number of standard library modules (audioop, ast, grp, _hashlib, pwd, _posixsubprocess, random, select, struct, termios, zlib) are now using the stable ABI defined by PEP 384.
How to Install Python 3.9.0 in Ubuntu:
1.) Open terminal either by pressing Ctrl+Alt+T on keyboard, or by searching for ‘terminal’ from system application launcher.
When terminal opens, run command to add the “deadsnakes” team PPA:
sudo add-apt-repository ppa:deadsnakes/ppa
Type user password (no asterisk feedback) when it prompts and hit Enter to continue.

2.) Then run commands to refresh system package cache, and install Python 3.9:
sudo apt update

sudo apt install python3.9
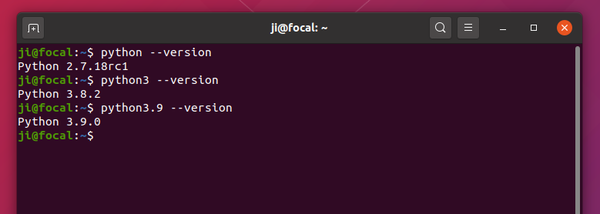
3.) Once successfully installed, check your system Python versions (python –version):
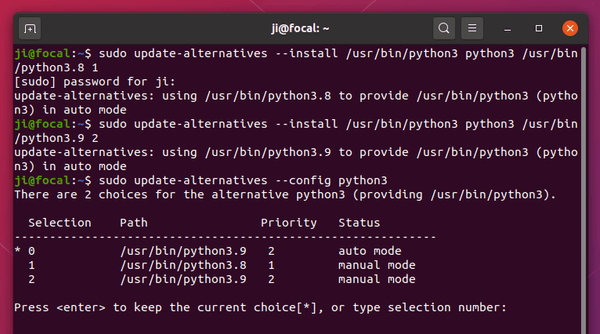
4.) (NOT Recommended) To use Python 3.9 as the default python3, run commands:
sudo update-alternatives --install /usr/bin/python3 python3 /usr/bin/python3.8 1

sudo update-alternatives --install /usr/bin/python3 python3 /usr/bin/python3.9 2
For Ubuntu 16.04 and Ubuntu 18.04, replace python3.8 in the code with system’s default python3 version..
And you can then switch between the two Python3 versions via command:
sudo update-alternatives --config python3
NOTE: Due to known bug, terminal won’t open if you changed python3 symlink. An workaround is recreate a symlink via command (Replace python 3.8 with your system default python3 version):
sudo rm /usr/bin/python3; sudo ln -s python3.8 /usr/bin/python3
Uninstall:
To uninstall the Python3.9 packages, run command:
sudo apt remove --autoremove python3.9 python3.9-minimal
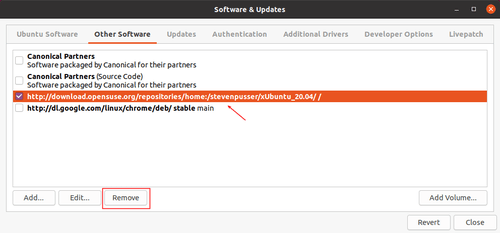
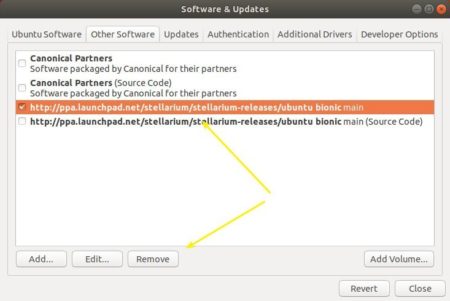
To remove the Deadsnakes PPA, launch Software & Updates and go to Other Software tab, then remove the repository line and close the window.