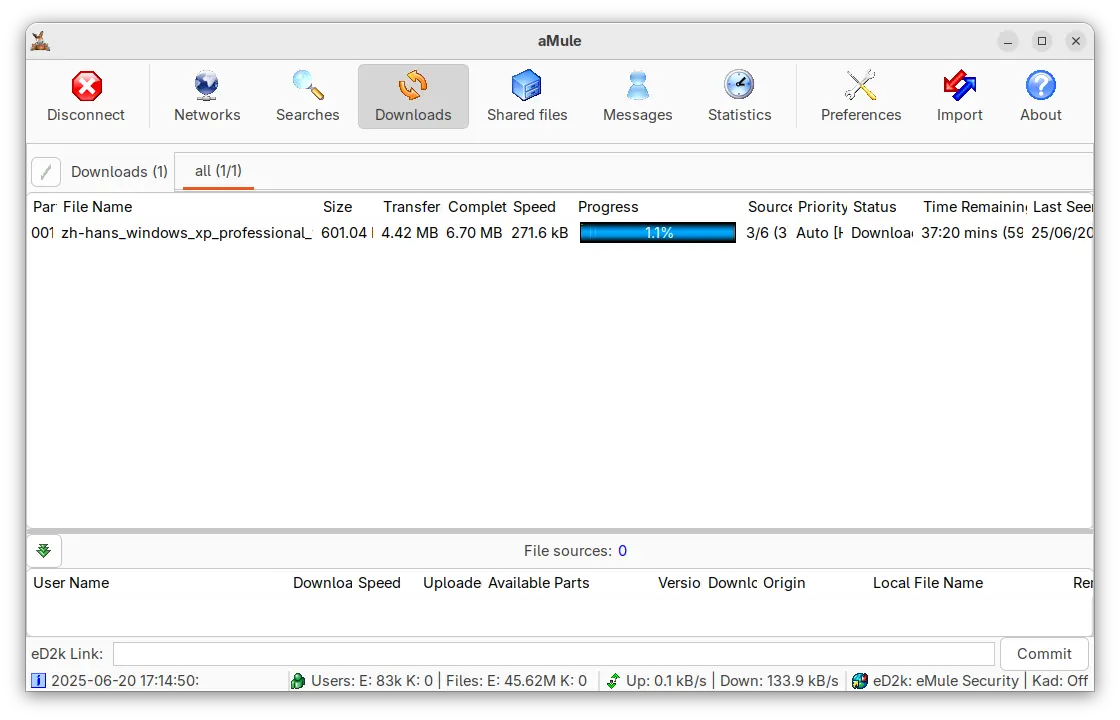
Archives For November 30, 1999

For those who want to install the most recent Kernel 6.6 with new hardware support or compatibility fixes, it’s now available in the zabbly repository for Ubuntu 20.04, Ubuntu 22.04, and Debian 12.

Linux 6.6 was released few weeks ago as the latest Kernel series. It features PSR power saving for Intel 4th/5th CPU, initial PECI support for 4th Gen Xeon, initial support for the Intel Lunar Lake VPU4, Dynamic Boost Control support for AMD Ryzen laptops, as well as various new hardware support. See HERE for more.

As Ubuntu Mainline Kernel PPA is stuck at old RC5 for unknown reason, there’s NO official package for the new Kernel release.

For choice, the Zabbly repository maintained by Ubuntu core developer (quit a few months ago) has updated the new kernel package for Ubuntu 22.04 & 20.04.

Add Zabbly Repository & install latest Kernel

Press Ctrl+Alt+T on keyboard to open terminal. Then, run the commands below one by one to add the repository and install latest Kernel:

  • Download & install the key:
    sudo wget -O - https://pkgs.zabbly.com/key.asc |sudo tee /etc/apt/keyrings/zabbly.asc
  • Setup the repository via single command:
    sh -c 'cat <<EOF > /etc/apt/sources.list.d/zabbly-kernel-stable.sources
    Enabled: yes
    Types: deb
    URIs: https://pkgs.zabbly.com/kernel/stable
    Suites: $(. /etc/os-release && echo ${VERSION_CODENAME})
    Components: main
    Architectures: $(dpkg --print-architecture)
    Signed-By: /etc/apt/keyrings/zabbly.asc
    
    EOF'

    This is a single command for Ubuntu/Debian. For their based systems, you have to replace $(. /etc/os-release && echo ${VERSION_CODENAME}) with jammy (for 22.04 base), focal (for 20.04 base), or bookworm for Debian 12 base.

  • Finally, update & install the new kernel:
    sudo apt update
    sudo apt install linux-zabbly

In case the previous steps are not clear enough, or it broke things up, see this step by step detailed guide instead.

OBS Studio, the popular live streaming software, announced new 30.0 release yesterday. Here are the new features and how to install guide for Ubuntu 22.04, Ubuntu 23.04/23.10, and Linux Mint 21.

OBS-Studio 30.0 is a big release with many new features. They include WHIP/WebRTC output, support for Intel QSV H264, HEVC, AV1 on Linux, “Safe Mode” that runs without scripting, and websockets, 10-bit capture and HDR playback support for Decklink devices.

Other changes include:

  • Redesigned the status bar
  • Full-Height docks option in the “Docks” menu
  • Add shader cache to improve startup time on Windows
  • Add application audio capture on macOS
  • Rework the virtual camera on macOS
  • Add YouTube Live Control Room Panel when streaming to YouTube
  • Option to hide OBS windows from macOS Screen Capture’s “Display Capture”
  • Arrange filters via drag & drop
  • Ability to set FFmpeg Options for VAAPI

And, there are tons of other changes and bug-fixes, see the release page for details.

How to Install OBS Studio 30.0 in Ubuntu

The release page (see the link above) provides Windows .exe, Mac OS .dmg, and Ubuntu .deb packages for downloading under ‘Assets’ section.

For Ubuntu and Linux Mint, there’s also an official PPA available to make it easy to keep the software up-to-date.

The PPA supports the new release for Ubuntu 22.04, Ubuntu 23.04, Ubuntu 23.10, and their based systems. While, Ubuntu 20.04 does not longer supported due to FFmpeg version mis-match.

1. Firstly, press Ctrl+Alt+T on keyboard to open a terminal window. When it opens, run command to add the PPA:

sudo add-apt-repository ppa:obsproject/obs-studio

Type user password (no asterisk feedback) when it asks and hit Enter to continue.

2. Then, either use Software Updater to update the software package (if an old version was installed).

Or, use apt command to install/upgrade the software package:

sudo apt install obs-studio

NOTE: Linux Mint may need to run sudo apt update first to update package cache.

Once installed, search for and launch OBS Studio from ‘Activities’ overview or start menu depends on your desktop environment and enjoy!

NOTE: OBS Studio in Ubuntu 22.04 and higher with Wayland, looks kinda borderless, due to Qt theming issue. If you prefer the classic header-bar and window border, see this tutorial to enable xcb plugin

Uninstall OBS Studio

To downgrade the software to the stock version that your system repository provides, run command:

sudo apt install ppa-purge && sudo ppa-purge ppa:obsproject/obs-studio

Or, either open Software & Updates and remove the PPA source line under ‘Other Software’ tab:

or run command in terminal to remove the PPA repository:

sudo add-apt-repository --remove ppa:obsproject/obs-studio

Also, remove the OBS Studio if you want by running command in terminal:

sudo apt remove --autoremove obs-studio

Hugin, the free open-source panorama photo stitching and HDR merging software, finally released the new stable 2023 release!

Changes in the new release include:

  • PTBatcherGUI can now also queue user defined assistant and user defined output sequences.
  • PTBatcherGUI: Added option to generate panorama sequences from an existing pto template.
  • Assistant: Added option to select different output options like projection, FOV or canvas size depending on different variables (e.g. image count, field of view, lens type).
  • Allow building with epoxy instead of GLEW for OpenGL pointer management.
  • Several improvements to crop tool (outside crop, aspect ratio, …).

How to install Hugin 2023.0.0 in Ubuntu:

For the source tarball as well as Windows msi packages, go the sourceforge download page.

For all current Ubuntu releases, including Ubuntu 18.04, Ubuntu 20.04, Ubuntu 22.04, Ubuntu 23.10, and their based systems, I’ve made the unofficial package into this PPA repository, not only for x86_64 but also 32-bit/64-bit ARM support!

I also sync the packages into the apps PPA, use either one as you prefer.

1. First, press Ctrl+Alt+T on keyboard to open terminal. When it opens, run command to add the PPA:

sudo add-apt-repository ppa:ubuntuhandbook1/hugin

Type user password (no asterisk feedback) when it asks and hit Enter to continue.

2. Update system package cache for Ubuntu 18.04 and Linux Mint, though it’s done automatically while adding PPA in Ubuntu 20.04+:

sudo apt update

3. Finally, either run the command below in terminal to install the panorama photo stitcher:

sudo apt install hugin

Or, upgrade the software (if an old version was installed) via Software Updater (Update Manager) app:

Uninstall hugin:

To remove the software package, simply run command:

sudo apt remove --autoremove hugin hugin-data

And, remove the PPA either by running command in terminal:

sudo add-apt-repository --remove ppa:ubuntuhandbook1/hugin

Or remove the source line from ‘Software & Updates‘ utility under Other Software tab.

Tilix terminal emulator released version 1.9.6 few days ago. Here’s how to install it in Ubuntu 22.04, Ubuntu 23.04, and Ubuntu 23.10.

Tilix is a tiling terminal emulator, which uses the VTE GTK+ 3 widget for various features, such as split horizontally or vertically, transparent background, background images, quake mode support, custom hyperlinks, experimental trigger and badge support.

The development of Tilix is moving slowly now due to lack of maintainers. The new 1.9.6 is released more than 20 months after the last stable. And, it only includes minor new features and bug-fixes:

  • Add close button to search box.
  • Replace variables in custom link commands
  • Follow system color-scheme for default theme-variant
  • Add compatibility with Nautilus 43
  • Avoid shell injection in open-tilix plugin
  • Fix GLib critical warnings on startup
  • Update to GtkD 3.10.0

Tilix search box has close button.

How to Install Tilix 1.9.6 in Ubuntu 22.04, Ubuntu 23.10

The new release provides prebuild package for Linux, which is available to download at the link below:

It’s ‘tilix-1.9.6_x86_64-linux-gnu.tar.gz‘ for 64-bit modern PC and laptop. Just download the package, extract, and run the executable to launch the terminal emulator.

Ubuntu PPA

The official tarball does NOT include run-time libraries. You have to manually figure out “error while loading shared libraries …” errors.

To make the life easy, I’ve upload the new packages into this unofficial PPA, build against the rules from Debian Unstable. So far, it supports Ubuntu 22.04, Ubuntu 23.04, Ubuntu 23.10, on both x86_64 and AArch64(arm64).

1. First, press Ctrl+Alt+T on keyboard to open terminal. When it opens, run command to add the PPA:

sudo add-apt-repository ppa:ubuntuhandbook1/tilix

Type user password (no asterisk feedback) when it asks and hit Enter to continue.

2. Linux Mint 21 users need to refresh system package cache manually, by either running the command below or using “Refresh” button in Update Manager:

sudo apt update

3. Finally, either run command to install the terminal emulator:

sudo apt install tilix

Or, update it through Software Updater (Update Manager) utility.

NOTE: Upgrading from v1.9.5 may cause following error pop-up at launch, but I don’t know how to correct the issue.

Thanks to @oswald_c, you may fix the issue by enabling ‘Run command as a login shell’ to enable it‘ option under default profile of “Preferences” dialog. See the screenshot below:

Uninstall Tilix

To downgrade Tilix to stock version in your system repository, open terminal (Ctrl+Alt+T) and run command to purge the PPA:

sudo apt install ppa-purge && sudo ppa-purge ppa:ubuntuhandbook1/tilix

To uninstall Tilix, use this command instead:

sudo apt remove --autoremove tilix tilix-common

And, remove the Ubuntu PPA, either by running command in terminal:

sudo add-apt-repository --remove ppa:ubuntuhandbook1/tilix

or use “Software & Updates” to remove the source line under “Other Software” tab.

GIMP image editor announced a new stable release for the 2.10 series few days ago. Here’s how you can install it in Ubuntu 24.04, Ubuntu 22.04, Ubuntu 20.04, and Ubuntu 23.10.

First of all, GIMP 2.10.38 includes Windows Ink drivers support for better tablets support on Windows. It also backports some small features from GTK3 to GTK2, with some improvements for Windows users. They include:

  • Use native Windows API for converting keystrokes to characters,
  • Fix keyboard input when using IMEs,
  • Fix mouse events in presence of transparent windows on the desktop,
  • Win32 IME Fixes, and more.

Besides the improvements for Windows users, the release also includes various bug-fixes, including that GIMP crashes every time on exit in my case in Ubuntu 24.04. See release note for more about GIMP 2.10.38.

(Old content for GIMP 2.10.36) The new release also has some new features. They include Adobe Swatch Exchange (ASE) and Adobe Color Book (ACB) palettes support.

Gradient Tool now has an “FG to Transparent (Hardedge)” option, to generate a gradient from the foreground color to transparency, with hard-edge transitions between the 2 colors. Which, as well includes a “Repeat” option to alternate repetitive colored shapes.

Other changes in GIMP 2.10.36 include:

  • Load GIF images with PixelAspectRatio header metadata correctly.
  • Improve formatting behavior when selecting and changing text on canvas.
  • Add “Table of Contents” option under Help > User Manual submenu.
  • Workaround broken graphic tablet with recent linuxwacom driver on Linux.

How to Install GIMP 2.10.38 in Ubuntu

GIMP provides official Linux package through Flatpak. For choices, they are Snap package and Ubuntu PPAs (.deb) maintained by contributors.

Option 1: Flatpak (official)

Flatpak is an universal package format that can be installed in most Linux, though it runs in sandbox.

To install GIMP 2.10.38 as Flatpak, press Ctrl+Alt+T on keyboard to open terminal and run the 2 commands below one by one:

  • Install the Flatpak daemon package:
    sudo apt install flatpak
  • Install GIMP Flatpak package:
    flatpak install https://dl.flathub.org/repo/appstream/org.gimp.GIMP.flatpakref

If you already installed an old version of the Flatpak package, try to update it by running command:

flatpak update org.gimp.GIMP

Option 2: Snap package

Like Flatpak, Snap is also an universal Linux package format runs in sandbox environment. It’s easy to install by simply search & click installing in App Center (or Ubuntu Software for 22.04 & earlier).

Option 3: Ubuntu PPA

For those who prefer native .deb package format, I’ve upload the new release package into this unofficial PPA for Ubuntu 24.04, Ubuntu 22.04, Ubuntu 20.04, and Ubuntu 23.10, with amd64, arm64 and armhf support.

1. First, open terminal (press Ctrl+Alt+T) and run command to add PPA:

sudo add-apt-repository ppa:ubuntuhandbook1/gimp

Type user password (no asterisk feedback) when it asks and hit Enter to continue.

2. Linux Mint users need to manually refresh system package cache, though, it’s done automatically in Ubuntu while adding PPA. To do so, run command:

sudo apt update

3. Finally, either run command to install GIMP 2.10.38:

sudo apt install gimp gegl libgexiv2-2

For Ubuntu 20.04, also run sudo apt install libgexiv2-2 to update the runtime library. Or run sudo apt upgrade if GIMP refused to run after installation.

Or, use “Software Updater” (Update Manager) to upgrade your current GIMP to the latest.

Uninstall GIMP

If you installed GIMP via the official Flatpak package, run command below in terminal to uninstall it:

flatpak uninstall --delete-data org.gimp.GIMP

Also run flatpak uninstall --unused to remove useless runtimes.

For the Snap package, simply use Ubuntu Software or App Center to uninstall it.

For the PPA package, either run command to purge PPA and downgrade to the stock version:

sudo apt install ppa-purge && sudo ppa-purge ppa:ubuntuhandbook1/gimp

Or, remove the image editor directly by running command:

sudo apt remove --autoremove gimp gimp-data gegl libgimp2.0 libbabl

Then, remove the PPA either via command:

sudo add-apt-repository --remove ppa:ubuntuhandbook1/gimp

or ‘Software & Updates’ tool under Other Software tab by removing the source line.

Audacity audio editor announced the first point release for the Audacity 3.4.0 feature release today!

The release can now built again in ARM devices and BSD. And, it has various stability and other fixes that 3.4.0 users are urged to upgrade to the new release.

They include:

  • Fix 24-bit recording.
  • Fix a crash with .aup importing.
  • Fix crossfading of clips and tracks.
  • Exporting multiple files honors sample rate settings again.
  • Fix crashes related to external program exports.
  • Ctrl+J is now a standard shortcut for joining clips.
  • Stereo tracks no longer randomly split into mono.
  • When exporting a file, the file extension is now always added
  • Fix a crash when exporting Opus with older CPUs that don’t support AVX.

How to Install Audacity 3.4.1 in Ubuntu:

Option 1: AppImage (official)
It provides official macOS .dmg, Windows .exe, and Linux .AppImage packages available to download at the link below:

For Linux, click expand the “Assets” section and choose download the .AppImage package.

Then, right-click on the .AppImage file and go to its ‘Properties’ dialog. Add executable permission by enable ‘allow executing file as program‘. Finally, right-click on it and select “Run” to launch Audacity.

Forgive me for the old image.

Option 2: Ubuntu PPA

For choice, I’ve uploaded the new release package into unofficial PPA for Ubuntu 22.04, 23.04, and Ubuntu 23.10 with amd64, arm64, and armhf support.

1. First, press Ctrl+Alt+T on keyboard to open terminal. When terminal opens, run command to add the PPA:

sudo add-apt-repository ppa:ubuntuhandbook1/audacity

Type user password (no asterisk feedback) when it asks and hit Enter to continue.

2. For Linux Mint users, you may manually update system package cache by running command:

sudo apt update

3. Finally, install Audacity 3.4.1 either by running the  command below in terminal:

sudo apt install audacity audacity-data

Or, launch ‘Software Updater’ to update from an existing version:

Option 3: Flatpak

Audacity is also available to install as universal Flatpak package, that run in sandbox.

First, press Ctrl+Alt+T on keyboard to open terminal. Then, Ubuntu users can install Audacity as Flatpak by running the 2 commands below one by one:

sudo apt install flatpak
flatpak install https://dl.flathub.org/repo/appstream/org.audacityteam.Audacity.flatpakref

Uninstall:

To uninstall Audacity 3.4.1 PPA package, you have 2 choices:

  • Purge the Ubuntu PPA, which also downgrade the installed packages to the stock versions in your system:
    sudo apt install ppa-purge && sudo ppa-purge ppa:ubuntuhandbook1/audacity
  • Or, remove Audacity package by running command:
    sudo apt remove --autoremove audacity audacity-data

    Then, remove the Ubuntu PPA via command:

    sudo add-apt-repository --remove ppa:ubuntuhandbook1/audacity

To uninstall the Flatpak package, use command:

flatpak uninstall --delete-data org.audacityteam.Audacity

Also run flatpak uninstall --unused to remove useless runtimes.

GNU Octave released version 8.4.0 this Sunday. Here’s how to install it in Ubuntu 20.04, Ubuntu 22.04, and Ubuntu 23.10 via PPA.

GNU Octave, a high-level interpreted language for numerical computations, release new 8.4.0 few days ago. The release came with mainly bug-fixes and improvements.

The official announcement is not ready yet. But, according to the in-app release note dialog, the changes include:

  • mkoctfile: Skip parsing for less flags.
  • Fix getting number of non-zero elements in SuiteSparse matrices.
  • delaunayn.m: Avoid erroneous simplex removal for integer inputs
  • delaunayn: Add precision loss warning for large int inputs.
  • delaunayn: Also warn for negative integers with large magnitude
  • Correctly load all-zero sparse matrices from text files.
  • Allocate correct storage for interleaved complex mxArray objects
  • mkoctfile: Prefer parsing over passing on argument after unknown argument
  • fft: Avoid segmentation fault with ND-arrays.
  • fft: Avoid overwriting input for inplace operations.
  • intersect.m: Correct third output with “stable” flag.
  • Avoid use-after-free issue in parser.
  • betainc.m: Improve integer input logic and validation.
  • webread: Apply timeout also for initial connection.

There are as well a few build system changes and documentation updates. For more, keep an eye on the news page.

How to Install Octave 8.4.0 in Ubuntu:

GNU Octave does not provide official packages for Ubuntu, since the official PPA has been discontinued for very long time.

To get it in your Ubuntu Linux, there are so far 2 choices: Flatpak package and Ubuntu PPA.

Option 1: Flatpak

Flatpak is an universal package format for Linux. It can install in most Linux system, however run in sandbox.

To install Octave as Flatpak in Ubuntu, simply press Ctrl+Alt+T on keyboard to open terminal. Then, run the 2 commands below one by one:

  • First, make sure Flatpak daemon is installed by running command:
    sudo apt install flatpak
  • Then, install Octave as Flatpak via command:
    flatpak install https://dl.flathub.org/repo/appstream/org.octave.Octave.flatpakref

Tips: first time installing an app as Flatpak, needs a log out and back in to make app icon visible. And, it may have many downloads for run-time libraries.

Option 2: Ubuntu PPA

There are also few unofficial Ubuntu PPA contains the most recent Octave packages. And, I have made this PPA for Ubuntu 20.04, Ubuntu 22.04, Ubuntu 23.04 & 23.10 with both x86_64 and arm64/armhf support.

1. First, press Ctrl+Alt+T on keyboard to open terminal. When it opens, run command to add the PPA:

sudo add-apt-repository ppa:ubuntuhandbook1/octave

Type user password (no asterisk feedback) when it asks and hit Enter to continue.

2. After adding PPA, Linux Mint users need to manually refresh system package cache, though it’s done automatically in Ubuntu.

sudo apt update

3. Finally, either run command in terminal to install the software package:

sudo apt install octave

Or, use “Software Updater” (Update Manager) to install updates if an old version was installed on your system.

Uninstall:

For choice, you can either downgrade Octave package to the stock version in system repository by purging the Ubuntu PPA. To do so, open terminal (Ctrl+Alt+T) and run command:

sudo apt install ppa-purge && sudo ppa-purge ppa:ubuntuhandbook1/octave

Or, remove Octave by running command in terminal:

sudo apt remove --autoremove octave octave-common

And remove the Ubuntu PPA by running command:

sudo add-apt-repository --remove ppa:ubuntuhandbook1/octave

If you installed Octave via Flatpak package, run the command below instead to remove it:

flatpak uninstall --delete-data org.octave.Octave

Also, run flatpak uninstall --unused to remove useless run-time libraries to free up some disk space.

Bleachbit, the popular system cleaner app, announced new major 4.6.0 release this Sunday!

It’s been almost 2 years since the last stable v4.4.2. While, version 4.5.x is there for beta testing purpose.

Compare to the latest stable release, the new Bleachbit 4.6.0 features:

  • Microsoft Edge on Linux support.
  • Firefox, Thunderbird, and Google Chrome installed as Flatpak support.
  • Firefox installed as Snap (default in 22.04+) support.
  • “shred with bleachbit” context menu for KDE (not enabled by default).
  • Clean recent documents list on KDE 5

Shred with Bleachbit context menu for KDE

The release also has various other changes and bug-fixes. When cleaning Firefox, it does no longer show “no such table” error. And, it fixed admin mode launching issue when working on Linux with Wayland session. Other changes include:

  • Clean recently-closed tabs on Firefox
  • Clean autofill data in Chromium-based browsers
  • Fix detection of invalid .desktop files
  • Remove Windows-specific files from Linux packages
  • And more. See release note for details.

BleachBit 4.6 can clean Firefox Snap in Ubuntu

How to Install Bleachbit in Ubuntu

The software provides official .rpm packages for CentOS, Fedora, and openSUSE, as well as .deb packages for Debian, Ubuntu and Linux Mint.

They are available to download at the link below:

Tips: for Linux Mint 21, click download the package for Ubuntu 22.04 Jammy Jellyfish. In case you don’t even know which Linux Distribution version is running, open terminal (press Ctrl+Alt+T) and run command cat /etc/os-release to tell.

Once you got the .deb package, either click open with “Software Install”, or open with “Gdebi package installer” if you have it installed.

Install Bleachbit .deb via Software Install

Or, right-click on blank area in your Downloads folder, and select “Open in Terminal”. Finally, run the command below to install it:

sudo apt install ./bleachbit_4.6.0*.deb

Once installed, search for and launch the tool from either start/applications menu or ‘Activities’ overview depends on your desktop environment.

Uninstall Bleachbit

To remove Bleachbit 4.6.0 in Debian, Ubuntu, Linux Mint, and their based systems, simply open terminal and run command:

sudo apt remove --autoremove bleachbit

Have multiple monitors connected to your Ubuntu 22.04 machine? There’s now an indicator to dim all or individual monitor screen brightness with sliders.

You can dim external monitor brightness with either physical buttons or ddcutil utility. However, an indicator applet in system tray can be more effective, and here’s one for Ubuntu 22.04 with default GNOME 42.

It’s a Gnome Shell extension, that adds a light bulb to top-right corner in panel. By clicking on it, will show you the slider to dim all the connected monitors, as well as individual sliders to dim certain screens.

And, by moving the slider to far right will make the screen totally dark, just like being turned off.

Besides dimming monitor screens, it can also change the colors with RGB sliders, which also can apply to either all or individual monitors.

As my laptop’s external HDMI port is broken, I can’t try out the multi-monitor support. But, the dimming and RGB color (need to at least move dim slider a bit to right) functions are working very well in my case in Ubuntu 22.04 Desktop PC.

My test without multi-monitors

How to Install the Dimming Control Indicator

First, launch Ubuntu Software, then search for and install “Extension Manager” app.

Install Extension Manager in Ubuntu 22.04+

Then, click on top-left ‘Activities’ button to open overview screen, search for and launch ‘Extension Manager’.

When the tool opens, navigate to ‘Browse‘ tab, and finally search and install “VividShade: Multi-Monitor RGB Dimming Control” extension.

The indicator applet will appear on panel immediately after installation.

Uninstall:

To uninstall this extension, also launch “Extension Manager“. Click expand it under first tab, finally click on red “Remove” button.

Audacity audio editor and recording tool announced the new major 3.4.0 release after almost 2 weeks of beta testing.

The new release features Beats and measures grid, allows to easily align audio clips to the musical tempo and rhythm. It shows you the subdivisions of each measure depending on zoom level, and you can snap clips to the nearest beat.

It also features new time stretching algorithm, allows to change the duration of your audio clips without affecting their pitch non-destructively. Just hold “Alt” (macOS: Option) while hovering over the top third of a clip edge to stretch it.

The 3.4.0 also features a new export dialog with easier access to options such as sample rate and custom mapping (for 5.1 or 7.1 audio). Additionally, the “Browse” button uses the native file browser now!

New Export dialog

Other changes include:

  • always uses Joint Stereo mode for MP3.
  • Simplified pasting logic, and stereo tracks.
  • uses Conan 2.
  • Built-in Opus support.
  • And stability fixes.
  • See change-log for more details

How to Install Audacity 3.4.0:

Option 1: AppImage (official)
It provides official macOS .dmg, Windows .exe, and Linux .AppImage packages available to download at the link below:

For Linux, click expand the “Assets” section and choose download the .AppImage package.

Then, right-click on the .AppImage file and go to its ‘Properties’ dialog. Add executable permission by enable ‘allow executing file as program‘. Finally, right-click on it and select “Run” to launch Audacity.

Option 2: Ubuntu PPA

For choice, I’ve uploaded the new release package into unofficial PPA for Ubuntu 22.04, 23.04, and Ubuntu 23.10.

NOTE: Due to bug, arm64 and armhf packages are excluded in the PPA until the bug-fix due in next point release.

1. First, press Ctrl+Alt+T on keyboard to open terminal. When terminal opens, run command to add the PPA:

sudo add-apt-repository ppa:ubuntuhandbook1/audacity

Type user password (no asterisk feedback) when it asks and hit Enter to continue.

2. For Linux Mint users, you may manually update system package cache by running command:

sudo apt update

3. Finally, install Audacity 3.4.0 either by running the  command below in terminal:

sudo apt install audacity audacity-data

Or, launch ‘Software Updater’ to update from an existing version:

Option 3: AppImage

Audacity is also available to install as universal Flatpak package, that run in sandbox.

However, it’s not updated to v3.4.0 at the moment of writing, see this page for details.

Uninstall:

To uninstall Audacity 3.4.0, you have 2 choices:

  • Purge the Ubuntu PPA, which also downgrade the installed packages to the stock versions in your system:
    sudo apt install ppa-purge && sudo ppa-purge ppa:ubuntuhandbook1/audacity
  • Or, remove Audacity package by running command:
    sudo apt remove --autoremove audacity audacity-data

    Then, remove the Ubuntu PPA via command:

    sudo add-apt-repository --remove ppa:ubuntuhandbook1/audacity