![]()
This quick tutorial shows you how to make your VLC media player remember the position of the last played files with a plugin called srpos.
srpos plugin works for VLC 2.1.x in Windows and Linux. It allows you to automatically save and restore up to 100 last played files position.
How to install this plugin:
For Ubuntu 14.10, Ubuntu 14.04, Linux Mint 17 and their derivatives, press Ctrl+Alt+T on keyboard to open the terminal. When it opens, run commands below one by one to install it from PPA:
sudo add-apt-repository ppa:samrog131/ppa

sudo apt-get update

sudo apt-get install vlc-srpos-plugin
For Ubuntu 12.04, Ubuntu 13.10 and their derivatives, you may consider upgrading VLC to the stable release v2.1.4 as the 2.0.x in their repositories are not supported. To do so, run:
sudo add-apt-repository ppa:djcj/vlc-stable

sudo apt-get update

sudo apt-get install vlc
After that, download .deb package from: Launchpad Page
- download vlc-srpos-plugin_0.3~trusty~ppa1_amd64.deb for 64-bit system.
- download vlc-srpos-plugin_0.3~trusty~ppa1_i386.deb for 32-bt system.
Ubuntu 14.10 and Ubuntu 14.04 user can also download & install the .deb directly from the launchpad page if you don’t like Ubuntu PPAs.
How to Use the Plugin:
Once the plugin installed:
1. Re-open VLC, and go to menu Tools -> Preferences.
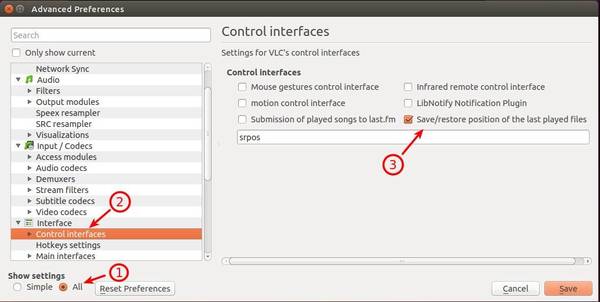
2. Under bottom left corner, select show All settings.
3. Navigate to Interface -> Control Interface on left sidebar.
4. Check the box where it says “Save/restore position of the last played files”
5. Save and close VLC. The plugin will work the next time you launch it.