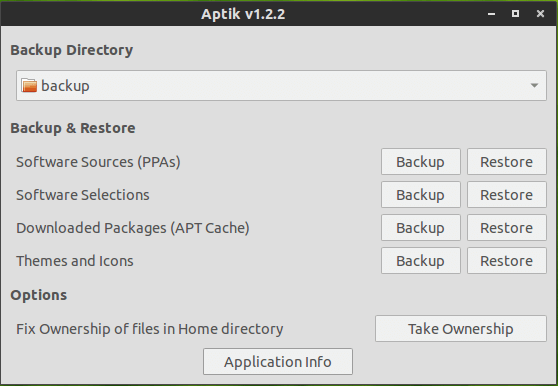
Aptik is a new tool to simplify re-installation of packages after doing a clean installation of an Ubuntu-based distribution. It can be used while re-installing or upgrading to the next Ubuntu/Linux Mint release.
With this simple tool, you can backup & restore:
- Software Sources (PPAs.)
- Software selections (list of installed packages)
- Downloaded Packages (APT Cache)
- Themes and Icons
How to Use Aptik:
Plug-in your pen drive and create a new folder on it named ‘backups’. Start Aptik and select the new folder as the backup directory.
1. Backup PPAs:
Click on the Backup button and you’ll see a list of third-party PPAs as well as the installed packages from PPAs.
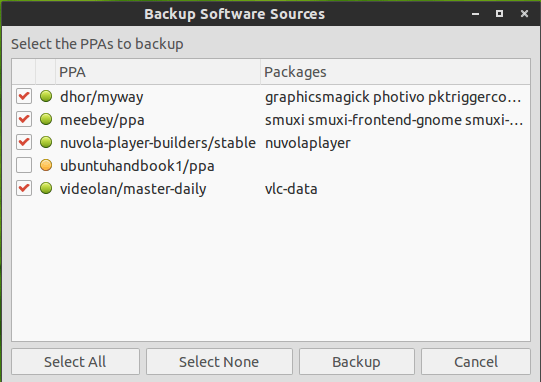
- PPAs with a green icon are active and have some packages installed.
- PPAs with a yellow icon are active but unused (no packages installed).
Select the PPAs to backup and click the Backup button. A file named ‘ppa.list’ will be created in the backup directory.
2. Backup Software Selections:
Click on the Backup button will display a list of installed top-level packages. These packages are top-level packages. Dependency packages will not be listed.
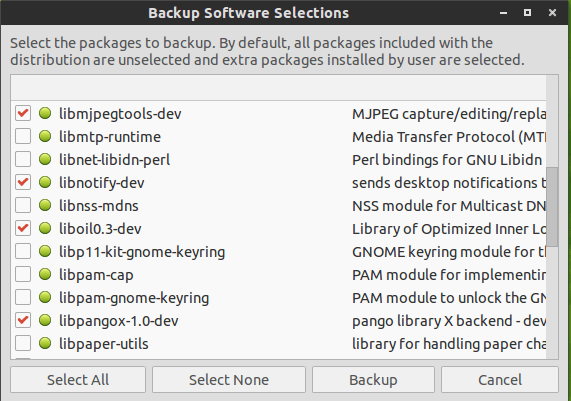
All packages that are a part of the Linux distribution are un-selected by default. For example, Firefox is a package that is installed by default on most Linux distributions. Since it came with the distribution, it will be un-selected by default. It can be selected if required.
A file named ‘packages.list’ will be created in the backup directory after you clicked no the backup button.
3. Click the Backup button for Downloaded Packages will paste packages from your system cache (/var/cache/apt/archives) to backup folder.
4. Similarly, all themes and icons from the directories /usr/share/themes and /usr/share/icons can be zipped and saved in the backup folder.
To restore backups:
Connect your pen drive to the new system. Install and then start Aptik and select the backup folder on the pen-drive as the backup directory. Click on the Restore buttons and select packages, PPAs, themes and restore them one by one.
About the “Fix Ownership of Home folder”:
The home folder can be manually copied to another location and then restored after doing a fresh install. However, it can sometimes cause problems if the user’s login name or UID is different from the previous one. Click the Take Ownership button to change ownership of files in your home directory to your current login ID. This is same as running the following command:
sudo chown username -R /home/username
How to Install Aptik:
Press Ctrl+Alt+T on keyboard to open the terminal. When it opens, run below commands one by one:
sudo add-apt-repository -y ppa:teejee2008/ppa

sudo apt-get update

sudo apt-get install aptik
Works for Ubuntu 14.04, Ubuntu 13.10, Ubuntu 13.04, Ubuntu 12.10, Ubuntu 12.04 and their derivatives.
via: teejee