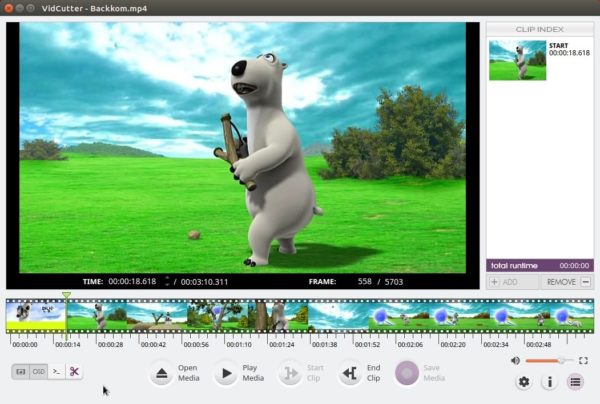
Archives For Howtos

Quick Tip: No Sound from HDMI Display / TV

Last updated: January 21, 2018

My laptop display was broken last night by accident. Now I connect my Ubuntu laptop to home TV using a HDMI cable for temporary use.

However, there’s no sound output from HDMI device (TV in my case) by default. So here’s the quick tutorial show you how.

1. Open terminal either via Ctrl+Alt+T or by searching for “terminal” from application launcher. When it opens, run command:

alsamixer

Then you’ll see something similar in following picture:

Here you need to make sure S/PDIF, S/PDIF 1, S/PDIF 2 are no muted.

  • use Left/Right keys to choose item.
  • press M to mute/unmute (00 means unmuted)

2. If sound is not muted via sound card mixer, launch “System Settings” and go to “Sound”:

Select HDMI device as sound output and unmute output volume.

wireshark

Wireshark network analyzer 2.4.4 was released a week ago. Now it’s finally available in PPA repository for Ubuntu 14.04, Ubuntu 16.04, Ubuntu 17.10.

Wireshark 2.4.4 is a small release with mainly bug-fixes and updated protocol support. Bug-fixes in the release include:

  • Multiple dissectors could crash.
  • The IxVeriWave file parser could crash.
  • The WCP dissector could crash.
  • Disabled the Linux kernel’s BPF JIT compiler due to security vulnerable.
  • Some keyboard shortcut mix-up has been resolved
  • Remote interfaces are not saved.
  • Wireshark & Tshark 2.4.2 core dumps with segmentation fault.
  • SSH remote capture promiscuous mode.
  • For more, see the release note.

How to Install Wireshark 2.4.3 in Ubuntu:

Wireshark has a stable PPA with the latest packages for Ubuntu 14.04, Ubuntu 16.04, and Ubuntu 17.10.

1. To add the PPA, open terminal from Unity Dash / App Launcher, or via Ctrl+Alt+T shortcut keys, and then run command:

sudo add-apt-repository ppa:wireshark-dev/stable

Type in your password (no visual feedback due to security reason) when it asks and hit Enter.

wireshark-official-ppa

2. For those who have a previous release installed, launch Software Updater (or Update Manager) to upgrade it to the latest:

upgrade wireshark

Or run the commands below in terminal to install / upgrade wireshark:

sudo apt-get update

sudo apt-get install wireshark

How to restore:

To restore to the stock version of Wireshark in Ubuntu main repositories, purge the PPA via ppa-purge tool:

sudo apt-get install ppa-purge && sudo ppa-purge ppa:wireshark-dev/stable

Wine 3.0 Released with Direct3D 10 and 11 Support

Last updated: January 25, 2019

Wine Stable

The Wine team announced the new stable release Wine 3.0 a day ago a large number of improvements and following great changes:

  • Direct3D 10 and 11 support.
  • The Direct3D command stream.
  • The Android graphics driver.
  • Improved DirectWrite and Direct2D support.

“because of the annual release schedule, a number of features that are being worked on have been deferred to the next development cycle. This includes in particular Direct3D 12 and Vulkan support, as well as OpenGL ES support to enable Direct3D on Android.”, the Wine team announced.

For detailed changes, read the announcement.

Wine running windows app in Linux

How to Install Wine 3.0 in Ubuntu:

Wine has an official apt repository contains packages for Ubuntu 14.04, Ubuntu 16.04, Ubuntu 17.10.

Wine 3.0 binary packages are in the process of being built. Once it’s published in apt repository, do following steps to install it:

1. Open terminal via Ctrl+Alt+T or by searching it from app launcher. When it opens, run command to add the repository key:

wget -nc https://dl.winehq.org/wine-builds/winehq.key && sudo apt-key add winehq.key

Type your password (no visual feedback while typing due to security reason) when it asks and hit Enter.

2. Add wine repository via command:

sudo apt-add-repository https://dl.winehq.org/wine-builds/ubuntu/

For Linux Mint 18.x, use following command instead (replace xenial with trusty for 17.x):

sudo apt-add-repository 'deb https://dl.winehq.org/wine-builds/ubuntu/ xenial main'

3. Finally check updates and install wine stable packages:

sudo apt-get update

sudo apt-get install --install-recommends winehq-stable

NOTE: If you get the unmet dependencies issue while installing Wine 3.0, try aptitude instead via command:

sudo aptitude install winehq-stable

The command tells you which packages broke the installation. This usually caused by wrong dependency versions. You can then manually fix the dependencies via Synaptic package manager.

For more details, see the official documentation.

Uninstall:

To remove wine-stable package, run command in terminal:

sudo apt-get remove --autoremove wine-stable wine-stable-amd64

To remove Wine repository, launch Software & Updates utility and navigate to Other Software tab.

MKVToolNix, free and open-source Matroska software, reached 20.0.0 release a day ago. Here’s how to install it in Ubuntu 16.04, Ubuntu 17.10.

MKVToolNix 20.0.0 fixed quite a number of bugs in mkvmerge, and removed those options and features deprecated a year ago. An important change was the near complete rewrite of mkvinfo’s internals.

Important notes in the announcement:

  • Feature removal: several deprecated features have been removed:
    • mkvmerge: the deprecated options --identify-verbose (and its counterpart -I), --identify-for-gui, --identify-for-mmg and --identification-format verbose-text
    • support for the deprecated, old, proprietary format used for option files
    • support for passing command line options via the deprecated environment variables MKVTOOLNIX_OPTIONS, MKVEXTRACT_OPTIONS, MKVINFO_OPTIONS, MKVMERGE_OPTIONS and MKVPROPEDIT_OPTIONS
  • mkvinfo: most of its code was re-written in order to lay the groundwork for including its functionality in MKVToolNix GUI but with more features than the existing mkvinfo GUI. Changes include but aren’t limited to:
    • Several element names are a bit clearer (e.g. Maximum cache instead of MaxCache).
    • All timestamps and durations are now output as nanoseconds in formatted form (e.g. 01:23:45.67890123). All additional formats (e.g. floating point numbers output in seconds or milliseconds) were removed.
    • Element names for chapters and tags are now translated if a translation is available.
    • Elements located in wrong positions within the Matroska document are handled better.

How to Install MKVToolNix 20.0.0 in Ubuntu:

The official apt repository offers the latest packages for Ubuntu 16.04, Ubuntu 17.04, Ubuntu 17.10 so far.

Open terminal via Ctrl+Alt+T or by searching it from app launcher. When it opens, do following steps:

1. Run command to add the repository:

sudo sh -c 'echo "deb https://mkvtoolnix.download/ubuntu/ $(lsb_release -sc) main" >> /etc/apt/sources.list.d/bunkus.org.list'

Replace $(lsb_release -sc) with xenial for Linux Mint 18.x. And input your password (no visual feedback while typing) when it prompts and hit Enter.

2. Then install the key:

wget -q -O - https://mkvtoolnix.download/gpg-pub-moritzbunkus.txt | sudo apt-key add -

3. Finally either upgrade the software via Software Updater (Update Manager):

or run command to install the software packages:

sudo apt-get update

sudo apt-get install mkvtoolnix mkvtoolnix-gui

Uninstall:

To remove the repository, launch Software & Updates utility and navigate to Other Software tab.

To remove MKVToolNix, use Synaptic Package Manager or run following command:

sudo apt-get remove --autoremove mkvtoolnix mkvtoolnix-gui

Kxstitch cross stitch

KXStitch 2.1.0, free and open-source cross stitch pattern software, was released a day ago. Here’s how to install it in Ubuntu via PPA.

KXStitch is a cross stitch pattern editor by KDE. The software features:

  • Importing images
  • Multiple floss palettes
  • Multiple stitch types
  • Pattern libraries
  • Reads PCStitch files
  • Flexible printing options

The latest KXStitch 2.1.0 was released silently. No announcement, no changelog. If you want to know what changed, look over the project commits on github page.

KX Stitch PPA for Ubuntu

How to Install KXStitch 2.1.0 in Ubuntu:

For Ubuntu 16.04, Ubuntu 17.10, Ubuntu 18.04 users, it can be easily installed via the unofficial PPA.

1. Open terminal either via Ctrl+Alt+T or by searching for ‘terminal’ from app launcher. When it opens, run command:

sudo add-apt-repository ppa:ubuntuhandbook1/kxstitch

Input your password (no visual feedback while typing) when it prompts and hit Enter to add the PPA.

2. Then check updates and install the software either via Synaptic Package Manager or by running commands:

sudo apt-get update

sudo apt-get install kxstitch

Uninstall:

To remove KXStitch cross stitch software, either use Synaptic or run command in terminal:

sudo apt-get remove --autoremove kxstitch

The PPA can be removed via “Software & Updates” utility under “Other Software” tab.

uGet download manager

uGet download manager has reached the new stable 2.2 release series. The new release features ability to download from Youtube.

“uGet respects the YouTube Policies so depending on the individual settings of a video it may not be possible to download video from YouTube. The vast majority of videos will be available for use in uGet. The reason this was done instead of using something youtube-dl is because this method allows uGet for Android to also download YouTube videos as well as not have to worry about the ever changing APIs of YouTube that consistently break alternative methods of downloading.” uGet team announced.

The “uGet Chrome Wrapper” browser extension is compatible with Firefox, Chromium, Google Chrome, Opera, and Vivaldi. It will be renamed in the near future to better reflect the functionality.

uGet 2.2.0 features:

  • Support for downloading from YouTube
  • Support for downloading from MEGA
  • Batch Downloading up to 3 Wildcard Ranges
  • Better support for Wayland
  • New Browser Extension: uGet Chrome Wrapper

How to Install uGet 2.2.0 in Ubuntu:

The new release has been made into uGet Stable PPA, available for Ubuntu 14.04, Ubuntu 16.04, Ubuntu 17.10, and Ubuntu 18.04.

1. Open terminal via Ctrl+Alt+T or from app launcher, and then run command to add the PPA:

sudo add-apt-repository ppa:plushuang-tw/uget-stable

Input your password (no visual feedback while typing) when it prompts and hit Enter.

uGet Stable PPA

2. Then upgrade the download manager from an existing release via Software Updater:

or you can run following 2 commands to check updates and install / upgrade uGet:

sudo apt-get update 

sudo apt-get install uget

How to Remove:

Run following command in terminal will remove the PPA and also downgrade to the stock version of uGet in your Ubuntu system:

sudo apt-get install ppa-purge && sudo ppa-purge ppa:plushuang-tw/uget-stable

If you want to remove uGet download manager, simply search for and remove it via “Ubuntu Software” utility.

Heard about Meltdown and Spectre, two severe hardware bugs that affect billions of devices?

Besides updating the Ubuntu Kernel via “Software Updater”, Intel has released an update processor microcode patch for Linux based operating systems to address the security vulnerabilities.

The patch has been made into Ubuntu repository. So FOLLOWING STEPS IS NOT REQUIRED any more!

Just update your system via Software Updater. Then launch Software & Updates -> Additional Drivers, and mark the line “Using Processor microcode firmware for Intel CPUs from intel-microcode” for installation if it’s not used.

1. Download the Intel Processor patch from the link below:

Intel Processor Micorcode Data File (.tgz)

Extract the file and you’ll get a new file folder with microcode.dat and intel-ucode directory.

2. To install the patch, open terminal via Ctrl+Alt+T or by searching for “terminal” from application launcher. When it opens, run command:

sudo cp -r ~/Downloads/microcode-*/intel-ucode /lib/firmware/

Then run:

sudo -i && echo 1 > /sys/devices/system/cpu/microcode/reload

Finally you need to reboot your machine to apply changes.

FileZilla Client 3.30.0 Released, How to Install

Last updated: January 9, 2018

FileZilla FTP Client

The FileZilla ftp client reached the 3.30.0 release a day ago with two new features and a few bug-fixes. Here’s how to install it in Ubuntu 16.04, Ubuntu 17.04, Ubuntu 17.10.

Changes in Filezilla 3.30.0 include:

  • In the search dialog local files can now be deleted or opened
  • The root node in the remote directory tree is now expanded by default
  • Fix uploading from search dialog
  • Fix formatting of filename in rename dialog
  • Fix Windows installer crash if an update installation is started with the updated version having been installed
  • Add additional logging if autoupdate mechanism fails

How to Install Filezilla 3.30.0 in Ubuntu:

So far the only to install the latest Filezilla client in Ubuntu is using the Flatpak package. And following steps will tell you how:

1. Open terminal via Ctrl+Alt+T or by searching for ‘terminal’ from app launcher. When it opens, do:

  • Run command to add the flatpak PPA:
    sudo add-apt-repository ppa:alexlarsson/flatpak

    Input your password (no visual feedback) when it prompts and hit Enter to continue.

  • Then run commands one by one to get the latest flatpak daemon:
    sudo apt-get update
    
    sudo apt-get install flatpak

2. After installed Flatpak, run following single command to install FileZilla client along with required Gnome platform.

flatpak install --from https://flathub.org/repo/appstream/org.filezillaproject.Filezilla.flatpakref

Uninstall:

To remove Filezilla installed via flatpak, run command:

flatpak uninstall org.filezillaproject.Filezilla

To remove flatpak, run command:

sudo apt-get remove --autoremove flatpak

To remove the PPA, open “Software & Updates” utility and navigate to “Other Software” tab.

This is quick tutorial shows you how to prevent Ubuntu desktop from being automatic turned off (or locked up) while you’re watching videos.

Although the “System Settings” utility offers “Power” page to change screen dimming, blank screen inactive time, etc, it will be convenient to have a panel indicator applet to toggle the settings.

And Caffeine shows an applet in system tray area allows to temporarily prevent the activation of both the screensaver and the “sleep” powersaving mode.

To install Caffeine in Unity or Other Desktops:

For non-Gnome users in Ubuntu 16.04, Ubuntu 17.10, and higher, just search for and install “caffeine” in Ubuntu Software:

Once installed, you can launch it from app launcher or let it launch automatically in next login.

To install Caffeine extension in Gnome Shell:

For Gnome Desktop, there’s an Caffeine extension available for install.

You can follow this tutorial to install the extension. Since Ubuntu 17.10 artful you can search for and install the extension via Ubuntu Software:

skip caffeine for xscreensaver which it not updated for a lone time.

Once installed, you should see the applet in system tray. And you can manage gnome extensions via “Gnome Tweaks” utility (Install it via Ubuntu Software if you don’t have it).

Sayonara, a Qt music player aims to be intuitive, easy usablility, and organizes even big music collections, reached the 1.0 release a few days ago.

Changes in Sayonara 1.0 include:

  • Choose covers between Google, Discogs and Last.fm servers.
  • Cover view: Reload covers, zoom and sorting
  • Multiple library support for Directories, Library.
  • Move/Copy/Rename operations and show Song info in Directories.
  • Removed date filter support
  • Add “Clear selection” button
  • Ability to choose system icons
  • Fast preference access
  • Lyric server updates
  • Removed MTP device support
  • Moved load/save to playlist tabs instead of plugin
  • Added proxy support
  • Set custom paths for stream recorder.
  • Added preferences options for Streams/Podcast

How to Install Sayonara 1.0 in Ubuntu:

To install the latest Sayonara 0.9.1 in Ubuntu 16.04, Ubuntu 17.04, Ubuntu 17.10, and their derivatives, do:

1. Open terminal (Ctrl+Alt+T) and add the official Sayonara PPA:

sudo add-apt-repository ppa:lucioc/sayonara

sayonara-player-ppa

2. Update and install the player via commands:

sudo apt update

sudo apt install sayonara

For those who don’t want to add PPA, grab .deb package from the PPA file archive.

3. (Optional) If you dislike the player, simply remove it via command:

sudo apt remove sayonara && sudo apt autoremove

And the PPA can be removed via Software & Updates utility under Other Software tab.