Archives For Howtos

Turpial 3 PPA

Turpial Twitter client 3.0 now is available in PPA for Ubuntu 13.10 Saucy and Linux Mint 16 Petra.

Turpial 3.0 was released on December 19, 2013, two years after the last stable release. Main features in this release include:

  • New backend on top of libturpial
  • Rewrite of the whole interface using Qt
  • Multiple accounts and multiple columns
  • Pre-visualization of images and user avatars
  • Messages queue
  • Added support for Mac OS (and Windows theoretically)
  • Broadcasting messages
  • Autologin
  • Cleaned and improved overall UI
  • Improved user interaction
  • Links, mentions and hashtags are clickable
  • Enhanced Twitter search
  • More services to short URLs and upload pictures
  • Improved conversation interface
  • Welcome screen
  • Restored window geometry at startup
  • Available in 11 languages: Catalan, German, Esperanto, Spanish, French, Italian, Japanese, Portuguese (Brazil), Portuguese (Portugal), Russian (Russia) and Turkish

turpial 3.0 in Ubuntu

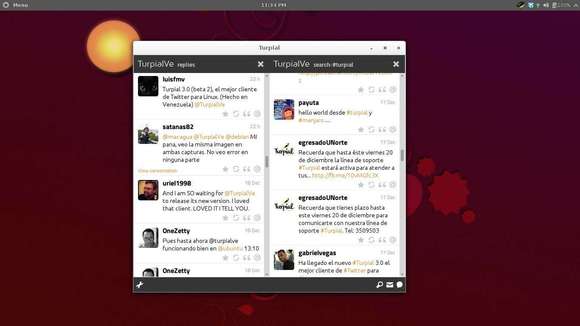
The Turpial website has announced a few hours ago that the Turpial’s PPA is back and so far it supports Ubuntu 13.10 Saucy.

To add the PPA, press Ctrl+Alt+T to open terminal and run:

sudo add-apt-repository ppa:effie-jayx/turpial

Then update and install the client:

sudo apt-get update

sudo apt-get install turpial

via: turpial.org.ve

rekonq 2.4.2 ppa

Rekonq is a web browser for KDE based on WebKit. Rekonq 2.4.2 has been released recently and here’s how to install it in Ubuntu, Linux Mint and their derivatives while the Kubuntu Backports PPA still has version 2.3.2.

Recently changes in rekonq:

rekonq 2.4.2

  • clear urlbar action added
  • global zoom settings added
  • faster suggestions in the urlbar
  • work around favicons
  • default tab width changed
  • doc update
  • bugfixes

rekonq 2.4.0:

  • added a simple ssh sync handler
  • adblock improvements
  • work on startup settings: load important things before, UI and then last things in the background

Install Rekonq:

Press Ctrl+Alt+T on keyboard to open terminal. When it opens, run below command to add the PPA for Ubuntu 14.04, Ubuntu 13.10, Ubuntu 13.04, Ubuntu 12.10, Ubuntu 12.04:

sudo add-apt-repository ppa:ubuntuhandbook1/apps

Ubuntu 12.04 and Ubuntu 12.10 users also need the KUbuntu Backports PPA:

sudo add-apt-repository ppa:kubuntu-ppa/backports

Finally update and install the browser:

sudo apt-get update; sudo apt-get install rekonq

rekonq web browser

G'MIC for Gimp

The G’MIC plug-in for GIMP proposes a set of various filters to apply on your images, including artistic effects, image denoising and enhancement algorithms, 3D renderers, etc. It is a quite large plug-in, integrating a lot of different effects.

This plug-in is able to :

  • Propose an image preview window for each available filter.
  • Manage multi-layers inputs and outputs. G’MIC defines filters to compose layers or create animations from static images.
  • Update his list of filter definitions from the Internet, so it is able to improve itself over time.
  • Allow any user to add its own custom filters in it, written in the G’MIC language interpreted by the internal image processing engine.

Install G'MIC plugin for Gimp

Install G’MIC Plugin in Ubuntu:

Thanks to Otto Meier, the GIMP PPA maintainer has built this plugin and standalone app into PPA, available for Ubuntu 14.04, Ubuntu 13.10, Ubuntu 13.04, Ubuntu 12.10, Ubuntu 12.04, Linux Mint and their derivatives.

To get started installing it, press Ctrl+Alt+T on keyboard to open terminal. When it opens, run command to add the PPA:

sudo add-apt-repository ppa:otto-kesselgulasch/gimp

After that, checking for updates via:

sudo apt-get update

Install the plugin for Gimp:

sudo apt-get install gimp-gmic

Once done, you can access the plugin from gimp menu Filters -> G’MIC….

You can also install the standalone (command line) app via:

sudo apt-get install gmic

Get help from its man page.

hugin 2014 in Ubuntu

Hugin is an easy to use panoramic imaging toolchain based on Panorama Tools. With Hugin you can assemble a mosaic of photographs into a complete immersive panorama, stitch any series of overlapping pictures and much more.

The first beta of Hugin 2014 has been released. Here’s how to install it in Ubuntu 13.10, Ubuntu 13.04, Ubuntu 12.10, Ubuntu 12.04, Linux Mint and their derivatives.

What’s New in Hugin 2014.0:

  • inherit many of the libpano improvements (of version 2.9.19)
  • the translation plane variables Tpy and Tpp have been added to the GUI (better support for translation parameters, e.g. for nadir images. A pano with translation parameters can now be rotated)
  • improvement of the GPU remapping code (bug fixes in the glue code, added some missing GPU transformations. Now fisheye lenses are supported by GPU code as well)
  • better support for line control point in Control points tab (it still requires that the same image is displayed left and right for full features, but also better support for line control points above several images)
  • obsolete programs matchpoint, nona_gui and PTBatcher have been removed
  • outdated translations have been removed from the default install
  • initialize the colour balance values during loading with EXIF values (this information is only stored and decoded by some cameras (mainly models by Panasonic, Pentax, Olympus, Nikon))
  • improved the assistant
  • allow customization of exiftool command used to copy metadata to output images

New tools added:

  • pto_mask: manipulate mask in project file
  • pto_template: apply template to project file
  • pto_move: move or copy project files with all associated images

Install Hugin:

The current stable version is available in Ubuntu universe repository, just search for and install it in Ubuntu Software Center.

If you’d like to try the Hugin 2014.0 beta, press Ctrl+Alt+T on keyboard to open terminal. When it opens run below commands one by one:

sudo add-apt-repository ppa:hugin/next

sudo apt-get update

sudo apt-get install hugin

Install Hugin 2014 ubuntu ppa

Hugin Homepage

mkvmerge gui ppa

mkvmerge GUI has been updated to version 6.7 recently with enhancements and various bug fixes. This simple tutorial shows you how to install or upgrade it in Ubuntu 13.10, Ubuntu 13.04, Ubuntu 12.10, Ubuntu 12.04 from its official repository.

Changes in mkvmerge GUI:

  • fixed faulty timing informations for H264/AVC
  • fixed mapping of MKV elements
  • support for muxing OPUS/WEBM
  • reading of DTS audio tracks for MP4 video files
  • improved AAC, AC3 and MP3 header decoding
  • enhanced reading of uncompressed PCM audio tracks from QUICKTIME and MP4
  • See the release note for details.

mkvmerge gui ppa

How to Install mkvmerge:

Press Ctrl+Alt+T on keyboard to open terminal. When it opens, run commands below one by one to install the tool:

sudo add-apt-repository "deb http://www.bunkus.org/ubuntu/saucy/ ./"

wget -O - http://www.bunkus.org/gpg-pub-moritzbunkus.txt | sudo apt-key add -

sudo apt-get update

sudo apt-get install mkvtoolnix mkvtoolnix-gui

You may replace saucy for Ubuntu 13.10 with raring for Ubuntu 13.04, quantal for Ubuntu 12.10, or precise for Ubuntu 12.04.

For those who hate Linux commands:

1. go to this page

2. select your Ubuntu editon -> binary

3. Choose your system type amd64 (64-bit) or i386 (32-bit). Check it out in System Settings -> Details.

4 Download and install the latest .deb package.

HP printers in Linux

HPLIP, an HP-developed solution for printing, scanning, and faxing with HP inkjet and laser based printers in Linux now is at version 3.14.1. This release mainly fixed two security fixes and added digital signature validation in upgrade feature.

As you may know, HPLIP is free, open source software distributed under the MIT, BSD, and GPL license. provides printing support for 2,295 printer models, including Deskjet, Officejet, Photosmart, PSC (Print Scan Copy), Business Inkjet, LaserJet, Edgeline MFP, and LaserJet MFP. (Note: Not all models are currently supported. See Supported Printers for more information.)

HPLIP 3.14.1 fixed below issues:

  • CVE-2013-6427: hplip: insecure auto update feature
  • CVE-2013-6402: hplip: insecure temporary file handling in pkit.py

Download & Install HPLIP:

1. Download the .run file from sourceforge page.

2. Right-click on the file and go to its Properties window, under Permissions tab check the box “Allow executing file as program”

allow hpip executable

3. Press Ctrl+Alt+T on keyboard to open terminal. When it opens run below command to start the installer:

./Downloads/hplip-3.14.1.run

Answer the questions and you’ll finally get the latest version of HPLIP installed on your system.

Linux Kernel 3.10.26 LTS

The Long Term Support Linux Kernel 3.10 series now is at the 26th update. Greg Kroah-Hartman announced this release on January 9 and urged users of this Kernel series to upgrade as soon as possible.

The Kernel 3.10.26 brings various improvements to ARM, PowerPC and x86 architectures, several improvements to the EXT4, GFS2, Ceph and JBD filesystems, and updated drivers, including USB, wireless, i915, Radeon. See the Changelog

Install / Upgrade Kernel 3.10.26:

The Ubuntu Kernel Team has made the Deb packages which are available in this page. If you’re comfortable with command line, follow the below steps to download & install them.

1. Press Ctrl+Alt+T on keyboard to open terminal and run commands below one by one to download Kernel Debs:

For 32 bit system:

cd /tmp/ && wget http://kernel.ubuntu.com/~kernel-ppa/mainline/v3.10.26-saucy/linux-headers-3.10.26-031026-generic_3.10.26-031026.201401091635_i386.deb

wget http://kernel.ubuntu.com/~kernel-ppa/mainline/v3.10.26-saucy/linux-headers-3.10.26-031026_3.10.26-031026.201401091635_all.deb

wget http://kernel.ubuntu.com/~kernel-ppa/mainline/v3.10.26-saucy/linux-image-3.10.26-031026-generic_3.10.26-031026.201401091635_i386.deb

For 64 bit system:

cd /tmp/ && wget http://kernel.ubuntu.com/~kernel-ppa/mainline/v3.10.26-saucy/linux-headers-3.10.26-031026-generic_3.10.26-031026.201401091635_amd64.deb

wget http://kernel.ubuntu.com/~kernel-ppa/mainline/v3.10.26-saucy/linux-headers-3.10.26-031026_3.10.26-031026.201401091635_all.deb

wget http://kernel.ubuntu.com/~kernel-ppa/mainline/v3.10.26-saucy/linux-image-3.10.26-031026-generic_3.10.26-031026.201401091635_amd64.deb

2. Install the Kernel:

cd /tmp/ && sudo dpkg -i linux-headers-3.10.26-*.deb linux-image-3.10.26-*.deb

Restart your computer and done.

If you’re using a proprietary video driver, you may need to re-build or re-install to get it work with the new kernel.

If for some reason this kernel release doesn’t work properly for you, reboot into previous kernel (Grub -> Advanced -> select previous kernel) and run commands to remove Linux Kernel 3.10.26:

sudo apt-get remove linux-headers-3.10.26-* linux-image-3.10.26-*

Linux Kernel 3.12.7

The latest Linux Kernel 3.12.7 has been announced a few hours ago. According the to changlog, Kernel 3.12.7 brings various improvements to ARM, PowerPC and x86 architectures, several improvements to the EXT4, GFS2, Ceph, JBD and CIFS filesystems, some sound and core enhancements, as well as numerous updated drivers, including USB, wireless, i915, Radeon, and more. See the changelog

This simple tutorial is going to show you how to install or upgrade to this kernel release in Ubuntu 13.10, Ubuntu 13.04, Ubuntu 12.10, Ubuntu 12.04, Linux Mint and their derivatives.

Install / Upgrade Kernel 3.12.7:

Ubuntu Kernel Team has made the DEB packages available in this page. If you’re comfortable with command line, follow below steps to download & install them.

1. Download the Kernel Debs:

For 32 bit system, open terminal by Ctrl+Alt+T and run below commands:

cd /tmp/ && wget http://kernel.ubuntu.com/~kernel-ppa/mainline/v3.12.7-trusty/linux-headers-3.12.7-031207-generic_3.12.7-031207.201401091657_i386.deb

wget http://kernel.ubuntu.com/~kernel-ppa/mainline/v3.12.7-trusty/linux-headers-3.12.7-031207_3.12.7-031207.201401091657_all.deb

wget http://kernel.ubuntu.com/~kernel-ppa/mainline/v3.12.7-trusty/linux-image-3.12.7-031207-generic_3.12.7-031207.201401091657_i386.deb

For 64 bit system:

cd /tmp/ && wget http://kernel.ubuntu.com/~kernel-ppa/mainline/v3.12.7-trusty/linux-headers-3.12.7-031207-generic_3.12.7-031207.201401091657_amd64.deb

wget http://kernel.ubuntu.com/~kernel-ppa/mainline/v3.12.7-trusty/linux-headers-3.12.7-031207_3.12.7-031207.201401091657_all.deb

wget http://kernel.ubuntu.com/~kernel-ppa/mainline/v3.12.7-trusty/linux-image-3.12.7-031207-generic_3.12.7-031207.201401091657_amd64.deb

2. Install the DEBs:

cd /tmp/ && sudo dpkg -i linux-headers-3.12.7-*.deb linux-image-3.12.7-*.deb

Restart your computer and done.

If you’re using a proprietary video driver, you may need to re-build or re-install to get it work with the new kernel.

If for some reason this kernel release doesn’t work properly for you, reboot into previous kernel (Grub -> Advanced -> select previous kernel) and run commands to remove Linux Kernel 3.12.7:

sudo apt-get remove linux-headers-3.12.7-* linux-image-3.12.7-*

Install Sailfish OS SDK

This simple tutorial is going to show you how to install Jolla’s Sailfish OS SDK on Ubuntu and other Linux Distributions.

Jolla has announced a graphical installer for Windows, Linux and Mac OS. It’s easy to install it on Linux systems, all you need to do is download the installer and start it in terminal.

Common pre-requisites:

1. Make sure you have Oracle VirtualBox 4.1.18+ installed. Ubuntu 13.04 and higher can installed it from Ubuntu Software Center. For Ubuntu 12.04, please download the latest version from virtualbox.org.

2. About 5GB of free disk space is required.

3. 4GB of RAM or more is recommended.

Download & Install:

1. Download the SDK for Linux from Sailfish OS official site.

If you don’t know which OS type you’re on. Press Ctrl+Alt+T on keyboard to open terminal, and run command below:

getconf LONG_BIT

2. Once downloaded, you have to give executable permission to the .run file by:

chmod +x ~/Downloads/SailfishOSSDK-*-offline.run

3. Start the installer by:

./Downloads/SailfishOSSDK-*-offline.run

In step 2 & 3 you may change the installer name to yours.

4. Follow the install wizard.

Sailfish OS SDK install wizard

When done, you’re able to launch SailfishOS IDE from Menu or Dash:

Sailfish OS IDE

audacious 3.4.3 Ubuntu

Audacious, the default audio player in Lubuntu and in Ubuntu Studio now is at version 3.4.3, which brings two important bug fixes and translation updates.

As you may know Audacious is an advanced music player with a focus on low resource usage, high audio quality, and support for a wide range of audio formats.

Audacious has below features (more about audacious at wikipedia):

  • built-in gapless playback
  • support for a wide range of audio formats
  • various plugins
  • support for Winamp 2 skins
  • accepts connections from client software, such as Conky.

The new release Audacious 3.4.3 mainly fixed below bugs:

  • Opus files are missed when opening folder (#364)
  • Exporting as cue-file produces segmentation fault (#371)

Audacious Music Player

Install Audacious:

For Ubuntu and its derivatives, we can install audacious from PPA. Supports Ubuntu 14.04, Ubuntu 13.10, Ubuntu 13.04, Ubuntu 12.10, Ubuntu 12.04.

To get started, press Ctrl+Alt+T on keyboard to open terminal. When it opens, run commands below one by one:

sudo add-apt-repository ppa:nilarimogard/webupd8

sudo apt-get update

sudo apt-get install adacious