Archives For News

Free open-source software updates and Linux news

Geary is a free and open-source email client formerly developed by Yorba. Now, it’s a community maintained app for GNOME Desktop.

The source code of the email client is available in this Gitlab page. And, features include:

  • Quick email account setup
  • Shows related messages together in conversations
  • Fast, full text and keyword search
  • Full-featured HTML and plain text message composer
  • Desktop notification of new mail
  • Compatible with GMail, Yahoo! Mail, Outlook.com and other IMAP servers

The graphical interface of this app is a little bit lag behind, since GNOME is porting to GTK4 plus Libadwaita, though it’s still working good. And, users can install it in all current Ubuntu releases, through either Deb package or Flatpak package.

How to Install Geary in Ubuntu:

Option 1: Deb package

For those who prefer the native .deb package format, Geary is available in system repository, though it’s a bit old.

To install it, simply press Ctrl+Alt+T on keyboard to open terminal. Then run commands below one by one:

sudo apt update
sudo apt install geary

Option 2: Flatpak package

If you want the most recent version, then it’s available to install as Flatpak package which runs in sandbox environment, and can be installed in most Linux.

Linux Mint 21+ and Fedora 38/39+ can directly search for and install the package from either Software Manager or GNOME Software.

While Ubuntu users can install the Flatpak by running 2 commands below one by one in terminal (Ctrl+ALt+T):

  • First, enable Flatpak support:
    sudo apt install flatpak
  • Then, run command to install the email client as Flatpak package:
    flatpak install https://dl.flathub.org/repo/appstream/org.gnome.Geary.flatpakref

  • For future updates, use command to update it:
    flatpak update org.gnome.Geary

NOTE: If you’re first time installing an app as Flatpak package, then you may need to log out and back in for the app icon visible in start menu or Gnome ‘Show Apps’ screen.

Uninstall Geary:

To remove Geary email client, simply run command in terminal:

sudo apt-get remove --autoremove geary

For the Flatpak package, use this command instead to uninstall:

flatpak uninstall --delete-data org.gnome.Geary

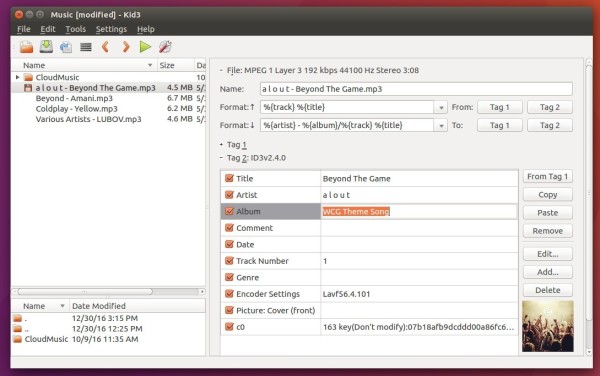
Kid3 audio tag editor 3.6.1 was released earlier today. Here’s how to install it in Ubuntu 18.04, Ubuntu 17.10, Ubuntu 16.04, and/or Ubuntu 14.04.

This bugfix release improves the speed when saving with a lot of unchanged files in the directory. It fixes wrong parsing of the xid atom when using the Mp4v2Metadata plugin, scrolling to the opened file when using a custom sort order in the file list and avoids changing the file name extension when setting file names from the tags.

Kid3 3.6.1 changelog:

  • Faster saving when many files are unchanged.
  • Do not change file extension when creating file name from tags.
  • Support for cross building.
  • Fix parsing of xid atom with Mp4v2Metadata plugin.
  • Scroll to opened file after sorting file list.
  • Avoid recursion when automatically applying format.

Kid3 Audio Tagger

How to Install Kid3 3.6.1 in Ubuntu:

The developer maintains a PPA repository with the latest packages for all current Ubuntu releases.

1. Open terminal either via Ctrl+Alt+T or by searching for ‘terminal’ from app launcher. When it opens, run command to add the PPA:

sudo add-apt-repository ppa:ufleisch/kid3

Type in your password (no visual feedback while typing) when it asks and hit Enter to continue.

Kid3 PPA

2. Then run following commands to install or upgrade the audio editor:

sudo apt update 

sudo apt install kid3-qt

For KDE users, replace kid3-qt in the last command with kid3 for better integration.

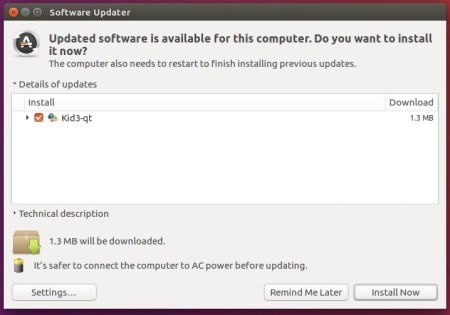
To upgrade Kid3 from an existing release, simply install the updates via Software Updater:

upgrade kid3 via software updater

Uninstall:

To remove the PPA, launch Software & Updates and navigate to ‘Other Software’ tab.

To remove Kid3 tag editor, either use system package manger or run command:

sudo apt-get remove --autoremove kid3 kid3-*

The first bug-fix release of IntelliJ IDEA 2018.1 was released a few days ago with several important and critical bug-fixes.

IntelliJ IDEA 2018.1.1 includes following fixes:

  • An important fix that restores the automatic check for updates.
  • The keystrokes aren’t lost during freezing anymore
  • Clicking the Replace all option from the Replace in path dialog doesn’t cause the IDE to freeze
  • Issue with broken JPS that inhibits all non-gradle Android builds
  • Facet settings stored externally are now loaded by the build process
  • support for annotationProcessorPaths option in the maven-compiler-plugin 3.5 for external dependencies.
  • Performance for scrolling huge text file on 4K monitors was improved
  • The issue with AWT popups, which were above other process windows after alt-tab, was fixed

Install IntelliJ IDEA 2018.1.1 in Ubuntu:

Jetbrains offers official snap packages for Ubuntu Linux users. You can install it in Ubuntu 16.04, Ubuntu 17.10, Ubuntu 18.04 via following steps.

1. (Ubuntu 16.04 only) For those who never installed a snap package, open terminal (Ctrl+Alt+T) and run command to install snapd daemon:

sudo apt-get install snapd snapd-xdg-open

No visual feedback while typing your password due to security reason.

2. Then you can search for and install IDEA via Ubuntu Software:

Or run command in terminal instead to install the IDE:

snap install intellij-idea-community --classic

For the ultimate edition, replace intellij-idea-community with intellij-idea-ultimate in the code.

Free and open-source scorewriter MuseScore 2.2.1 was released a few days ago. Now it’s available in the PPA repository for Ubuntu 18.04, Ubuntu 17.10, Ubuntu 16.04, Ubuntu 14.04.

MuseScore has an stable PPA repository, which was not updated for almost a year due to outdated dependency libraries in Ubuntu 16.04 since version 2.1.0. Now the PPA is active again with the latest 2.2.1 packages for all current Ubuntu releases.

1. To add the PPA, open terminal either via Ctrl+Alt+T or by searching for ‘terminal’ from app launcher. When it opens, run command:

sudo add-apt-repository ppa:mscore-ubuntu/mscore-stable

Input your password (no visual feedback while typing) when it prompts and hit Enter to continue.

2. Then upgrade MuseScore from an existing release via Software Updater (Update Manager):

or simply run commands one by one in terminal to install or upgrade the scorewriter:

sudo apt-get update

sudo apt-get install musescore

Uninstall MuseScore:

To uninstall the software, open terminal and run command:

sudo apt-get remove --autoremove musescore

And you can remove PPA repositories by launching Software & Updates and navigating to “Other Software” tab.

Flight Simulator FlightGear 2018.1 Released

Last updated: April 7, 2018

The open-source flight simulator FlightGear 2018.1 now is available for download.

Changes in FlightGear 2018.1 “Honolulu” include:

  • Improved “Classic theme” with better fonts and colours
  • Canvas MapStructure support for SlippyMaps, including VFRCharts, STAMEN,
  • Various improvements to the Launcher
  • Atmospheric Light Scattering renderer: extra volumetric vegetation layers for denser undergrowth
  • Active Volcanos, including Kilauea, Stromboli, Etna,
  • CH Products Throttle Quadrant supported out-of-the-box.
  • Improved support for add-ons
  • And many other changes

flightgear flight simulator 2.12 ubuntu

Download / Install FlightGear 2018.1:

Source tarball, Windows and Mac OS packages are available for download at the link below:

Download FlightGear

For Ubuntu Linux, there’s a PPA repository (check the link before doing following steps) and the new release packages should be available in few days.

1. To add the PPA repository, open terminal either via Ctrl+Alt+T or by searching for ‘terminal’ from app launcher. When it opens, run command:

sudo add-apt-repository ppa:saiarcot895/flightgear

Input your password (no visual feedback while typing due to security reason) and hit Enter.

2. Then you can upgrade FlightGear via Software Updater (may not work on Ubuntu 16.04 due to version system change) once it’s published in the PPA repository.

Or install it for the first time via commands:

sudo apt-get update

sudo apt-get install flightgear

Uninstall:

To uninstall FlightGear, simply run following command in terminal:

sudo apt-get remove --autoremove flightgear

And remove the PPA by launching “Software & Updates” utility and navigating to Other Software tab.

Ubuntu 18.04

The final beta of Ubuntu 18.04 Bionic Beaver LTS (Long Term Support) was released a few hours ago.

Ubuntu 18.04 Beta 2 features iso images for Ubuntu Desktop, Server, and Cloud products. Also Kubuntu, Lubuntu, Ubuntu Budgie, Ubuntu Kylin, Ubuntu MATE, Ubuntu Studio, and Xubuntu images are available.

The beta includes updated versions of most of core set of packages, including a current 4.15 kernel, and much more. And the final release of Ubuntu 18.04 will be available on April 26.

Download Ubuntu 18.04 Beta2

Notable hanges in Kubuntu 18.04 since the last LTS:

  • Replace Dragonplayer with VLC as default media player.
  • Muon package manager is shipped by default once again.
  • Replace Amarok with Cantata Qt5 as default music player.
  • Drop Telepathy instant messaging client from the defaults.

Notable changes in Xubuntu 18.04 include:

  • Removed the GTK Theme Configuration tool
  • Replaced the Sound Indicator with the Xfce PulseAudio Plugin.
  • Replaced Application indicator with Status Notifier Plugin
  • Replace some desktop applications: Evince -> Atril, File Roller -> Engrampa, GNOME Calculator -> MATE Calculator.

Changes in Ubuntu MATE 18.04 include:

  • MATE desktop 1.20
  • Uses Indicators by default in all layouts.
  • Brisk Menu switches to a dash-style launcher for Mutiny or Cupertino layout.
  • Minimal installation support and more and more other changes.
  • New and updated desktop layouts
  • The xcursor themes have been replaced with new cursours from MATE upstream

Changes in Ubuntu Budgie 18.04 Beta2 include:

  • Introduce Window Shuffler – a brand-new GUI and keyboard based grid tiling
  • Weather Applet now is working again.
  • Budgie Welcome has had a whole series of changes

Notable changes in Ubuntu Studio 18.04 Beta 2 include:

  • Add an option to Ubuntu Studio Controls to set the CPU governor to performance mode
  • Removed zynjacku as this is no longer maintained software
  • Updated versions of main multimedia packages

The beta images for other flavors: Ubuntu Kylin 18.04, LUbuntu 18.04.

Pragha music player 1.3.91 was released earlier today as the second beta of the next Pragha 1.4.

The 1.3.91 release of the lightweight music player (formerly known as Consonance) features:

  • New Koel plugin that allow play music from this service.
  • Implements cache purge limited by size. 1GB by default.
  • Add option to “Add and Play” from library view.
  • Allows reordering the columns of the playlists.
  • New panel on info plugin that show recomendations from Lastfm.
  • Use custom name for the panel icons.
  • Add a symbolic icon for panel. Not used by default.
  • Add “Search” hint to search entry.
  • And various bug-fixes. See here for details.

Pragha Music Player in Elementary OS Freya

How to Install Pragha 1.3.91 in Ubuntu 18.04, 16.04, 17.10:

While the project page provides only source tarball, you can easily install Pragha music player via an unofficial PPA in Ubuntu 16.04, Ubuntu 18.04, and Ubuntu 17.10.

1. Open terminal via Ctrl+Alt+T or from app launcher. When it opens, run command to add the PPA:

sudo add-apt-repository ppa:ubuntuhandbook1/pragha

Input your password (no visual feedback while typing due to security reason) and hit Enter.

2. Then install the music player either via Synaptic Package Manager or by running commands:

sudo apt-get update

sudo apt-get install pragha

Remove Pragha:

To remove the music player, either use Synaptic Package Manager or by running command:

sudo apt-get remove --autoremove pragha

And you can remove the PPA via Software & Updates utility under ‘Other Software’ tab.

Music notation software MuseScore 2.2.1 was released a day ago with some fixes to the last 2.2 release.

MuseScore 2.2.1 release highlights:

  • Fix messed playback in the score
  • Fix a regression playback slow to engage, when starting playback too quickly after load score
  • Fix a regression MIDI fixup for overlapping note shouldn’t kick in for different midi tracks
  • Fix that 2.0.x score gives synthesizer output artifact with new soundfont

How to Install MuseScore 2.2.1 in Ubuntu:

The single executable Appimage files to run MuseScore in Linux are available for download:

32-bit Appimage

64-bit Appimage

ARM-architectures

Download the appimage, make it executable and run the file to launch the free scorewriter:

MuseScore is also available as Snap, version 2.2.1 is not available at the moment, which can be easily installed via Ubuntu Software Center.

GnuCash

GnuCash, free and open-source accounting software, reached the 3.0 stable release series a few days ago.

GnuCash 3.0 now uses the Gtk+-3.0 toolkit and the WebKit2Gtk API. It also features:

  • New editors to remove outdated or incorrect match data from the import maps.
  • New user interface for managing files associated with transactions
  • Improved facility for removing old prices from the price database
  • Ability to remove deleted files from the history list in the file menu.
  • A new CSV importer largely rewritten in C++, adding new features including the ability to re-import CSV files exported from GnuCash, along with a separate CSV price importer.
  • A new preference panel for the Alphavantage API key
  • A Reconciliation Report based on the Transaction Report,a Income GST Report, and a Cashflow Barchart report.
  • And more and more other changes, see news page for details.

Download / Install GnuCash 3.0 in Ubuntu:

There’s no PPA repository contains GnuCash 3.0 package or updated snap package at the moment of writing, other than building it from the source tarball:

Download GnuCash

Linux Kernel

Linux Kernel 4.16 was released yesterday. Linus Torvalds announced in lkml.org:

So the take from final week of the 4.16 release looks a lot like rc7, in that about half of it is networking. If it wasn’t for that, it would all be very small and calm.

We had a number of fixes and cleanups elsewhere, but none of it made me go “uhhuh, better let this soak for another week”. And davem didn’t think the networking was a reason to delay the release, so I’m not.

End result: 4.16 is out, and the merge window for 4.17 is open and I’ll start doing pull requests tomorrow.

Outside of networking, most of the last week was various arch fixlets (powerpc, arm, x86, arm64), some driver fixes (mainly scsi and rdma) and misc other noise (documentation, vm, perf).

The appended shortlog gives an overview of the details (again, this is only the small stuff in the last week, if you want the full 4.16 changelog you’d better get the git tree and filter by your area of interest).

Linux Kernel 4.16 release highlights:

  • Spectre / Meltdown mitigation & other security updates.
  • L2 CDP support for L2 cache partitioning on Intel CPUs
  • Correct AMD Zen temperature reporting for the Ryzen Threadripper 1900X processor.
  • P-State driver support for Skylake X servers.
  • POWER memory protection keys support
  • Oracle DAX driver for SPARC co-processor
  • Jailhouse guest support for non-root users

How to Install Kernel 4.16 in Ubuntu:

Other than using a graphical tool UKUU to install the latest mainline kernel packages, following steps will tell you how to manually download and install it in all current Ubuntu releases.

The mainline kernels do not include any Ubuntu-provided drivers or patches. They are not supported and are not appropriate for production use.

The mainline kernel PPA has made the new kernel binaries for Ubuntu, available for download at the link below:

Download Kernel 4.16 (.deb)

Depends on your OS type, download and install the packages in turns:

  1. linux-headers-4.16.0-xxxxxx_all.deb
  2. linux-headers-4.16.0-xxx-generic(/lowlatency)_xxx_amd64(/i386).deb
  3. linux-image-4.16.0-xxx-generic(/lowlatency)_xxx_amd64(/i386).deb

Select generic for common system, and lowlatency for a low latency system (e.g. for recording audio), amd64 for 64bit system, i386 for 32bit system, or armhf, arm64, etc for other OS types.

To get the Kernel 4.16 from the command console, run the commands below one by one:

For 64-bit OS:

cd /tmp/

wget -c http://kernel.ubuntu.com/~kernel-ppa/mainline/v4.16/linux-headers-4.16.0-041600_4.16.0-041600.201804012230_all.deb

wget -c http://kernel.ubuntu.com/~kernel-ppa/mainline/v4.16/linux-headers-4.16.0-041600-generic_4.16.0-041600.201804012230_amd64.deb

wget -c http://kernel.ubuntu.com/~kernel-ppa/mainline/v4.16/linux-image-4.16.0-041600-generic_4.16.0-041600.201804012230_amd64.deb

sudo dpkg -i *.deb

for 32-bit OS:

cd /tmp/

wget -c http://kernel.ubuntu.com/~kernel-ppa/mainline/v4.16/linux-headers-4.16.0-041600_4.16.0-041600.201804012230_all.deb

wget -c http://kernel.ubuntu.com/~kernel-ppa/mainline/v4.16/linux-headers-4.16.0-041600-generic_4.16.0-041600.201804012230_i386.deb

wget -c http://kernel.ubuntu.com/~kernel-ppa/mainline/v4.16/linux-image-4.16.0-041600-generic_4.16.0-041600.201804012230_amd64.deb
sudo dpkg -i *.deb

After installed these .debs, restart and enjoy!

Uninstall Linux Kernel 4.16:

Start/restart your machine and select boot with the previous kernel in Grub2 -> Advanced menu. Then use Ubuntu Tweak, or other system tool to remove the Kernel 4.16, or you may see this how to remove old kernels tutorial.