Archives For November 30, 1999

Gnome Subtitles is a subtitle editor for the GNOME desktop (also works in Unity). It supports the most common text-based subtitle formats, video previewing, timings synchronization and subtitle translation.

Some supported subtitle formats are: Advanced Sub Station Alpha, FAB Subtitler, MicroDVD, Mplayer 1/2, MPSub, SubRip, SubViewer 1/2.

Gnome Subtitles

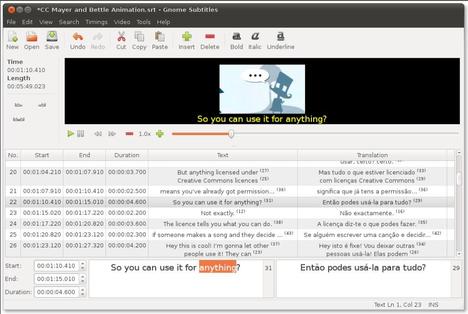
The latest version has reached 1.3 which allows to set the gap between subtitles, to be used when inserting or splitting subtitles. Also there are a lot of bug fixes and other improvements.

Install Gnome Subtitles 1.3 via PPA

For Ubuntu 13.04, Ubuntu 12.04, Ubuntu 12.10 and their derivatives, such as Linux Mint and Elementary OS. Press Ctrl+Alt+T and run below commands one by one in pop-up terminal:

sudo add-apt-repository ppa:pedrocastro/ppa

sudo apt-get update

sudo apt-get install gnome-subtitles

For Ubuntu 13.10 Saucy, run below commands instead:

sudo add-apt-repository ppa:nilarimogard/webupd8

sudo apt-get update

sudo apt-get install gnome-subtitles

Once installed, open it from Unity Dash and Enjoy!

The latest Stable Linux Kernel 3.10.10 has been released. All users of the 3.10 kernel series are urged to upgrade as soon as possible. Here’s how to Install / upgrade in Ubuntu 13.04, Ubuntu 12.04 Precise and Ubuntu 12.10 Quantal.

Linux Kernel 3.10.10 Ubuntu

The Kernel 3.10.10 is a small release that includes a few updated drivers, fixes, as well as other small changes. See the changelog.

Install / Upgrade Kernel 3.10.10

The DEB packages for Debian / Ubuntu based systems are available. Press Ctrl+Alt+T on your keyboard to open terminal. When it opens, run below commands to download them:

for 32-bit system:

wget http://kernel.ubuntu.com/~kernel-ppa/mainline/v3.10.10-saucy/linux-headers-3.10.10-031010-generic_3.10.10-031010.201308291422_i386.deb

wget http://kernel.ubuntu.com/~kernel-ppa/mainline/v3.10.10-saucy/linux-headers-3.10.10-031010_3.10.10-031010.201308291422_all.deb

wget http://kernel.ubuntu.com/~kernel-ppa/mainline/v3.10.10-saucy/linux-image-3.10.10-031010-generic_3.10.10-031010.201308291422_i386.deb

for 64-bit system:

wget http://kernel.ubuntu.com/~kernel-ppa/mainline/v3.10.10-saucy/linux-headers-3.10.10-031010-generic_3.10.10-031010.201308291422_amd64.deb

wget http://kernel.ubuntu.com/~kernel-ppa/mainline/v3.10.10-saucy/linux-headers-3.10.10-031010_3.10.10-031010.201308291422_all.deb

wget http://kernel.ubuntu.com/~kernel-ppa/mainline/v3.10.10-saucy/linux-image-3.10.10-031010-generic_3.10.10-031010.201308291422_amd64.deb

After that, both 32-bit and 64-bit run below command to install the kernel:

sudo dpkg -i linux-headers-3.10.10-*.deb linux-image-3.10.10*.deb

Once properly installed, you can remove the downloaded packages for saving space.

(Optional) To remove this kernel, run below command:

sudo apt-get purge linux-image-3.10.10*

Want to use the Snow sabre icons on Ubuntu based system? Well, it’s easy and here I’ll show you how.

snow sabre icons ubuntu

As you may know, Snow sabre icons (Folders) was originally a Mac theme created by miniMac for his personal use on Mac. Here you can download the Snow Sabre icon theme (black & silver) from deviantart

For Ubuntu, Linux Mint, Elementary OS, etc. Download the package from the previous link and put the result folders into user’s $HOME/.icons folder.

snow sabre icons ubuntu

Or you can put the icon folders under /usr/share/icons for global use.

To apply the icon theme, go to gnome tweak tool -> Theme -> Icon Theme and select it in the drop-down box.

apply snow sabre icons

As you may know, when you’re running commands in terminal with sudo at beginning, you have to enter user password to get past. Within a certain time, you don’t need to enter the password again to run another sudo command.

The default timeout is about 5 minutes, here’s how to change it in Ubuntu 13.10, Ubuntu 13.04, Linux Mint and Elementary OS.

To get started, press Ctrl+Alt+T on your keyboard to open terminal. When it opens, run below command to edit the config file:

sudo visudo

Use the arrow keys to scroll down and find out below line:

Defaults env_reset

Change it into:

Defaults env_reset, timestamp_timeout=10

Replace 10 with other number of minutes as you want.

change sudo password timeout

After that, press Ctrl+X and followed by Y to save the changes.

That’s it. Enjoy!

You may already know that there’s an utility in System Settings allows to change user privacy settings, such amazon search results in Unity Dash, recent document and record activity, etc.

Privacy settings

This simple tutorial shows you an indicator applet allows to quickly change privacy settings via the menu on top-panel. The Privacy Indicator menu allows to:

  • Enable / Disable Amazon online search results in Unity Dash
  • Clear recent documents
  • Enable / Disable and clear record activity
  • display username on panel

Privacy Indicator Ubuntu

Install Privacy Indicator:

You can install the indicator easily by using the DEB. Just download and double-click to install the below package:

indicator-privacy_all.deb

Or you can install it via command:

wget http://www.florian-diesch.de/software/indicator-privacy/dist/indicator-privacy_0.03-1_all.deb

sudo dpkg -i indicator-privacy_0.03-1_all.deb; sudo apt-get -f install

Once installed, open it from Unity Dash. Enjoy!

Catfish is a versatile file searching tool. It is a search GUI powered by locate and find behind the scenes, with autocompletion from Zeitgeist and locate. The advanced options allow filtering by date and file type. The interface is intentionally lightweight and simple, using only GTK+.

catfish file search ubuntu

Features:

  • search files anywhere on your computer, include mounted partitions.
  • search hidden files
  • search files by modified time
  • search files by type

Install Catfish File Search:

You can install Catfish file searching tool in Ubuntu 13.04 Raring, Ubuntu 12.10 Quantal, Ubuntu 12.04 Precise and their derivatives, such as Linux Mint and Elementary OS.

Press Ctrl+Alt+T on your keyboard to open terminal. When it opens, run below commands one by one to install the tool:

sudo add-apt-repository ppa:catfish-search/catfish-stable

sudo apt-get update

sudo apt-get install catfish

Once done, you can open it from Unity Dash:

catfish file search ubuntu unity

Touchpad Indicator has been updated to 0.9.5 with the ability to change touchpad status using Mouse Wheel. The developer announced in his blog:

“It is certainly much more comfortable turning the mouse wheel (regardless of whether it is up or down) to do two clicks to change the status of the touchpad, first to display the menu and the second to select the option.”

touchpad indicator ubuntu

In the new release, keyboard shortcuts now reside in dconf instead of gconf, specifically in org.gnome.desktop.wm.keybindings. To set a specific keyboard shortcut for toggling Touchpad-Indicator, go to org.gnome.settings-daemon.plugins.media-keys.custom-keybindings in Dconf Editor

Touchpad indicator custom shortcust

Touchpad Indicator 0.9.5 also fixes below bugs:

  • # 1036808 Ubuntu 12.04 Suffers suspension after an internal error
  • # 1062694 Touchpad status resets to ‘ON’ when laptop lid is closed.
  • # 1075029 watchdog.py got some problem
  • # 1099821 keyboard shortcut does not work well
  • # 1111784 watchdog fails to enable touchpad on mouse removal
  • # 1192930 indicator Touchpad not working correctly.
  • # 1197984 Unable to save preferences
  • # 1198003 Cant enable Autostart
  • # 1036529 When unplug enable Wont get my External mouse
  • # 1131179 enabled touchpad indicator shows when it is disabled
  • # 1114511 Touchpad-indicator has gone berserk and Enables and disables randomly

Install Touchpad Indicator:

The PPA has been updated for Ubuntu 13.10, Ubuntu 12.10, Ubuntu 13.04 users. Press Ctrl+Alt+T on your keyboard to open terminal. When it opens, run below commands one by one to install Touchpad Indicator:

sudo add-apt-repository ppa:atareao/atareao

sudo apt-get update

sudo apt-get install touchpad-indicator

For Ubuntu 12.04 and its derivatives, you may download and install the DEB package (didn’t test).

The Qt-based Multimedia Player Qmmp released version 0.7.2 a few hours ago. It fixed some bugs and removed unimplemented function. Here’s how to install / upgrade to this release in Ubuntu 13.04, Ubuntu 12.10, Ubuntu 12.04 and their derivatives.

qmmp ubuntu

As you may know, Qmmp is a Qt audio player with WinAmp-like interface. It supports MPEG1 layer 2/3, Ogg Vorbis, Ogg Opus, Native FLAC, Ogg FLAC, Musepack, WavePack, tracker modules (mod, s3m, it, xm, etc), ADTS AAC, CD Audio, WMA, Monkey’s Audio (and other formats provided by FFmpeg library), PCM WAVE (and other formats provided by libsndfile library), midi, chiptune formats (AY, GBS, GYM, HES, KSS, NSF, NSFE, SAP, SPC, VGM, VGZ, VTX)

Changes in Qmmp 0.7.2:

  • fixed queue update bug
  • fixed track length formatting
  • fixed api documentation
  • fixed gcc warnings
  • fixed memory leaks
  • fixed wildmidi config path
  • fixed playlist autosave feature
  • fixed possible segmentation fault
  • fixed title format update bug
  • removed unimplemented function

Install or Upgrade the Qmmp via PPA:

The PPA has updated for Ubuntu 13.04 Raring, Ubuntu 12.10 Quantal and Ubuntu 12.04 Precise users. Press Ctrl+Alt+T on your keyboard to open terminal. When it opens, run following 3 commands one by one:

sudo add-apt-repository ppa:forkotov02/ppa
sudo apt-get update
sudo apt-get install qmmp qmmp-plugin-pack

There are a few Qmmp skins, you can use them by place the extracted folders under “$user Home/.qmmp/skins/” folder. You may press Ctrl+H to see hidden file folders.

Classic Menu Indicator 0.08 Has Been Released

Last updated: August 26, 2013

After about one year and a half, Classic Menu Indicator finally released a new version 0.08. It brings a few improvements and adds support for more languages.

As you may know, ClassicMenu Indicator is a indicator applet for Unity, that provides the main menu of Gnome2/Gnome Classic.

classic menu indicator 0.08

New features in ClassicMenu indicator 0.08:

  • ClassicMenu Indicator has its own icon now
  • added support for some configuration options
  • improved handling of missing/unusable icons
  • extended “ClassicMenu Indicator” submenu
  • added Estonian, French, Croatian, Japanese, Malay, Brazilian, Portuguese, Russian, Chinese (Simplified) language support
  • changed the way commands are run

To install Classic Menu Indicator 0.08, just download and double-click to install the DEB:

ClassicMenu_indicator_0.08_all.deb

The source code is also available for downloading from here.

The Cloud Based Nuvola Music Player has reached 2.1.0. It brings new features for users as well as for service maintainers and many bug fixes.

As you may know, Nuvola Player runs a web interface of cloud music services – Google Play Music, Amazon Cloud Player, 8tracks, Grooveshark, Hype Machine, Pandora, Rido – in its own window and provides integration with a Linux desktop.

nuvola player ubuntu unity

The new release Nuvola 2.1.0 brings following changes:

  • Added information about format support.
  • New service Deezer.
  • Extensions: Almost all extensions are enabled by default.
  • Notifications extension: Added support for actions and resident notifications.
  • Last.fm extension: Added switches to disable scrobbling for particular services.
  • Added a few keyboard shortcuts: Go back Left and go forward Right.
  • Service selector is opened in a separate window and uses native GTK+ widgets instead of web view. GTK+ zoom level is respected and non-free screenshots are not loaded.
  • User interface: Added option to prefer dark GTK+ theme.
  • Context menu of a web view is populated with custom actions.
  • Removed UI modes “toolbar only” and “both toolbar and menubar”. Main menu reorganized.
  • MPRIS extension: Renamed to Remote Player Interface.
  • Install / Upgrade Nuvola Player in Ubuntu

    For Ubuntu and its derivatives, press Ctrl+Alt+T to open terminal. When it opens, run below commands one by one:

    sudo add-apt-repository ppa:nuvola-player-builders/stable
    
    sudo apt-get update
    
    sudo apt-get install nuvolaplayer