Archives For November 30, 1999

Nvidia DriverThe latest Long Lived Nvidia driver has reached 319.49, which added support for new GPUs and fix a few bugs. Here’s how to install or upgrade it in Ubuntu 13.04, Ubuntu 12.10, Ubuntu 12.04.

What’s new in Nvidia 319.49:

  • Added support for the following GPUs: GeForce GT 740A, GeForce GT 745A, GeForce GT 755M, GeForce GT 625, GeForce GTX 645, GRID K340, GRID K350, NVS 315, Quadro K500M
  • Fixed a bug that caused DisplayPort monitors connected to Quadro FX 3800, 4800, or 5800 to remain off after DPMS.
  • Added the NVIDIA OpenGL-based Inband Frame Readback (NvIFROpenGL) library to the Linux driver package. This library provides a high performance, low latency interface to capture and optionally encode an individual OpenGL framebuffer. NvIFROpenGL captures pixels rendered by OpenGL only and is ideally suited to application capture and remoting.
  • Fixed a bug that caused applications using CUDA-GL interop to crash when run on X servers with Xinerama enabled.
  • Fixed a bug that could prevent some double-bit ECC errors from being properly reported.
  • Fixed a bug which could cause a blank screen when changing house sync settings on Quadro Kepler GPUs with Quadro Sync boards.
  • Fixed a bug that prevented nested loops with identical loop conditions in GLSL shaders from terminating correctly. This could cause hangs in applications such as Exa PowerVIZ.
  • Fixed a bug that resulted in corrupt texels when a previously empty texture image was specified with glXBindTexImageEXT. In GNOME 3, this caused gnome-screenshot to produce garbled window screenshots.
  • Fixed a bug that caused the X server to crash when querying the current mode of disabled displays.
  • Download & Install Nvidia Driver:

    NOTE 1: At the moment when you’re reading this tutorial, you may check out the latest version of Nvidia driver for Linux at this page.

    NOTE 2: Below installation guide works for all Nvidia Linux Drivers (.run file) downloaded from the Official Website.

    1.) Download the driver:

    Download Nvidia 319.49 for Linux 32-bit

    Download Nvidia 319.49 for Linux 64-bit

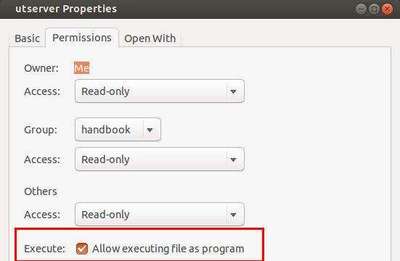
    2.) Open file browser and navigate to the downloaded package. Right-click on it and go to its Properties window. In Permissions tab, check the box where is says “allow executing file as program”

    all execute as program

    3.) Now, you need to switch to command console by pressing Ctrl+Alt+F1. Log in with your username and password. When login, stop the graphic session by running below command.

    sudo stop lightdm

    4.) Finally, start the installer and follow the on screen prompts. Change the filename to yours if you’re going to install another version.

    sudo sh ~/Downloads/NVIDIA-Linux-*-319.49.run

    When done, restart your computer by sudo reboot command.

    If for some reason the new drivers do not work properly, re-do step 3.) and followed by below command to unintall the Nvidia Driver:

    sudo ~/Downloads/NVIDIA-Linux-*-319.49.run --uninstall

    Enjoy!

    R Statistical PackageIf you have problem installing R statistical package via the official document. Here’s easy guide with pictures shows you how to install R package in Ubuntu 13.04, Ubuntu 12.04, Ubuntu 12.10, Ubuntu 10.04.

    R Package is available in Ubuntu Software Center by default, but it’s old. This tutorial will install the latest verson – so far it is 3.0.1 – in Ubuntu via the via official repository.

    Add R Statistical Package Repository:

    Search for and open Software & Updates from unity dash home.

    software&updates

    Navigate to Other Software tab, click Add and paste below line in pop-up window.

    For Ubuntu 12.04: deb http://cran.stat.ucla.edu/bin/linux/ubuntu precise/

    For Ubuntu 13.04: deb http://cran.stat.ucla.edu/bin/linux/ubuntu raring/

    For Ubuntu 12.10: deb http://cran.stat.ucla.edu/bin/linux/ubuntu quantal/

    For Ubuntu 10.04: deb http://cran.stat.ucla.edu/bin/linux/ubuntu lucid/

    add r package repository

    You can change “cran.stat.ucla.edu” to other mirrors.

    Install R Statistical Package:

    After added the repository, press Ctrl+Alt+T on your keyboard to open terminal. When it opens, run below command to get the key:

    sudo apt-key adv --keyserver keyserver.ubuntu.com --recv-keys E084DAB9

    add r package keyring

    Finally, you can use Synaptic Package Manager (install it from Ubuntu Software Center) to install R Package.

    install r package ubuntu

    Indicator-terminal is an applet in Ubuntu top panel that shows a terminal window for running commands when you click on the icon.

    terminal indicator

    Install Indicator-terminal in Ubuntu:

    NOTE: This project is still in early development. It has bugs and may break you system. Use it at your own risk!

    There’s a PPA for Ubuntu 13.10 Saucy, Ubuntu 13.04 Raring, Ubuntu 12.10 Quantal. Press Ctrl+Alt+T to open terminal, when it opens, run below commands one by one:

    sudo add-apt-repository ppa:erasmo-marin/indicator-terminal
    
    sudo apt-get update
    
    sudo apt-get install indicator-terminal

    Once installed, restart you machine.

    To remove this indicator, run below commands in terminal:

    sudo apt-get install ppa-purge
    
    sudo ppa-purge ppa:erasmo-marin/indicator-terminal
    
    sudo apt-get remove indicator-terminal

    Want to customize the notification bubbles? Well, here I’ll tell you how to move its location, change text color, enable close bubble on click in Ubuntu 13.04 Raring, Ubuntu 13.10 Saucy.

    change location of notification bubble

    The default Notification Bubbles – NotifyOSD – is not customizable in Ubuntu. Leolik provides a patched (configurable) NotifyOSD in his PPA which allows to change:

    • colors
    • size of the bubbles, font size, icon size, corner radius
    • opacity
    • timeout
    • position on the screen (top-right, middle-right, bottom-right, bottom-left, middle-left, top-left)
    • disable fade out
    • click anywhere on the notification to close it

    To install this customizable notification bubbles in Ubuntu 13.04, Ubuntu 12.10, Ubuntu 12.04, Ubuntu 11.10, Ubuntu 11.04. Press Ctrl+Alt+T to open terminal, run below commands one by one:

    sudo add-apt-repository ppa:leolik/leolik 
    
    sudo apt-get update
    
    sudo apt-get install notify-osd

    Once installed, run command to restart the service:

    pkill notify-osd

    Now install a graphical tool to configure NotifyOSD. Run below commands one by one in terminal:

    sudo add-apt-repository ppa:nilarimogard/webupd8
    
    sudo apt-get update
    
    sudo apt-get install notifyosdconfig

    After that, you can use this tool to customize your notifications:

    configure notification

    To change the location, run below command in terminal:

    gsettings set com.canonical.notify-osd gravity NUMBER

    Where the NUMBER can be:

    1 – top-right corner
    2 – middle-right
    3 – bottom-right corner
    4 – bottom-left corner
    5 – middle-left
    6 – top-left corner

    The latest Linux Kernel 3.10.9 has been released. All users of the 3.10 kernel series are urged to upgrade as soon as possible. Here’s how to install / upgrade in Ubuntu 13.04 Raring, 12.04 Precise and 12.10 Quantal.

    Linux Kernel 3.10.9 Ubuntu

    Linux kernel 3.10.8 has a problem on networking, so the Kernel 3.10.9 was announced few hours later with a fix. See the official announcement.

    Install / Upgrade Kernel 3.10.9

    The mainline kernel PPA has updated Debs packages for Debian / Ubuntu based users. Press Ctrl+Alt+T on your keyboard to open terminal. Then download and install the Debs.

    for 32-bit system:

    wget http://kernel.ubuntu.com/~kernel-ppa/mainline/v3.10.9-saucy/linux-headers-3.10.9-031009-generic_3.10.9-031009.201308201935_i386.deb
    
    wget http://kernel.ubuntu.com/~kernel-ppa/mainline/v3.10.9-saucy/linux-headers-3.10.9-031009_3.10.9-031009.201308201935_all.deb
    
    wget http://kernel.ubuntu.com/~kernel-ppa/mainline/v3.10.9-saucy/linux-image-3.10.9-031009-generic_3.10.9-031009.201308201935_i386.deb

    for 64-bit system:

    wget http://kernel.ubuntu.com/~kernel-ppa/mainline/v3.10.9-saucy/linux-headers-3.10.9-031009-generic_3.10.9-031009.201308201935_amd64.deb
    
    wget http://kernel.ubuntu.com/~kernel-ppa/mainline/v3.10.9-saucy/linux-headers-3.10.9-031009_3.10.9-031009.201308201935_all.deb
    
    wget http://kernel.ubuntu.com/~kernel-ppa/mainline/v3.10.9-saucy/linux-image-3.10.9-031009-generic_3.10.9-031009.201308201935_amd64.deb

    After that, both 32-bit and 64-bit run below command to install the kernel

    sudo dpkg -i linux-headers-3.10.9-*.deb linux-image-3.10.9*.deb

    Finally apply changes to grub boot loader:

    sudo update-grub

    You can remove the downloaded packages after the kernel is properly installed.

    The latest stable Linux Kernel 3.10.4 has been released. This simple tutorial will show you how to install / upgrade this kernel in Ubuntu 13.04 Raring, 12.10 Quantal and 12.04 Precise.

    Linux Kernel 3.10.4

    Linux kernel 3.10.4 is an important release, which brings many improvements to IPv4 and IPv6 protocols, as well as many updated drivers and ARM fixes. All users of the 3.10 kernel series are urged to upgrade as soon as possible. See official announcement.

    To get started, press Ctrl+Alt+T to open a terminal window, copy and paste below command into terminal and run to download the kernel:

    for 32-bit system:

    wget http://kernel.ubuntu.com/~kernel-ppa/mainline/v3.10.4-saucy/linux-headers-3.10.4-031004-generic_3.10.4-031004.201307282043_i386.deb http://kernel.ubuntu.com/~kernel-ppa/mainline/v3.10.4-saucy/linux-headers-3.10.4-031004_3.10.4-031004.201307282043_all.deb http://kernel.ubuntu.com/~kernel-ppa/mainline/v3.10.4-saucy/linux-image-3.10.4-031004-generic_3.10.4-031004.201307282043_i386.deb

    for 64-bit system:

    wget http://kernel.ubuntu.com/~kernel-ppa/mainline/v3.10.4-saucy/linux-headers-3.10.4-031004-generic_3.10.4-031004.201307282043_amd64.deb http://kernel.ubuntu.com/~kernel-ppa/mainline/v3.10.4-saucy/linux-headers-3.10.4-031004_3.10.4-031004.201307282043_all.deb http://kernel.ubuntu.com/~kernel-ppa/mainline/v3.10.4-saucy/linux-image-3.10.4-031004-generic_3.10.4-031004.201307282043_amd64.deb

    After that, both 32-bit and 64-bit run below command to install the kernel

    sudo dpkg -i linux-headers-3.10.4-*.deb linux-image-3.10.4*.deb

    Finally apply changes to grub boot loader:

    sudo update-grub

    You can remove the downloaded packages after the kernel is properly installed.

    This simple tutorial shows how to install latest Komodo edit on Ubuntu 13.04 Raring, 12.10 Quantal, 12.04 Precise via ppa repository.

    komodo ubuntu

    Komodo Edit, based on the award-winning Komodo IDE, offers sophisticated support for all major scripting languages, including in-depth autocomplete and calltips, multi-language file support, syntax coloring and syntax checking, Vi emulation, Emacs key bindings. It provides dynamic language expertise for Perl, PHP, Python, Ruby, and Tcl, plus JavaScript, CSS, HTML, and XML, and template languages like RHTML, Template-Toolkit, HTML-Smarty and Django.

    Install Komodo Edit

    A PPA repository has been created for Ubuntu users. So far it supports Ubuntu 13.04, 12.04 and 12.10.

    To add the repository, press Ctrl+Alt+T on your keyboard to open terminal. When it opens, run below commands:

    sudo add-apt-repository ppa:mystic-mirage/komodo-edit

    After that, update your package lists and install this tool via command below:

    sudo apt-get update; sudo apt-get install komodo-edit

    Once installed, open it by running komodo command. You may need to manually create launcher shortcut

    This simple tutorial shows you how to install the latest RawTherapee 4.0.11 on Ubuntu 13.04 Raring, 12.10 Quantal, 12.04 Precise using PPA repository.

    RawTherapee main window

    RawTherapee is a cross-platform raw image processing program written in C++, using a GTK+ front-end and a patched version of dcraw for reading raw files. It is notable for the advanced control it gives the user over the demosaicing and developing process.

    “The 4.0.11 release includes a number of new features which you can read about below, but just as importantly it contains a large number of speed improvements and bug fixes, so we recommend you update straight away!”

    New features:

    • CIECAM02 “Adaptation scene luminosity” now calculated automatically
    • CIECAM02 hot/bad pixel fixer to prevent bright pixels from appearing
    • The Defringe tool is now able to target a range of specific colors without touching others
    • New bundled processing profiles
    • New keyboard shortcuts to apply rank and color labels and a new direct popup menu for color labels, all in the File Browser
    • “Profile Fill Mode” button controls whether to replace missing processing profile values with default ones or not
    • Keyboard shortcuts to open the next/previous image and to synchronize the File Browser strip with the currently opened image
    • New demosaicing algorithms for noisy photos:
      • LMMSE
      • IGV
    • More zoom levels
    • Redesigned save window
    • New functionality of the minima/maxima control points curves editor, see the RawTherapee Manual
    • Support for TIFFfiles with alpha channels
    • Support for 32-bit TIFF files (HDR)
    • Preferences/Batch processing options: all to ‘Add’ and all to ‘Set’
    • Support for
      • Nikon D5200
      • Nikon D7100
      • Nikon COOLPIX A
      • Panasonic Lumix DMC-G5

    Install RawTherapee:

    The latest release is available for Ubuntu 13.04 Raring, 12.10 Quantal, Ubuntu 12.04 Precise from the ppa repository.

    To add the ppa, press Ctrl+Alt+T on your keyboard to open a terminal window. When it opens, run below command:

    sudo add-apt-repository ppa:dhor/myway

    Then update package lists and install via Synaptic Package Manager. Or you can run below command instead:

    sudo apt-get update; sudo apt-get install rawtherapee

    RawTherapee unity dash