Archives For November 30, 2012

tabbed ssh connection manager

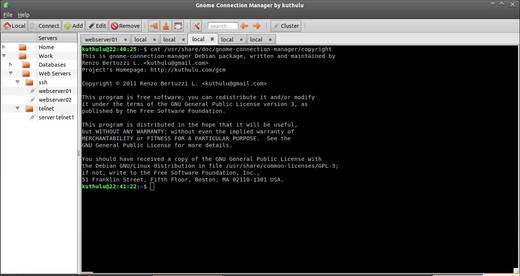
Gnome Connection Manager is a free and open-source ssh connection manager for gtk+ environments. It features multiple tunnels in tabs and unlimited vertical/horizontal window splitting.

Features:

  • Gnome Connection Manager is licensed under the GNU General Public License version 3
  • It’s designed in Glade and written in python, so it just need PyGTK to run in any linux environment
  • Can store passwords for easy access to hosts
  • Supports multiple ssh tunnels for each host
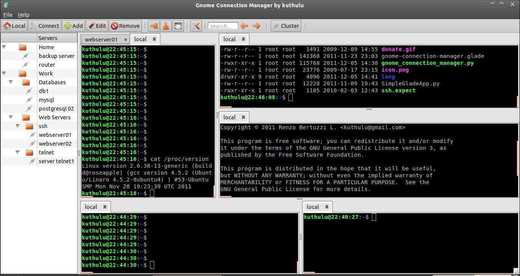
  • Unlimited vertical/horizontal window splitting. You can have as many visible consoles as you want
  • Drag&Drop tabs between consoles
  • Connect to multiple hosts with just one click
  • Grouping hosts
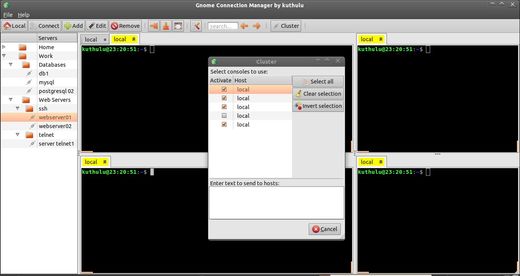
  • Cluster mode. Work on several hosts at the same time
  • Customizable shortcuts
  • Send custom commands to hosts
  • It’s free, and the source is included in the download

Screenshots:

tabbed ssh connection manager

tabbed ssh connection split screen

tabbed ssh connection cluster mode

Install:

The DEB packages for Ubuntu, Debian, Linux Mint and source code are available in Gnome Connection Manager website.

CopyQ 2.0.0

CopyQ is an advanced clipboard manager with searchable and editable history, and with support for text, HTML, images and any other custom format.

CopyQ 2.0.0 was release recently, it features local synchronization, faster tab loading and saving, and more. See the changelog:

  • Synchronize items with files on disk
  • Faster tab loading and saving (data format was changed; only backward compatible)
  • User can limit size of text items
  • Opening external image editor fixed on Windows
  • New logo and website
  • Lot of other fixes

copyq local synchronization

copyq edit history

Install CopyQ in Ubuntu and Other Linux

The installers for Ubuntu 13.10, Ubuntu 13.04, Ubuntu 12.10, Ubuntu 12.04, Debian, OpenSUSE, Fedora now are available in sourceforge.net.

Download the package for your OS and double click to install CopyQ. Once installed, open it from Dash or Menu.

CopyQ website: http://hluk.github.io/CopyQ/

frostwire 5.6.9

FrostWire, a free and open source BitTorrent client recently released v5.6.9 with big improvements. See the changelog:

  • Insanely faster cloud search results.
  • Significant memory optimizations on search result parsing and display.
  • Removed jDownloader libraries, less complexity, lighter app.
  • Cloud audio downloads are much smaller, no audio demuxing necessary from video services.
  • Cloud video DASH download support.
  • Smarter playlist name suggestion algorithm takes into account ID3 tags.
  • Fixes bug where new playlists wouldn’t be saved if default name was used.

frostwire faster cloud, memory optimization

If you use Frostwire on Ubuntu Linux as your Bittorrent client, it’s strongly recommended to upgrade to this release. To do so, just go to the official webpage, download and install the the DEB package.

HotShots


HotShots, a Qt screenshot tool with some editing features now is at version 2.0.0 with many new features added and bug fixes. I’ve create a PPA and you can easily install it in Ubuntu 13.10, Ubuntu 13.04, Ubuntu 12.10, Ubuntu 12.04 via 3 commands in terminal.

What’s New in HotShots 2.0.0:

Features:

  • Autostart on linux
  • Add Portuguese translation. Thanks to Vinícius “A. Jorge”.
  • Add German translation. Thanks to dbr.
  • Change default location of translation file on linux (“/share/hotshots/locale” instead of “/share/locale”)
  • Change some icons (best visual consistency)
  • Add launch editor action in systray menu
  • Editor: ability to set background color for some item type (rectangle, ellipse, text)
  • Editor: add a palette of last used of foreground/background color pair
  • Editor: add last saved/loaded file
  • Editor: add “bring to top/bottom” for selected elements
  • Editor: add “autorepeat” on font size buttons
  • Add MacOSX target

Bugs:

  • Editor: add margin to render pixmap (incorrect crop)
  • Editor: correct layout problem on font preview
  • Editor: correct focus problem on text item
  • Editor: correct saved shadow state on some items
  • Editor: correct invalid proposed name for “save as” function
  • Editor: correct text cursor move with keyboard if text item is selected
  • correct a problem with automatic naming of exported image

hotshots 2.0 in ubuntu 13.10

Install HotShots via PPA:

Press Ctrl+Alt+T on keyboard to open terminal. When it opens, run commands below one by one to add the PPA and install the tool:

sudo add-apt-repository -y ppa:ubuntuhandbook1/apps

sudo apt-get update

sudo apt-get install hotshots

Once installed, open it from Dash or Menu.

Linux Kernel 3.10.23 LTS

The latest Kernel Long Term Support now is at 3.10.23, which brings many updated drivers (Radeon, Ethernet, HID), several IPv4 and IPv6 fixes, as well as other changes. See the changlog for details.

Linux kernel 3.10.23 is quite big release and users of Kernel 3.10 series are urged to upgrade as soon as possible. Here’s how to do it in Ubuntu, Linux Mint and their derivatives.

Install / Upgrade Kernel 3.10.23:

1. Download the DEBs:

Press Ctrl+Alt+T on keyboard to open terminal. When it opens, run commands below one by one to download Kernel DEB packages (available in Ubuntu Kernel page):

For 32 bit system:

cd ~/Downloads/

wget http://kernel.ubuntu.com/~kernel-ppa/mainline/v3.10.23-saucy/linux-headers-3.10.23-031023-generic_3.10.23-031023.201312081135_i386.deb

wget http://kernel.ubuntu.com/~kernel-ppa/mainline/v3.10.23-saucy/linux-headers-3.10.23-031023_3.10.23-031023.201312081135_all.deb

wget http://kernel.ubuntu.com/~kernel-ppa/mainline/v3.10.23-saucy/linux-image-3.10.23-031023-generic_3.10.23-031023.201312081135_i386.deb

For 64 bit system:

cd ~/Downloads/

wget http://kernel.ubuntu.com/~kernel-ppa/mainline/v3.10.23-saucy/linux-headers-3.10.23-031023-generic_3.10.23-031023.201312081135_amd64.deb

wget http://kernel.ubuntu.com/~kernel-ppa/mainline/v3.10.23-saucy/linux-headers-3.10.23-031023_3.10.23-031023.201312081135_all.deb

wget http://kernel.ubuntu.com/~kernel-ppa/mainline/v3.10.23-saucy/linux-image-3.10.23-031023-generic_3.10.23-031023.201312081135_amd64.deb

2. Install the Kernel:

cd ~/Downloads/ && sudo dpkg -i linux-headers-3.10.23-*.deb linux-image-3.10.23-*.deb

Once installed restart computer and done.

NOTE: If you’re using proprietary drivers, you may need to rebuild or re-install it after upgraded to new kernel version.

If for some reason this kernel does not work properly for you, restart and boot into Grub -> Advanced -> select previous kernel. Then remove Linux Kernel 3.10.24 via commands below:

sudo apt-get purge linux-headers-3.10.23-* linux-image-3.10.23-*

Linux Kernel 3.11.4

Linux Kernel 3.12.4 was released recently. It brings many updated drivers (HID, ISDN, Radeon, Ethernet, Wireless), several IPv4 and IPv6 fixes, as well as multiple networking improvements. See the changelog for details.

Linux Kernel 3.12.4 is quite big release and all users of this Kernel series are urged to upgrade as soon as possible. Here’s how to do it in Ubuntu 13.10, Ubuntu 13.04, Ubuntu 12.10, Ubuntu 12.04, Linux Mint and their derivatives.

Install / Upgrade Kernel 3.12.4

1. Download the DEBs

The DEB packages has been made into Ubuntu Kernel page, you can download them at this page. Or press Ctrl+Alt+T on keyboard to open terminal, and run commands below one by one:

For 32 bit system:

cd ~/Downloads/

wget http://kernel.ubuntu.com/~kernel-ppa/mainline/v3.12.4-trusty/linux-headers-3.12.4-031204-generic_3.12.4-031204.201312081207_i386.deb

wget http://kernel.ubuntu.com/~kernel-ppa/mainline/v3.12.4-trusty/linux-headers-3.12.4-031204_3.12.4-031204.201312081207_all.deb

wget http://kernel.ubuntu.com/~kernel-ppa/mainline/v3.12.4-trusty/linux-image-3.12.4-031204-generic_3.12.4-031204.201312081207_i386.deb

For 64 bit system:

cd ~/Downloads/

wget http://kernel.ubuntu.com/~kernel-ppa/mainline/v3.12.4-trusty/linux-headers-3.12.4-031204-generic_3.12.4-031204.201312081207_amd64.deb

wget http://kernel.ubuntu.com/~kernel-ppa/mainline/v3.12.4-trusty/linux-headers-3.12.4-031204_3.12.4-031204.201312081207_all.deb

wget http://kernel.ubuntu.com/~kernel-ppa/mainline/v3.12.4-trusty/linux-image-3.12.4-031204-generic_3.12.4-031204.201312081207_amd64.deb

2. Install the Kernel

cd ~/Downloads/ && sudo dpkg -i linux-headers-3.12.4-*.deb linux-image-3.12.4-*.deb

Once installed, restart your computer and done.

NOTE: Any drivers not part of the main kernel tree (which of course includes proprietary drivers) must be rebuilt for new kernel versions as internal kernel interfaces may have changed.

If for some reason this kernel does not work properly for you, restart and boot into Grub -> Advanced -> select previous kernel. Then remove Linux Kernel 3.12.4 via commands below:

sudo apt-get purge linux-headers-3.12.4-* linux-image-3.12.4-*

Tor repository

This tutorial shows how to install Tor – a free software for enabling online anonymity – via its official repository in Ubuntu 13.10, Ubuntu 13.04, Ubuntu 12.04, Ubuntu 12.10, Ubuntu 10.04

It’s not recommended to use the default Tor packages in Ubuntu’s universe repository because have not reliably been updated in the past, which means you could be missing stability and security fixes.

NOTE: What follows is going to show how to install Tor (standalone), you’ll need to manually configure your apps to use Tor.

If you just want to use Tor for anonymous web browsing, please use the Tor Browser Bundle. It comes with readily configured Tor and a browser patched for better anonymity.

To get started, press Ctrl+Alt+T on keyboard to open terminal. When it opens, follow below steps:

1. Paste command below and hit enter to add Tor repository:

sudo sh -c 'echo "deb http://deb.torproject.org/torproject.org $(lsb_release -sc) main" >> /etc/apt/sources.list.d/tor.list'

2. Download and install the key:

gpg --keyserver keys.gnupg.net --recv 886DDD89

gpg --export A3C4F0F979CAA22CDBA8F512EE8CBC9E886DDD89 | sudo apt-key add -

3. Now refresh your sources and install deb to keep the signing key current:

sudo apt-get update

sudo apt-get install deb.torproject.org-keyring

Finally, the latest stable Tor is available in Ubuntu Software Center.

See the Wiki page for more

How to Enable TRIM on SSD in Ubuntu Linux

Last updated: April 17, 2014

enable TRIM on SSD

Trim command (TRIM) helps keep your solid-state drive (SSD) at its full speed. If you find your SSD slowed down after a while of using, TRIM may help you make SSD always fast.

Because low-level operation of SSDs differs significantly from hard drives, the typical way in which operating systems handle operations like deletes and formats resulted in unanticipated progressive performance degradation of write operations on SSDs. Trimming enables the SSD to handle garbage collection overhead, which would otherwise significantly slow down future write operations to the involved blocks, in advance.

See more about TRIM on the Wiki page

UPDATE: Ubuntu 14.04 Trusty will have TRIM enabled by default.

To get started, press Ctrl+Alt+T on keyboard to open terminal. When it opens, follow steps below:

1. Check out if you have an SSD:

cat /sys/block/sda/queue/rotational

If you got 0 it’s a SSD. If the output was 1 it’s a HDD.

2. Even if you have an SSD not all of them support TRIM. To find out if yours does run:

sudo hdparm -I /dev/sda | grep "TRIM supported"

If what you get back is this:

Data Set Management TRIM supported

Then you are all good to go. If there’s no output, your SSD doesn’t support TRIM.

3. Next run:

sudo fstrim -v /

You should see an output that looks something like this:

/: 87781376 bytes were trimmed

4. If everything went OK it’s time to make a CRON job so fstrim run’s once a day.

To do this run:

gksudo gedit /etc/cron.daily/trim

Copy and paste below lines and save it.

#!/bin/sh
LOG=/var/log/trim.log
echo “*** $(date -R) ***” >> $LOG
fstrim -v / >> $LOG
fstrim -v /home >> $LOG

Finally make it executable:

sudo chmod +x /etc/cron.daily/trim

That’s it. You now have TRIM enabled.

via: pinguyos forum

LiVES 2.2.0 ubuntu 13.10

LiVES is a simple, yet powerful video editor and VJ tool. It allows you to combine realtime and rendered effects, streams and multiple video/audio files, and then encode to over 50 formats.

LiVES 2.2.0 was released a few days ago with new features, improvements and bug fixes. This tutorial is going to show you how to install it in Ubuntu 13.10 Saucy or Linux Mint 16 Petra via PPA.

What’s New in LiVES 2.2.0:

  • Add new avformat_decoder.
  • Optimisations for handling larger clips.
  • Use threading for pulling frames from video clips.
  • Much faster loading/saving of layouts in multitrack.
  • Fix crash in swscale when frame width is not multiple of 4.
  • Fix crash (regression) setting parameters in multitrack.
  • Fix breakage in multiple image loading.
  • Fix opening preview for quick opening clips.
  • Fix bug in “delete frames” for virtual clips.
  • Fix audio encoding in “Encode Selection”
  • Fixes for letterbox mode playback.
  • Compilation fixes for Debian Sid.
  • Various improvements to rte window.
  • Add “randomiser” data processing plugin.
  • Improvements to colour correction and tvpic effects.
  • Fix jack transport during playback (regression).
  • Fix for saving data connection mappings.
  • Implement multiple inputs per output in the data connector.
  • Optimised thread locking between audio and video effects threads.
  • Fix problems with setting defaults for colour values.
  • Decoder plugin fixes for ffmpeg 2.2 (needs further testing).
  • Preserve clip comments and renamed clip names between restarts (bugfix).
  • Small fixes for rfx_builder window.
  • Minor GUI improvements.
  • Add initial translation to Piemontese. (Simon Uslengh).
  • Updated translations to UK English, German, Russian and Ukranian.
  • LiVES video editor 2.2.0

    Install LiVES:

    For Ubuntu 13.10 and its derivatives, run commands below one by one in terminal (Ctrl+Alt+T) to install it from PPA:

    sudo add-apt-repository -y ppa:n-muench/vlc
    
    sudo apt-get update
    
    sudo apt-get install lives

    For other Ubuntu releases, you may install the old versions from Ubuntu Software Center.

    Source code is available in LiVES project homepage.

    flight simulator

    FlightGear is a sophisticated and open flight simulator framework for use in research or academic environments, pilot training, as an industry engineering tool, for DIY-ers to pursue their favorite interesting flight simulation idea.

    FlightGear is available in Ubuntu Software Center, but it’s a little old. The latest v2.12.x has been released with many exciting new features, enhancements and bug fixes. Highlights in this release include improved usability, continued development of the Canvas rendering toolkit, and improved scenery rendering. For details, see the changlog

    Install FlightGear via PPA:

    There’s a PPA for Ubuntu 13.10, Ubuntu 13.04, Ubuntu 12.10, Ubuntu 12.04, Linux Mint users to easily install FlightGear easily via 3 commands in terminal.

    To get started, press Ctrl+Alt+T on keyboard to open terminal. When it opens, run the 3 commands below one by one:

    sudo add-apt-repository ppa:saiarcot895/flightgear
    
    sudo apt-get update
    
    sudo apt-get install flightgear flightgear-data

    As the PPA description said, if you’re upgrading from a previous version of flightgear, you will need to remove ALL flightgear-related packages before installing flightgear:

    sudo apt-get remove flightgear simgear fgfs-base fgfs-models-base fgfs-scenery-base fgfs-aircraft-*

    Once installed, you’re able to open the simulator from Menu or Unity Dash.

    flightgear flight simulator 2.12 ubuntu