Archives For November 30, 2017

RawTherapee

Open source Raw image processor RawTherapee 5.4 was released a few days ago. Here’s how to install it in Ubuntu 16.04, Ubuntu 17.10, Ubuntu 18.04, and derivatives.

New features in RawTherapee 5.4 include:

  • New default processing profiles, now the default look for raw photos closely matches the out-of-camera look with regard to tones and includes lens distortion and vignetting correction.
  • New histogram matching tool, to have RawTherapee automatically adjust the image for you to match the out-of-camera look with a single click of a button.
  • New HDR Tone Mapping tool to compress the light in scenes with a high dynamic range, allowing you to show details in both shadows and highlights in a realistic way.
  • New Local Contrast tool to boost clarity using a simple interface.
  • New color toning method L*a*b* Color Correction Grid.
  • New RCD demosaicing algorithm to minimize artifacts even with artificial lighting and strong chromatic aberration.
  • New thumbnail overlay icons in the File Browser and Filmstrip to help you distinguish normal images from HDR and Pixel Shift ones.
  • Added support for showing out-of-gamut areas based on the output profile.
  • Added support for reading and writing metadata and ICC profiles to and from PNG images.
  • Added support for processing Sony Pixel Shift ARQ raw files – make sure that the ARQ extension is enabled in Preferences > File Browser > Parsed Extensions.
  • Create Sony ARQ raw files using https://github.com/agriggio/make_arq
  • Added support for saving 32-bit floating-point TIFFs clamped to [0;1].
  • Added profiled chromatic aberration correction support using Lensfun.
  • More tools now have an on/off switch.
  • The user interface is cleaner, with all power-house tools moved into a new “Advanced” tab to prevent slider-shock to newcomers.
  • The Metadata tab now lets you choose whether you want to copy metadata unchanged, edit metadata or strip metadata when saving images. Now you can also make metadata changes in batch mode.
  • The choice of whether the main histogram should display information using the working profile or the output profile is now available from the Editor tab’s top toolbar.
  • The Crop tool’s aspect ratio now defaults to that of the image, and RawTherapee automatically zooms-to-fit the crop once it’s placed.
  • RGB input-type ICC profiles can now be used as output profiles.
  • The saved reference image for profiling (created from within the Color Management tool) now contains metadata.
  • PNG and compressed TIFF images make use of better compression.
  • Shortcut key changes: Zoom-to-fit the crop using “f”, fit the whole image using “Alt+f”.

How to Install RawTherapee 5.4 in Ubuntu:

For Ubuntu 16.04, Ubuntu 17.10, Ubuntu 18.04, and derivatives, the new release is available via this PPA repository.

1. Open terminal either via Ctrl+Alt+T or by searching for “Terminal” from app launcher. When it opens, run command:

sudo add-apt-repository ppa:dhor/myway

Input your password (no visual feedback when typing) when it prompts and hit Enter to add the PPA.

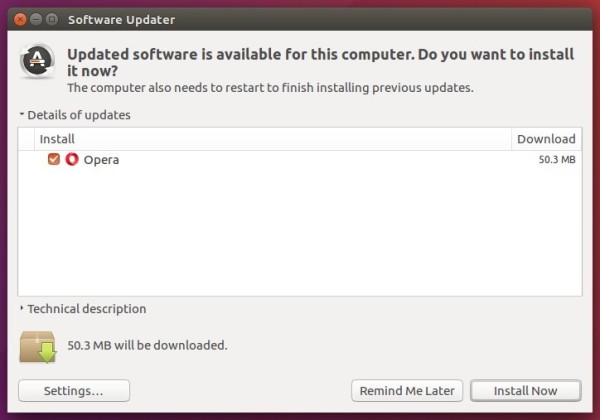
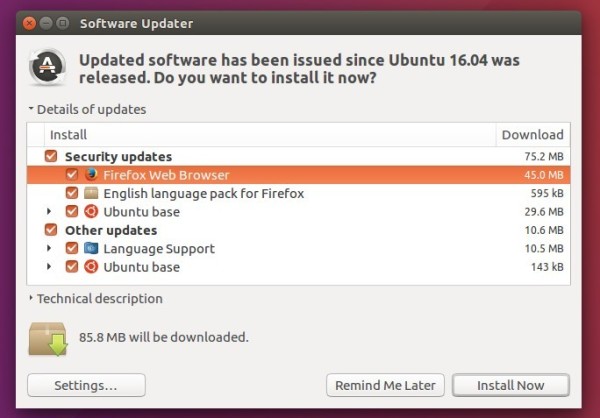
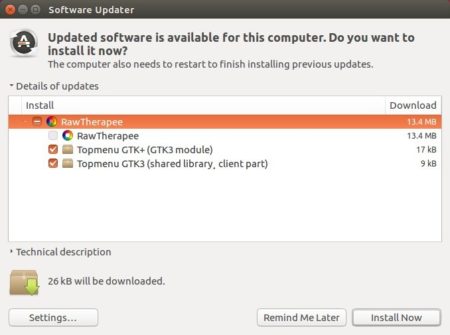
2. After that, upgrade the software via Software Updater if a previous version was installed:

The upgrading process may be kept back if you were installing it from Ubuntu Software App.

A workaround is simply running following commands instead to install or upgrade RawTherapee:

sudo apt-get update

sudo apt-get install rawtherapee

How to Remove:

To uninstall the free raw developer, run command in terminal:

sudo apt-get remove --autoremove rawtherapee

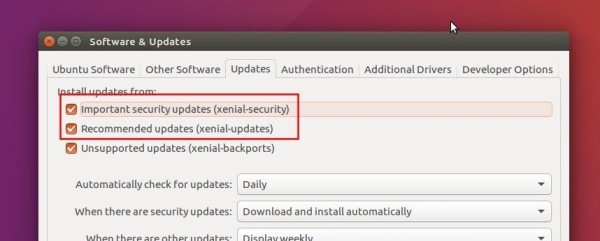
And remove the PPA via “Software & Updates” utility under Other Software tab, by removing the line says “http://ppa.launchpad.net/dhor/myway/ubuntu”.

opera web browser

Opera web browser reached the new stable 52 release a day ago with ad blocker improvements, cool new animations and more.

Opera 52 release highlights:

  • Faster page loading with improved ad blocker.
  • Select multiple tabs by holding down Ctrl while clicking on each desired tab
  • New tabs’ context menu option: Copy page address(es)
  • Tabs can be closed by holding Alt while clicking it.
  • New error page animations.
  • See the release note for more.

How to Install Opera 52 in Ubuntu:

The opera website offers official .deb binaries for Ubuntu Linux, available for download at the link below:

Download Opera for Linux

If you have a previous release installed, and enabled the official Opera Linux repository, upgrade it via Software Updater:

To manually add the Opera for Linux repository, open terminal via Ctrl+Alt+T or from app launcher, when it opens, run commands:

1. Add the opera repository:

sudo sh -c 'echo "deb http://deb.opera.com/opera-stable/ stable non-free" >> /etc/apt/sources.list.d/opera.list'

2. Get the key:

wget -O - http://deb.opera.com/archive.key | sudo apt-key add -

Finally either install Opera via your system package manager or upgrade the browser via Software Updater.

SMplayer

SMPlayer 18.3, a new monthly release of the Mplayer / MPV front-end, was released a few hours ago.

SMPlayer is a small release with only following changes:

  • Possibility to search for subtitles using the hash and filename methods at the same time.
  • Fix a bug which prevented to play some YouTube URLs.

SMPlayer with Mac skin

How to Install SMPlayer 18.3 in Ubuntu:

For Ubuntu 14.04, Ubuntu 16.04, Ubuntu 17.10, Ubuntu 18.04, and derivatives, do following steps to install or upgrade SMPlayer via its PPA repository.

1. Search for and launch “terminal” from application launcher. When it opens, run command:

sudo add-apt-repository ppa:rvm/smplayer

Input your password (no visual feedback while typing) when it asks and hit Enter.

Smplayer PPA

2. Then upgrade SMPlayer using Software Updater (or Update Manager):

upgrade smplayer

or run commands in terminal to install (or upgrade) the media player:

sudo apt-get update

sudo apt-get install smplayer smtube smplayer-themes

Uninstall:

To remove SMPlayer, run command in terminal:

sudo apt-get remove --autoremove smplayer smtube smplayer-*

And remove the PPA via “Software & Updates” utility under Other Software tab.

OBS Studio, free and open-source live streaming and screen recording software, reached 21.1 release a day ago. Here’s how to install it in Ubuntu 18.04, Ubuntu 17.10, Ubuntu 16.04, and/or Ubuntu 14.04.

Changes OBS Studio 21.1 include:

  • Updated the Browser source to Chromium 63 with a few fixes and APNG (animated PNG) image files support.
  • Dockable windows can now be nested.
  • Updated the program to use the latest Microsoft development toolchain (Visual Studio 2017) for the Windows version.
  • Changed log file uploading to hastebin (for now) instead of anonymous github gists due to github removing anonymous gist support.
  • Fixed an issue where the AMD encoder wouldn’t show up for some people since 21.0.
  • And various other fixes. See the release page.

How to Install OBS Studio 21.1 in Ubuntu:

The software has a Ubuntu PPA contains the latest packages for all current Ubuntu releases.

1. Open terminal either via Ctrl+Alt+T or by searching for “terminal” from app launcher. When it opens, run command to add the PPA:

sudo add-apt-repository ppa:obsproject/obs-studio

Input your password (no visual feedback while typing) when it prompts and hit Enter.

2. For Ubuntu 14.04 you also need to run command to another PPA for FFmpeg library:

sudo add-apt-repository ppa:kirillshkrogalev/ffmpeg-next

3. Now you can install OBS-Studio via Synaptic package manager, upgrade the software from an existing release via Software Updater, or simply run commands one by one:

sudo apt-get update

sudo apt-get install obs-studio

Once installed, launch the software from Unity Launcher, Gnome Launcher, or other app launcher and enjoy!

Uninstall:

To remove the software, either use Synaptic package manager or run command in terminal:

sudo apt-get remove --autoremove obs-studio

To remove PPA repositories, launch Software & Updates and navigate to ‘Other Software’ tab.

Kid3 audio tag editor reached the 3.6.0 release earlier today with some new features, MP4 support improvements and bug-fixes.

New features and improvements in Kid3 3.6.0:

  • New look for Android app using Qt Quick Controls 2.
  • Editor for star ratings, configurable mapping between rating values and number of stars.
  • Option to restrict length of file names.
  • Option to show hidden files in file and directory lists.
  • Support adding unknown 4 letter atoms to M4A files.
  • Allow Camelot wheel value 1A-12A, 1B-12B for initial key.

Kid3 Audio Tagger

How to Install Kid3 3.6.0 in Ubuntu:

The developer maintains a PPA repository with the latest packages for Ubuntu 14.04, Ubuntu 16.04, and Ubuntu 17.10.

1. Open terminal either via Ctrl+Alt+T or by searching for ‘terminal’ from app launcher. When it opens, run command to add the PPA:

sudo add-apt-repository ppa:ufleisch/kid3

Type in your password (no visual feedback while typing) when it asks and hit Enter to continue.

Kid3 PPA

2. Then run following commands to install or upgrade the audio editor:

sudo apt update 

sudo apt install kid3-qt

For KDE users, replace kid3-qt in the last command with kid3 for better integration.

To upgrade Kid3 from an existing release, simply install the updates via Software Updater:

upgrade kid3 via software updater

Uninstall:

To remove the PPA, launch Software & Updates and navigate to ‘Other Software’ tab.

To remove Kid3 tag editor, either use system package manger or run command:

sudo apt-get remove --autoremove kid3 kid3-*

CopyQ is an open-source clipboard manager software with editing and scripting features. It monitors system clipboard and saves its content in customized tabs. Saved clipboard can be later copied and pasted directly into any application.

The latest CopyQ 3.3.0 was released earlier today with following changes:

  • Add option for searching numbers in item list and tray menu
  • Use exception instead of return code for exportData()/importData()
  • Draw icon shadow (for internal icon font)
  • Remove support for Qt 4, require Qt >= 5.1.0
  • Fix storing only non-empty clipboard items
  • Fix opening web browser from script with open()
  • Fix exiting clipboard provider process when not needed
  • Fix exportData()/importData() with relative file paths
  • Fix SVG app icon resolution in some panels
  • Fix closing window after a menu is closed and window is unfocused
  • Fix icons for command error notifications
  • Fix warnings when using system icons
  • Linux: Fixes for AppData, desktop and flatpak files
  • OSX: Fix pasting items
  • OSX: Log errors when global shortcut registration fails

CopyQ clipboard manager in Ubuntu 14.04

Install Copyq 3.3.0 in Ubuntu:

The software has an official PPA repository that contains the latest packages for Ubuntu 14.04, Ubuntu 16.04, Ubuntu 17.10, Ubuntu 18.04 so far.

1. To add the PPA, open terminal from application launcher and run command:

sudo add-apt-repository ppa:hluk/copyq

Input your password (no visual feedback while typing) when it prompts and hit Enter to continue.

2. After added the PPA repository, install CopyQ either via Synaptic package manager or by running commands in terminal:

sudo apt-get update

sudo apt-get install copyq

Once installed, start the clipboard manager from application launcher and you’ll see the icon in system tray area.

Uninstall:

To remove the software, either use Synaptic package manager or run command:

sudo apt-get remove --autoremove copyq

To remove PPA repositories, launch Software & Updates and navigate to Other Software tab.

Enlightenment E22

The second bug-fix and stability release of Enlightenment E22 was announced last night. Here’s how to install it in Ubuntu 17.10, Ubuntu 16.04, and Ubuntu 14.04.

Bug fixes in Enlightenment 0.22.2 include:

  • systray related crashes
  • luncher: popup focus issue.
  • Login with wrong password possible! “Authentication via PAM had errors setting up the authentication session. The error code was 11”
  • BSD CPUClock bryce gadget – arrow moves in the opposite direction
  • luncher preview issues
  • e moves and resizes maximized windows on restart
  • Copy Paste freezes E.
  • Better check for evas gl support
  • Black flicker between E’s splash screen and desktop
  • moving gadgets around multiple times crashes E
  • make it simpler to report bugs
  • wayland / xwayland issues
  • Make Bryce Less like a pogostick
  • lockscreen gadgets are not shown on “startup lockscreen” and “suspend lockscreen”
  • window borders doesn’t accept edje icons
  • For more, go to the news page

How to Install Enlightment E22.2 via PPA in Ubuntu:

For all current Ubuntu releases and derivatives, Enlightenment 0.22.2 is available for install via the PPA repository.

1. Open terminal via Ctrl+Alt+T or by searching “Terminal” from app menu. When it opens, run command:

sudo add-apt-repository ppa:niko2040/e19

Type in your password and hit Enter to add the E21 PPA, though it contains e19 in its name.

2. Then check updates and install the window manager via commands:

sudo apt-get update

sudo apt-get install enlightenment

If everything goes well, log out and select log back with Enlightenment session.

Uninstall:

The PPA can be removed via the Software & Updates utility under Other Software tab. To remove Enlightenment, simply run command:

sudo apt-get remove enlightenment && sudo apt-get autoremove

uGet download manager

uGet download manager reached the 2.2.1 release a few days ago with less memory usage and some bug-fixes.

uGet 2.2.1 was released silently in its project page with following changes:

  • reduce memory usage.
  • mega plug-in: completed size should not be ‘-1’ if file size > 2G on a 32-bit system.
  • adjust speed limit independently without enabling global speed limit.
  • fix that can’t get 1080p video from YouTube.
  • update translation files.

How to Install uGet 2.2.1 in Ubuntu:

There’s no announcement and official PPA updates at the moment of writing.

However, the .deb packages for Ubuntu 14.04 trusty, Ubuntu 16.04 xenial, Ubuntu 17.10 artful, and Ubuntu 18.04 bionic are available at:

uGet 2.2.1 (i386.deb for 32bit, amd64.deb for 64bit)

Download the .deb that matches your Ubuntu edition, and click install it via Ubuntu Software, Gdebi, or by running command in terminal (Ctrl+Alt+T):

sudo dpkg -i ~/Downloads/uget_*.deb; sudo apt-get -f install

Once installed, open the download manager from your application launcher and enjoy!

Firefox 59 Released with Faster Page Load Time

Last updated: March 14, 2018

Firefox 55

Mozilla Firefox reached the new stable 59.0 release last night. The new release focus on improvements to page loading time, firefox screenshots, and more.

Changes in Firefox 59.0 include:

  • Faster load times for content on the Firefox Home page
  • Faster page load times by loading either from the networked cache or the cache on the user’s hard drive (Race Cache With Network)
  • Improved graphics rendering using Off-Main-Thread Painting (OMTP) for Mac users (OMTP for Windows was released in Firefox 58)
  • Drag-and-drop to rearrange Top Sites on the Firefox Home page, and customize new windows and tabs in other ways
  • Added tools to annotate and crop your Firefox Screenshots
  • Enhanced WebExtensions API including better support for decentralized protocols and the ability to dynamically register content scripts
  • Improved Real-Time Communications (RTC) capabilities.
  • Implemented RTP Transceiver to give pages more fine grained control over calls
  • Implemented features to support large scale conferences
  • Added support for W3C specs for pointer events and improved platform integration with added device support for mouse, pen, and touch screen pointer input
  • Added the Ecosia search engine as an option for German Firefox
  • Added the Qwant search engine as an option for French Firefox
  • Added settings in about:preferences to stop websites from asking to send notifications or access your device’s camera, microphone, and location, while still allowing trusted websites to use these features
  • And various security fixes.

Upgrade to Firefox 59 in Ubuntu:

The distribution builds will be available in a few days, check the link before doing following steps.

For Ubuntu 14.04, Ubuntu 16.04, and Ubuntu 17.10, simply launch Software Updater (Update Manager) and you’ll see Firefox in the update list after checking for updates.

upgrade firefox

If you don’t see the Firefox update, make sure “security” and “updates” repositories are enabled by Software & Updates utility:

That’s it. Enjoy!

Gscan2pdf, a simple GUI tool to produce PDFs or DjVus from scanned documents, reached the 2.0 release a few days ago. The new release has switched from GTK+ 2 to GTK+ 3.

Changes in Gscan2PDF 2.0 (and 2.0.1) include:

  • Fixed editing OCR output
  • Fixed displaying image after undoing
  • Fixed displaying image after deleting page
  • Fixed text in progress bars
  • Fixed warning message clearing all pages if no scanner detected
  • Switch from gtk+-2 to gtk+-3, requiring the reimplementation of GtkImageview in pure Perl, as C library not compatible with gtk+-3.
  • Fixed ghosting if flatbed only source option but not set.
  • Fixed setting preferences if frontend not set to libsane-image-perl and no scanner available.

How to Install Gscan2pdf 2.0.1 in Ubuntu:

The developer’s PPA contains the new release packages for Ubuntu 18.04 so far. Ubuntu 16.04 and Ubuntu 17.10 packages are in process.

Open terminal via Ctrl+Alt+T or by searching for “terminal” from app launcher. When it opens, do following steps:

1. Add the PPA via command:

sudo add-apt-repository ppa:jeffreyratcliffe/ppa

Type in your password (no visual feedback while typing due to security reason) when it prompts and hit Enter.

gscan2pdf ppa

2. For those who have a previous release installed, upgrade it through Software Updater:

upgrade gscan2pdf

For the first time, you can either install it via Synaptic Package Manager or by running following commands in terminal:

sudo apt-get update

sudo apt-get install gscan2pdf

How to Remove:

To remove gscan2pdf, either use your system package manager or run command:

sudo apt-get remove --autoremove gscan2pdf

And the PPA can be removed via Software & Updates utility, under Other Software tab.