Archives For November 30, 1999

The first release candidate of the open-source kart racing game, SuperTuxKart 0.10 RC1, was released today.

Since the last beta, SuperTuxKart rc1 features:

  • Networked multiplayer (over LAN or the net) is now ready for general use
  • Replace the old mansion track with the new upgraded Ravenbridge Mansion track.
  • Add the Black forest add-on to the official STK track set!
  • Also numerous bugs have been fixed.

How to Install SuperTuxKart 0.10 in Ubuntu:

The followings steps will install the RC1 release at the moment for Ubuntu 16.04, Ubuntu 18.04, Ubuntu 18.10, Ubuntu 19.04.

This also works for the final SuperTuxKart 0.10 once it’s released.

1. Open terminal either via Ctrl+Alt+T keyboard shortcuts, or by searching for ‘terminal’ from app launcher. When it opens, run command:

sudo add-apt-repository ppa:stk/dev

Type user password (no asterisk feedback) when it prompts and hit Enter to continue adding the PPA.

2. For Ubuntu 16.04 and Linux Mint, you need to run command to refreah system package cache:

sudo apt update

3. Finally install the game via command:

sudo apt install supertuxkart

Once installed, open the game from your system application launcher and enjoy!

Uninstall:

To remove SuperTuxKart, open terminal and run command:

sudo apt remove –auto-remove supertuxkart supertuxkart-data

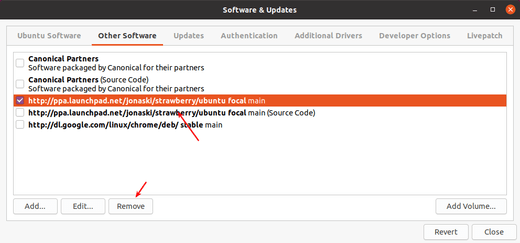
To remove the PPA, open Software & Updates -> Other Software, and remove the repository line:

WPS office for Linux 2019 was released with numerous new features and performance improvements. Here’s how to install it in Ubuntu 18.04.

WPS Office is developed by Zhuhai-based Chinese software developer Kingsoft. The office suite is made up of WPS Writer, WPS Presentation, and WPS Spreadsheet. The latest 2019 release features:

  • New skin style, icons, control points, Supports high resolution screen and custom appearance.
  • New pages, integration of recently opened documents, local templates, document templates, online templates, etc.
  • Document area supports preview effect when setting font size.
  • New built-in browser.
  • Support Home Page, Collection Document Search, Common Location, Cloud Documents, etc.
  • Support personal center, displaying account details and modifying account information.
  • Support for inserting SVG format pictures.
  • Support insertion of QR Code and bar code.
  • Support multi-window, multi-label free splitting and combination, and free management of labels.
  • Support setting areas for dates/times in charts.
  • Support Uygur typesetting.
  • Optimize skin and appearance settings to support custom appearance.
  • And many other new features and bug-fixes.

Download / Install WPS 2019 in Ubuntu:

Go to official WPS Linux download page, scroll down and select download amd64.deb for 64-bit OS, or i386.deb for 32-bit OS.

Downlowd WPS (.deb)

Then open terminal (Ctrl+Alt+T) and install the package via command:

sudo dpkg -i ~/Downloads/wps-office*.deb

Uninstall:

To remove the office suite, run command in terminal:

sudo apt remove --auto-remove wps-office

The latest STABLE release of Plex media server is finally available to install in Ubuntu 16.04, Ubuntu 18.04, and higher easily via Snap package.

The official Plex media server snap is available in BETA channel for quite a long period of time. By releasing version 1.15.2.793, the snap package finally goes stable.

Plex magically organizes your media libraries and streams them to any device – including all your video, music, and photo libraries. With a Plex Pass, supported tuner, and digital antenna, you can also watch and record FREE over-the-air broadcast TV, including major networks. You can also enjoy podcasts Plus Plex News – the most balanced and comprehensive personalized video newsfeed out there. Try Plex FREE!

Install Plex Media Server in Ubuntu 18.04

To install the snap package in Ubuntu 18.04 and higher, simply open Ubuntu Software, search for and install plex:

Install Plex Media Server in Ubuntu 16.04

To install it in Ubuntu 16.04, first make sure snapd daemon is installed by running command in terminal (open terminal via Ctrl+Alt+T):

sudo apt-get install snapd

Then run command to install the snap package:

sudo snap install plexmediaserver

Once installed, the service starts automatically and silently in background with root user.

Open your web browser and go to http://localhost:32401, sign up and start indexing and sorting your media files for easy access.

Uninstall:

To remove Plex media server, depend on your Ubuntu version either use Ubuntu Software or run command in terminal:

sudo snap remove plexmediaserver

shutter screenshot

For those still sticking to the popular screenshot tool, Shutter is available to install in Ubuntu 19.04 via a third-party PPA.

Shutter is no longer available in Ubuntu Software since Ubuntu 18.10, because some old Gnome libraries required by the screenshot tool have been removed from Ubuntu universe repositories.

If you’re just looking for an alternative, I would recommend Flameshot which can be installed from Ubuntu Software.

1. Open terminal either via Ctrl+Alt+T keyboard shortcut, or from application launcher. When it opens, run command to add the PPA:

sudo add-apt-repository ppa:linuxuprising/shutter

Type user password (no asterisk feedback due to security reason) when it prompts and hit Enter to continue.

2. Then install Shutter either via Synaptic package manager or by running command in terminal:

sudo apt install shutter

Once installed, launch it from gnome software menu and enjoy!

Uninstall Shutter:

To remove shutter, simply open terminal and run command:

sudo apt remove --auto-remove shutter

And remove the PPA via Software & Updates -> Other Software.

gnome shell

Ubuntu Gnome desktop will play a simple alert sound for certain types of messages and events, e.g., terminal tab completion alert and usb plugged in or removed.

In Ubuntu 19.04 sound settings, it only provide options to choose a different alert sound, though it used to have an option to disable or mute it in old Ubuntu releases.

1. Open Ubuntu Software, search for and install dconf editor:

2. Launch dconf editor and navigate to org/gnome/desktop/sound.

Then turn off the switch for “event-sounds”.

That’s it.

In addition, previous changes will be restored once you choose an alert sound (pic 1) in Sound settings.

HP Linux Imaging and Printing

HP developed Linux drivers HPLIP 3.19.3 was released with new printers and new Linux Distro’s support.

HPLIP 3.19.3 adds following new devices support:

  • HP OfficeJet Pro All-in-One 9010, 9020
  • HP OfficeJet All-in-One 9010
  • HP PageWide XL 4100 Printer, 4100 MFP, 4600 Printer, 4600PS MFP
  • HP Color LaserJet Managed MFP E77422a, E77422dv, E77422dn, E77428dn
  • HP LaserJet MFP E72425a, E72425dv, E72425dn, E72430dn
  • HP LaserJet Managed MFP E62655dn, E62665hs
  • HP LaserJet Managed Flow MFP E62665h, E62675z, E62665z
  • HP LaserJet Managed E60155dn, E60165dn, E60175dn
  • HP Color LaserJet Managed E65150dn, E65160dn, MFP E67650dh, Flow MFP E67660z

The new release also adds support for Debian 9.7(64-bit), RHEL-7.6(64-bit), LinuxMint 19.1(64-bit). Also Gen2 Class driver now is supported, and basic Booklet printing support for a list of devices.

Download / Install HPLIP 3.19.3 in Ubuntu:

1. To install the software, download the package “hplip-3.19.3.run” from the link below:

HPLIP Download Page

2. Then make the downloaded file executable from its Properties dialog:

3. Finally open terminal either via Ctrl+Alt+T or search for “terminal” from app launcher. When it opens, run command to start installing it:

./Downloads/hplip-3.19.3.run

Type user password (no asterisk feedback) when it prompts and hit Enter.

4. Then follow the terminal prompts, answer some questions to build and install HPLIP on your system. When everything is done, plug/re-plug your printers and enjoy!

In LinuxMint 19.1 cups is not printing from the localhost:631. The work around is to install the cups-filters via commands:

sudo apt-get remove --purge cups
    
sudo apt-get install cups
   
sudo apt install --reinstall cups-filters 

PyCharm IDE

PyCharm IDE 2019.1 was released yesterday with many new features and improvements. Here’s how to install it in Ubuntu.

PyCharm 2019.1 release highlights:

  • Completely redesigned Jupyter Notebooks support
  • Improved quick documentation for HTML and CSS.
  • Navigate quickly to recent locations, rather than files.
  • Python 2.6 and 3.4 are no longer supported.

How to Install PyCharm 2018.3.1 in Ubuntu:

Jetbrains offers official Snap package for Linux desktop, which keeps the IDE always up-to-date.

For Ubuntu 18.04 and higher, simply open Ubuntu Software, search for and install pycharm packages:

For Ubuntu 16.04, open terminal (Ctrl+Alt+T) and install snapd daemon via command:

sudo apt install snapd snapd-xdg-open

Then install PyCharm snap package via command:

sudo snap install pycharm-community --classic

In the command replace pycharm-community with pycharm-professional for the professional edition.

Uninstall:

To remove the PyCharm snap package, either use Ubuntu Software or run command in terminal:

sudo snap remove pycharm-professional pycharm-community

Vivaldi web browser released version 2.4 today. The new release supports drag & drop moving toolbar icons by holding Shift key.

Vivaldi 2.4 release highlights:

  • Toolbar buttons now is movable.
  • Option to reset toolbar.
  • Bookmark a selection of tabs via the context menu (right-click)
  • Support managing people and guest profiles
  • Basic Calculator in Quick Commands
  • Allow double-click to rename tab stack
  • Make it possible to sync the content of the bookmarks bar
  • And many more other changes. See the previous link for details.

How to Install Vivaldi 2.4 in Ubuntu:

The official Ubuntu .DEB packages are available for download at the link below:

Download Vivaldi (DEB)

Grab the deb matches your OS, then install it via Ubuntu Software or Gdebi package manager. Or run command in terminal:

sudo dpkg -i ~/Downloads/vivaldi-stable_2.4*.deb

In addition, after installed the .deb package, you can enable Vivaldi apt repository (Softare & Updates -> Other Software) to receive future updates through Software Updater:

LibreOffice

Ubuntu users can finally upgrade the default LibreOffice office suite to version 6.2 (6.2.2) via PPA, though the LibreOffice 6.2 snap package is available to install for many days.

LibreOffice 6.2 was released a months ago. New features include:

  • LibreOffice NotebookBar UI in 3 styles: Tabbed, Groups, and Contextual.
  • Improved icons for HiDPI displays.
  • Context menus of each app has been reworked and tidied up.
  • Better file compatibility with Microsoft Office

Install Libreoffice 6.2.2 via PPA in Ubuntu:

For Ubuntu 16.04, Ubuntu 18.04, Ubuntu 18.10, and Ubuntu 19.04, do following steps to install the office suite from Libreoffice Fresh PPA.

1. Open terminal either via Ctrl+Alt+T keyboard shortcuts, or by searching for “terminal” from application launcher. When it opens, run command to add the LibreOffice PPA:

sudo add-apt-repository ppa:libreoffice/ppa

Type user password (no asterisk feedback while typing) when it prompts, and read terminal output for PPA description and hit Enter to continue.

2. Then you’ll see the upgrade available in Software Updater after checking for updates.

Or run commands in terminal to install LibreOffice:

sudo apt update

sudo apt install libreoffice

For Ubuntu 18.04 and higher, you can skip sudo apt update as it’s done while adding PPA.

Uninstall:

You can restore to stock version of LibreOffice in Ubuntu main archive by running command in terminal:

sudo apt-get install ppa-purge && sudo ppa-purge ppa:libreoffice/ppa

Stellarium released version 0.19.0 today. Here’s how to install it in Ubuntu 16.04, Ubuntu 18.04, Ubuntu 18.10, and higher.

Stellarium 0.19.0 features 5 new sky cultures, many new DSO textures, code refactoring, and many other changes including:

  • Add new type of computation for AstroCalc/Phenomena tool
  • Add GUI options to change constellations and asterisms font size
  • Add Chinese medieval sky culture.
  • Add DSO textures
  • Add scripting graphics tool
  • Add classifications support for sky cultures
  • Add support 2 southern deep sky catalogues
  • Add armintxe, paleolithic sky culture and landscape
  • Add Maya constellations
  • Add 2 Babylonian skycultures

How to Install Stellarium 0.19.0 in Ubuntu:

1. Open terminal either via Ctrl+Alt+T keyboard shortcut or by searching ‘terminal’ from app launcher. When it opens, run command to add the PPA:

sudo add-apt-repository ppa:stellarium/stellarium-releases

Type user password (no asterisk feedback while typing) when it prompts and hit Enter.

2. Then upgrade Stellarium from an existing release with Software Updater utility:

Or run following commands to install the software for the first time:

sudo apt-get update

sudo apt-get install stellarium

Uninstall:

To remove the software, either use your system package manager or run command:

sudo apt-get remove --autoremove stellarium

And remove the PPA via “Software & Updates” utility under Other Software tab.