Archives For November 30, 1999

Free and open-source planetarium software, Stellarium 0.18.1, was released 2 days ago with new features, many improvements and lots of bug-fixes.

The major changes in Stellarium 0.18.1 include:

  • Improvements and fixes for Hierarchical Progressive Surveys [HiPS] support
  • Updated the main UI, code of plugins, code and data.
  • Updated GPS handling
  • Added rise, transit and set times for celestial objects
  • Added dithering support
  • Many other improvements and various bug-fixes.
  • See the release note for details.

How to Install Stellarium 0.18.0 in Ubuntu:

The software has an official PPA repository that contains the latest Stellarium packages for Ubuntu 16.04, Ubuntu 17.10, Ubuntu 18.04.

1. Open terminal either via Ctrl+Alt+T or by searching ‘terminal’ from app launcher. When it opens, run command to add the PPA:

sudo add-apt-repository ppa:stellarium/stellarium-releases

Input your password (no visual asterisks feedback while typing) when it prompts and hit Enter.

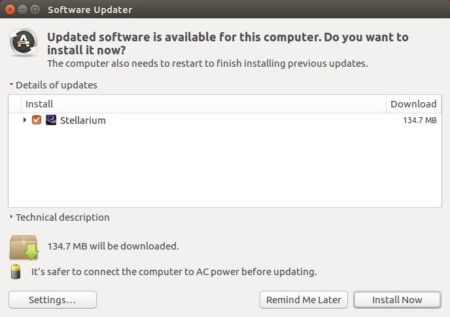
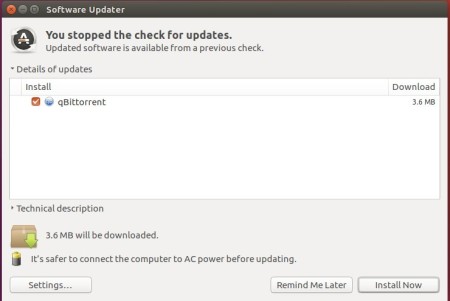
2. Then upgrade Stellarium from an existing release with Software Updater utility:

Or run following commands to install the software for the first time:

sudo apt-get update

sudo apt-get install stellarium

Uninstall:

To remove the software, either use your system package manager or run command:

sudo apt-get remove --autoremove stellarium

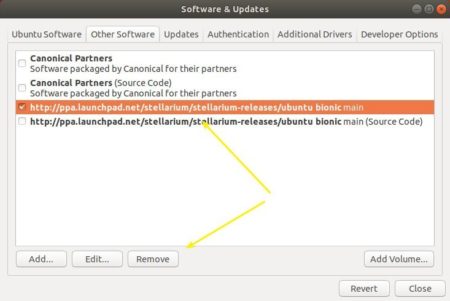
And remove the PPA via “Software & Updates” utility under Other Software tab.

For Ubuntu 18.04 users sticking to open-source graphics drivers, the latest Mesa 18.1.3 graphics library now is available to install via X-Updates PPA.

Mesa 18.1.3 was released a few days ago with several fixes to the RADV Vulkan driver, Meson and Autotools build systems updates, fixes within the common NIR and GLSL compiler code paths, a few Intel driver fixes, and more.

To enjoy some Linux games while using the open source RadeonSI / RADV / Intel / Nouveau drivers, you may follow below steps to install Mesa 18.1.3 in Ubuntu 18.04:

1. Open terminal either via Ctrl+Alt+T or by searching for ‘Terminal’ from software launcher. When it opens, run command:

sudo add-apt-repository ppa:ubuntu-x-swat/updates

Type your password (no asterisks feedback while typing) when it prompts and hit Enter to continue.

2. After adding the PPA, do system update via command:

sudo apt-get dist-upgrade

apt-get update is not required any more in Ubuntu 18.04 since adding PPA automatically refreshes system repositories.

3. Finally check your driver version via command:

glxinfo | grep "OpenGL version"

Uninstall:

To restore changes and downgrade to the default drives shipped in Ubuntu 18.04, run command:

sudo apt-get install ppa-purge && sudo ppa-purge ppa:ubuntu-x-swat/updates

OpenShot Video Editor

OpenShot video editor 2.4.2 was released a day ago with exciting new effects, tons of bug fixes, and performance improvements.

OpenShot 2.4.2 release highlights:

  • 7 New Effects (Crop, Hue, Color Shift, Pixelate, Bars, Wave, Shift)
  • Auto audio mixing strategy per clip (average, reduce, or none)
  • Auto-Rotates any Clip with Reader metadata ‘rotate’ attribute.
  • Experimental codecs now supported in FFmpeg/LibAV
  • Many improvements for Audio playback, stability, export dialog, etc.
  • And numerous bug-fixes. See release note for details.

How to Install OpenShot 2.4.2 in Ubuntu:

OpenShot’s official PPA now contains the 2.4.2 release packages for Ubuntu 14.04, Ubuntu 16.04, and Ubuntu 17.10, and Ubuntu 18.04.

1. Open terminal (either via Ctrl+Alt+T or by searching for ‘terminal’ from app launcher) and run command to add the PPA:

sudo add-apt-repository ppa:openshot.developers/ppa

Input your password (no visual asterisks feedback while typing) when it prompts and hit Enter.

2. Then upgrade the editor via “Software Updater”, if you have a previous openshot-qt package installed.

Or run commands to check updates and install / upgrade OpenShot:

sudo apt-get update

sudo apt-get install openshot-qt libopenshot*

Uninstall:

To uninstall openshot video editor, run following command in terminal:

sudo apt-get remove --autoremove openshot-qt

And remove the PPA by launching “Software & Updates” and navigating to Other Software tab.

Free and open-source musical notation software MuseScore 2.3 was released with new features and numerous bug fixes.

MuseScore 2.3 release highlights:

  • Implement extensions to provide an easy way to install soundfont, templates and instruments.xml
  • Add buzz roll tremolo stem
  • Add a more flexible way to choose noteheads in drumset for percussion instrument
  • Implement filters in Zerberus
  • Add ability to have a different MIDI pitch for drum instrument based on articulation or tremolo
  • Implemented flams and crush notation for unpitched percussion

And there are lots of bug-fixes, see the release note for details.

Install MuseScore via PPA in Ubuntu:

The software has a stable PPA contains the most recent MuseScore packages for all current Ubuntu releases.

Open terminal (either via Ctrl+Alt+T or by searching for terminal from app launcher) and run command to add the PPA:

sudo add-apt-repository ppa:mscore-ubuntu/mscore-stable

Then you can upgrade the software via Software Updater, or run command to install the latest MuseScore:

sudo apt-get update

sudo apt-get install musescore

For more details, see this how to tutorial.

Install MuseScore snap package in Ubuntu:

The software offers official snap package. Snap is an universal Linux package format that runs in sandbox and it auto-updates itself once a new release is published in snappy store.

The snap application can be easily installed in Ubuntu Software:

Download MuseScore appimage:

While PPA and Snap packages are always delayed for a few days, MuseScore 2.3 Appimages, single executable to run the software, are available for download:

MuseScore Appimage (64-bit)

MuseScore Appimage (32-bit)

Select download the appimage matches your OS type, and:

  1. go file Properties -> Permissions tab.
  2. check the box says “Allow executing file as program
  3. finally click Run the appimage to launch MuseScore.

Cinnamon

Linux Mint 19, a popular Ubuntu-based Linux distribution, was officially released today for Cinnamon, MATE, and Xfce editions.

Linux Mint 19, codename “Tara”, is a long term support (LTS) which will be supported until 2023. It ships with Linux kernel 4.15 and based on Ubuntu 18.04.

Linux Mint 19 features:

  • Ships with Cinnamon 3.8, MATE 1.20, Xfce 4.12 for respective editions.
  • TimeShift now is used for performing OS system snapshots (system restore points).
  • Brand new welcome screen.
  • Various improvements to Update Manager and Software Manager.
  • Great improvements for HiDPI support
  • The multimedia codecs now include the Microsoft fonts.
  • All the Mint tools support HiDPI, GTK3 and Python3.
  • XApps, Artwork, and many other improvements.


Download Linux Mint 19

opera web browser

Opera 54 stable was released today with some new features. Here’s how to install it in Ubuntu.

Opera 54 release highlights:

  • Display news feed below your regular Speed Dial folders (enable it in Easy setup).
  • Add “Update and Recovery” in Opera Menu to check browser updates, and reset browser settings.
  • Updated to Chromium version 67.0.3396.87.

How to Install Opera 54 in Ubuntu:

The opera website offers official .deb binaries for Ubuntu Linux, available for download at the link below:

Download Opera for Linux

If you have a previous release installed, and enabled the official Opera Linux repository, upgrade it via Software Updater:

To manually add the Opera for Linux repository, open terminal via Ctrl+Alt+T or from app launcher, when it opens, run commands:

1. Add the opera repository:

sudo sh -c 'echo "deb http://deb.opera.com/opera-stable/ stable non-free" >> /etc/apt/sources.list.d/opera.list'

2. Get the key:

wget -O - http://deb.opera.com/archive.key | sudo apt-key add -

Finally either install Opera via following command or upgrade the browser via Software Updater:

sudo apt-get update

sudo apt-get install opera-stable

Firefox 55

Mozilla Firefox 61.0 was released a few hours ago with further more performance improvements, new features, and safer online experience.

Firefox 61.0 release highlights:

  • Faster page rendering with Quantum CSS improvements and the new retained display list feature
  • Faster switching between tabs on Windows and Linux
  • WebExtensions now run in their own process on MacOS
  • Ability to add search engines to the address bar “Search with” tool from the page action menu.
  • On-by-default support for the latest draft of the TLS 1.3 specification
  • Access to FTP subresources inside http(s) pages has been blocked
  • Improvements for dark theme support across the entire Firefox user interface
  • Added support to allow WebExtensions to hide tabs
  • Improved bookmark syncing

Download / Install Firefox 61

Ubuntu Mozilla team will package the new Firefox release, and publish it in updates / security repositories.

The new release packages will be usually available in a few days, at that time you can install it via Software Updater.

Install OBS Studio Easily via Snap in Ubuntu

Last updated: June 25, 2018

For those who don’t want to add third-party repositories, the free and open-source streaming and recording program OBS Studio now can be easily installed in Ubuntu via Snap package.

Snap is an universal Linux package format. Snap application runs in sandbox and it auto-updates itself once a new release is out and snapped by the maintainer.

The latest OBS Studio 21.1.2 is now available as snap package. You can easily install it from Ubuntu Software:

For Ubuntu 16.04 users who never installed a snap package, run command sudo apt install snapd first to install the daemon.

Or run command in terminal (Ctrl+Alt+T) to install the OSB Studio snap package:

snap install obs-studio

You may found that the snap package is kinda large in file size that because it bundles almost all its dependencies.

NOTE: To access webcam and content on external storage, you need to run 2 two commands:

sudo snap connect obs-studio:camera

sudo snap connect obs-studio:removable-media

Finally launch the software from Gnome launcher or Unity launcher (may need to log out and log in back) and enjoy!

SMplayer

SMPlayer media player 18.6 was released earlier today. Here’s how to install it via PPA in all current Ubuntu releases.

SMPlayer 18.6 release highlights:

  • Updated the library used by the web server for the chromecast feature
  • Added option to choose type of the playlist window: dockable (as before) or just a normal window.
  • Fix the bug that the key shortcuts for play next/previous cause a “busy” mouse cursor in Windows 10.

SMPlayer with Mac skin

How to Install SMPlayer 18.6 in Ubuntu:

For Ubuntu 14.04, Ubuntu 16.04, Ubuntu 17.10, Ubuntu 18.04, and derivatives, do following steps to install or upgrade SMPlayer via the PPA repository.

1. Search for and launch “terminal” from application launcher. When it opens, run command:

sudo add-apt-repository ppa:rvm/smplayer

Input your password (no visual feedback while typing) when it asks and hit Enter.

Smplayer PPA

2. Then upgrade SMPlayer using Software Updater (or Update Manager):

upgrade smplayer

or run commands in terminal to install (or upgrade) the media player:

sudo apt-get update

sudo apt-get install smplayer smtube smplayer-themes

Uninstall:

To remove SMPlayer, run command in terminal:

sudo apt-get remove --autoremove smplayer smtube smplayer-*

And remove the PPA via “Software & Updates” utility under Other Software tab.

This tutorial shows how to disable your laptop’s built-in webcam in Ubuntu 24.04, Ubuntu 22.04, Ubuntu 20.04, and Ubuntu 18.04.

If you rarely use the webcam in your laptop, then it’s a good choice to disable it for privacy and security reasons. Some laptops have physical buttons to do the job, but most others do NOT.

Besides covering your webcam with a sticky note, here’s how to configure your Ubuntu to soft-block using Kernel module option.

Continue Reading…