NVIDIA 346.35, the first stable release of the 346.xx series driver, has been released with new features, improvements, and numerous bug fixes.
Instead of NVIDIA 340.xx series, the new driver becomes the Latest Long Lived Branch version of NVIDIA Linux drivers.
The 346.35 driver brings:
- new GPUs support: GeForce 800A, GeForce 800M, GeForce GTX 970M, GeForce GTX 980M.
- support for X.Org xserver ABI 19 (xorg-server 1.17)
- support for decoding VP8 video streams using the NVCUVID API on GPUs with VP8 hardware decode support.
- new EGL extensions support: EGL_EXT_device_base, EGL_EXT_platform_device, EGL_EXT_output_base
- support for NVENC on GeForce GPUs.
- the ability to increase the operating voltage on certain GeForce GPUs in the GeForce GTX 400 series and later. Voltage adjustments are done at the user’s own risk.
- accelerated support for r8g8b8a8, r8g8b8x8, b8g8r8a8 and b8g8r8x8 RENDER formats.
- support in nvidia-settings for a GTK+ 3 user interface on x86 and x86_64.
- added the nvidia-settings option –use-gtk2 to force the use of the GTK+ 2 UI library
There are also numerous fixes and improvements, see the release highlight.
How to Install NVIDIA 346.35 in Ubuntu:
Before the xorg-edgers PPA updates for this driver, you can download & install the official NVIDIA package by following below steps:
1. Select download the official installer from links below:
32-bit Linux | 64-bit Linux | 32-bit ARM Linux
32-bit or 64-bit? Check your OS type by going to top-right corner shutdown menu (gear button) and clicking ‘About This Computer’
2. To be able to install the new driver, you have to remove the previous driver by running below command in a terminal window (Open terminal from the Dash or by pressing Ctrl+Alt+T on keyboard):
sudo apt-get remove nvidia* && sudo apt-get autoremove
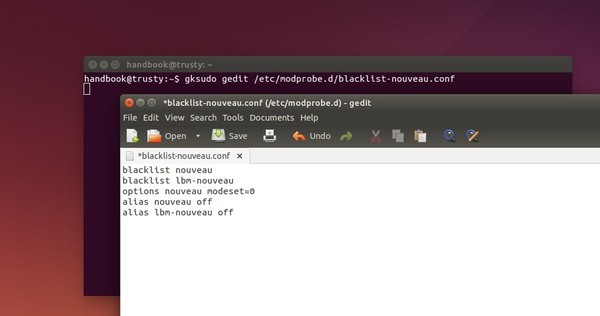
3. You should also blacklist the open source nouveau driver by running below command to edit the config file:
gksudo gedit /etc/modprobe.d/blacklist-nouveau.conf
Add below lines to the end and click save.
blacklist nouveau
blacklist lbm-nouveau
options nouveau modeset=0
alias nouveau off
alias lbm-nouveau off
4. You can also disable the Kernel Nouveau by running below commands one by one:
echo options nouveau modeset=0 | sudo tee -a /etc/modprobe.d/nouveau-kms.conf

sudo update-initramfs -u
5. Finally reboot your computer and when you’re at the login prompt press Ctrl+Alt+F1 (or F2 ~ F6) to switch to command console. Login with your username and password.
6. When you’re at the black & white text console, the graphics session is still there and you can switch back by pressing Ctrl+Alt+F7. You have to kill the graphics session by running below command:
sudo stop lightdm
Replace lightdm with gdm, mdm, or kdm for GNOME, Linux Mint, or KUbuntu.
7. At last give permission to the downloaded package and run it:
cd ~/Downloads && chmod +x NVIDIA-Linux-*-346.35.run && sudo sh NVIDIA-Linux-*-346.35.run
Follow the on screen prompts and when everything’s done reboot your computer. In next boot after log in, run sudo nvidia-xconfig to save your new nvidia configuration.
(Optional) To remove the driver, re-do step 5 & 6 and run:
cd ~/Downloads && sudo sh NVIDIA-Linux-*-346.35.run --uninstall
Also undo the step 3 & 4 by removing the
cd /etc/modprobe.d/ && sudo rm blacklist-nouveau.conf nouveau-kms.conf && sudo update-initramfs -u
Good luck!