Greg Kroah-Hartman has also announced the Linux Kernel 3.12.10 and urged users of 3.12 series to upgrade as soon as possible.
Similar to Kernel 3.13.2, Linux kernel 3.12.10 brings updated architectures, including ARM, s390, PowerPC, PA-RISC, and x86, numerous updates drivers (wireless, rtc, scsi, tty, usb, etc.), some filesystem improvements (mainly Btrfs, HPFS and EXT4), a couple of networking fixes for IPv4 and IPv6, and some sound improvements. See the announcement.
Install / Upgrade to Kernel 3.12.10:
The Ubuntu Kernel Team has build the deb packages which are available in this page. Low-latency Kernel packages are also included.
If you’re comfortable with command line, you can also follow the steps below to download & install this kernel:
1. Download Kernel DEBs:
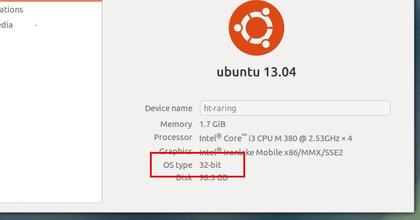
For 32-bit system:
wget http://kernel.ubuntu.com/~kernel-ppa/mainline/v3.12.10-trusty/linux-headers-3.12.10-031210-generic_3.12.10-031210.201402061553_i386.deb

wget http://kernel.ubuntu.com/~kernel-ppa/mainline/v3.12.10-trusty/linux-headers-3.12.10-031210_3.12.10-031210.201402061553_all.deb

wget http://kernel.ubuntu.com/~kernel-ppa/mainline/v3.12.10-trusty/linux-image-3.12.10-031210-generic_3.12.10-031210.201402061553_i386.deb
For 64 bit system:
wget http://kernel.ubuntu.com/~kernel-ppa/mainline/v3.12.10-trusty/linux-headers-3.12.10-031210-generic_3.12.10-031210.201402061553_amd64.deb

wget http://kernel.ubuntu.com/~kernel-ppa/mainline/v3.12.10-trusty/linux-headers-3.12.10-031210_3.12.10-031210.201402061553_all.deb

wget http://kernel.ubuntu.com/~kernel-ppa/mainline/v3.12.10-trusty/linux-image-3.12.10-031210-generic_3.12.10-031210.201402061553_amd64.deb
2. Install all the packages:
sudo dpkg -i linux-headers-3.12.10-*.deb linux-image-3.12.10-*.deb
Once installed, restart your computer and done.
If you’re using a proprietary video driver, you may need to re-build or re-install to get it work with the new kernel.
If for some reason this kernel release doesn’t work properly for you, reboot into previous kernel (Grub -> Advanced -> select previous kernel) and run this command to remove Linux Kernel 3.12.10:
sudo apt-get remove linux-headers-3.12.10-* linux-image-3.12.10-*