Archives For November 30, 2015

classic gnome icon

ClassicMenu Indicator 0.10 has been released. Now it’s based on GTK3 and supports Ubuntu 16.04.

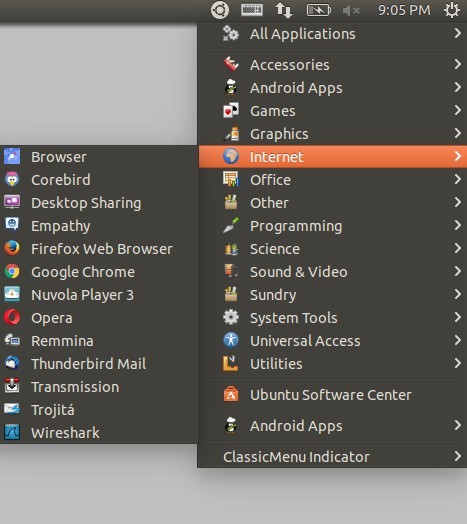
ClassicMenu Indicator is a system tray area applet provides classic GNOME-style application menu for those who prefer this over the Unity dash menu.

Since the last was released two years ago, ClassicMenu Indicator 0.10 brings following changes:

  • ported to GTK3, Python3
  • Ubuntu Software Center in main menu
  • custom logo icon support
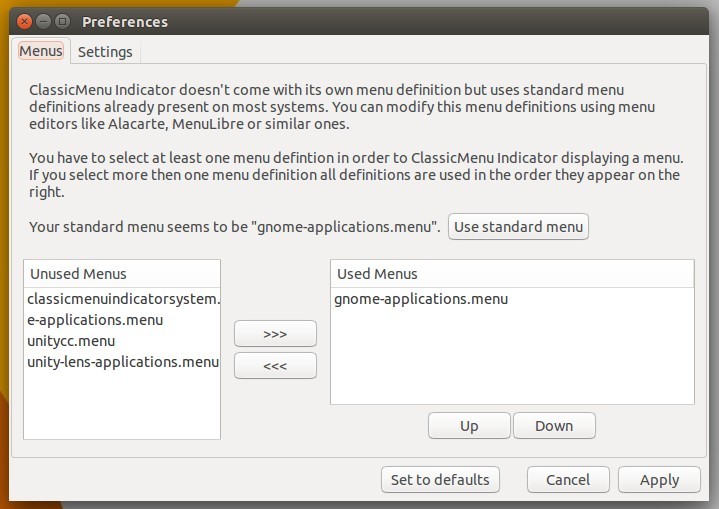
  • new preference window allows to change menu definitions, icons, and other settings.
  • show wine applications, and even Android apps for me.
  • various fixes and translation updates

ClassicMenu Indicator 0.10

classicmenu-definitions

classicmenu-settings

Download and Install ClassicMenu 0.10:

Download the “classicmenu-indicator_0.10_all.deb” package from either

ClassicMenu Indicator Webpage

or

the Official PPA

Then click install it via Software Center. Works for all current Ubuntu releases and based systems, though it’s built against Ubuntu 16.04.

Finally launch ClassicMenu indicator from the Unity Dash menu. Or just log out, it’ll start automatically at next login.

pilemd-markdown

Still looking for a Markdown Editor for your Ubuntu Linux? Try PileMd, a modern new app created a few days ago.

PileMd is an open-source note app that features:

  • Light Weight
  • Like rich editor it has Undo/Redo histories, open link in editors, keymaps
  • Sync data with locall files
  • Note and Text searching
  • Beautiful inline code highlight
  • manage notes with drag and drop
  • paste images, export notes, share on Qiita, and more..
PileMd Markdown Editor in Elementary OS Freya

PileMd Markdown Editor in Elementary OS Freya

pilemd-preview pilemd-manage

Install PileMd Markdown Editor in Ubuntu:

At the moment, there’s only portable version available. Just download the Linux package, extract and RUN EXECUTABLE FILE in the result folder.

Download PileMd for Linux

start-pilemd

To create a shortcut, follow the steps below:

1. Open terminal from App Launcher, and run command to open downloaded package with super user privilege:

gksudo file-roller ~/Downloads/pilemd.linux-x64.0.8.3.zip

Depends on downloaded package name, replace pilemd.linux-x64.0.8.3.zip in the command. Install gksu via Software Center if not work.

archive-manager

2. When archive manager opens, extract it to Computer -> opt folder for global use.

extract2opt

Finally launch file browser and navigate to Computer -> opt. There you should see the PileMd folder. Mine is PileMd-linux-x64

3. To create a launcher, run command in terminal:

gksudo gedit /usr/share/applications/pilemd.desktop

It will open gedit text editor with a blank file, paste below content and save it.

[Desktop Entry]
Name=PileMd
Categories=GNOME;Office;
Exec=PATH-TO-EXECUTABLE %U
Icon=PATH-TO-ICON-FILE
Terminal=false
Type=Application
MimeType=text/x-markdown;text/plain;asdas/dkwodw;

For me, the executable file path is /opt/PileMd-linux-x64/PileMd.

For icon, get it from the source code in release page. Put the icon in the installation folder /opt/PileMd-linux-x64 or user’s local icons folder .local/share/icons(press Ctrl+H to view hidden folders).

Selection_063

When everything’s done, you should be able to launch PileMd from App Launcher.

Linux Kernel

The Linux Kernel has reached the new stable 4.5 release. Linus Torvalds yesterday announced:

    So this is later on a Sunday than my usual schedule, because I just couldn’t make up my mind whether I should do another rc8 or not, and kept just waffling about it. In the end, I obviously decided not to,
    but it could have gone either way.

    We did have one nasty regression that got fixed yesterday, and the networking pull early in the week was larger than I would have wished for. But the block layer should be all good now, and David went through all his networking commits an extra time just to make me feel comfy about it, so in the end I didn’t see any point to making the release cycle any longer than usual.

    And on the whole, everything here is pretty small. The diffstat looks a bit larger for an xfs fix, because that fix has three cleanup refactoring patches that precedes it. And there’s a access type
    pattern fix in the sound layer that generated lots of noise, but is all very simple in the end.


Download and Install Linux Kernel 4.5:

NOT recommended for “normal” users! You MUST know what you’re going to do and how to revert the changes.

Ubuntu Kernel Team has made the binary packages for this kernel release, available for download at the link below:

Download Kernel 4.5 (DEBs)

First check out your OS type, 32-bit, 64-bit, then select install below packages one by one:

  1. linux-headers-4.5.0-xxx_all.deb
  2. linux-headers-4.5.0-xxx-generic_xxx_i386/amd64.deb
  3. linux-image-4.5.0-xxx-generic_xxx_i386/amd64.deb

If you need a low latency system (e.g. for recording audio) then download & install below packages instead:

  1. linux-headers-4.5.0-xxx_all.deb
  2. linux-headers-4.5.0-xxx-lowlatency_xxx_i386/amd64.deb
  3. linux-image-4.5.0-xxx-lowlatency_xxx_i386/amd64.deb

For command line, download and install the kernel debs via:

For 64-bit system:

cd /tmp/

wget http://kernel.ubuntu.com/~kernel-ppa/mainline/v4.5-wily/linux-headers-4.5.0-040500_4.5.0-040500.201603140130_all.deb

wget http://kernel.ubuntu.com/~kernel-ppa/mainline/v4.5-wily/linux-headers-4.5.0-040500-generic_4.5.0-040500.201603140130_amd64.deb

wget http://kernel.ubuntu.com/~kernel-ppa/mainline/v4.5-wily/linux-image-4.5.0-040500-generic_4.5.0-040500.201603140130_amd64.deb

sudo dpkg -i *.deb

For 32-bit system:

cd /tmp/

wget http://kernel.ubuntu.com/~kernel-ppa/mainline/v4.5-wily/linux-headers-4.5.0-040500_4.5.0-040500.201603140130_all.deb

wget http://kernel.ubuntu.com/~kernel-ppa/mainline/v4.5-wily/linux-headers-4.5.0-040500-generic_4.5.0-040500.201603140130_i386.deb

wget http://kernel.ubuntu.com/~kernel-ppa/mainline/v4.5-wily/linux-image-4.5.0-040500-generic_4.5.0-040500.201603140130_i386.deb

sudo dpkg -i *.deb

Uninstall Kernel 4.5:

Reboot computer and select boot with previous kernel (under Advanced Options) entry when you’re at Grub bootloader. Finally remove kernel 4.5 via command:

sudo apt-get remove linux-headers-4.5.0-* linux-image-4.5.0-*; sudo update-grub

MakeMKV icon

MakeMKV is tool converts video clips from DVD / Blu-ray disc into a set of MKV files, preserving most information, so that it can be played on your favorite OS with VLC or MPlayer.

MakeMKV is proprietary software with a free 30-day trial. It’s free to use while in beta, and it’s been in beta for a few years. The software features:

  • Reads DVD and Blu-ray discs
  • Reads Blu-ray discs protected with latest versions of AACS and BD+
  • Preserves all video and audio tracks, including HD audio
  • Preserves chapters information
  • Preserves all meta-information (track language, audio type)
  • Fast conversion – converts as fast as your drive can read data.
  • No additional software is required for conversion or decryption.
  • Available for Windows, Mac OS X and Linux
  • Functionality to open DVD discs is free and will always stay free.
  • All features (including Blu-ray decryption and processing) are free during BETA.

How to Install MakeMKV (Beta) in Ubuntu via PPA:

Besides building MakeMKV from source, an Ubuntu PPA for Ubuntu 16.04, Ubuntu 15.10, Ubuntu 14.04, and Ubuntu 12.04 is available to make it much easier to install.

1. Add PPA

Launch terminal (Ctrl+Alt+T) and paste below command and run to add PPA:

sudo add-apt-repository ppa:heyarje/makemkv-beta

Type in your password (no visual feedback when typing) when it asks and hit Enter to continue.

MakeMKV Beta PPA

2. Update and install the tool via:

sudo apt-get update

sudo apt-get install makemkv-oss makemkv-bin

For those who don’t want to add PPA, grab the .deb packages for both makemkv-bin and makemkv-oss from THIS PAGE.

Once installed, launch it and register the software by going to Help -> Register. Get the Beta key from this forum post.

You can now select your Blu-ray disc drive in MakeMKV window, and click the Steam icon on the toolbar.

MakeMKV

Wait the converting process to be finished, or play the given url (looks like below) while it’s being decoded in background using VLC or MPlayer:

http://localhost:51000/stream/title0.ts

vlc-open-network-stream

Spotify Client for Linux

Linux Spotify client 1.x finally goes stable! The stable Linux repository added support for Ubuntu 16.04 LTS, and Ubuntu 15.10.

Due to lack of developers working on the Linux client, Spotify 1.x takes 9 months of development to be made into stable repository,

In June 2015 we released version 1.x of the client for Linux in the testing repository.

The intention was to fix a few of the bigger issues and then quickly move this to stable. That never happened, since after September, we have had no developers working on the linux client. There are still lots of problem with this version of the client for linux, but we are now seeing much more problems with the old client.

Read the community announcement for more details.

Spotify Client 1.0.24

How to Install Spotify Client 1.x in Ubuntu:

The client now is available for all current Ubuntu releases. Ubuntu 16.04 and Ubuntu 15.10 does not longer need to manually install the libgcrypt11 library.

If you’ve the testing repository added in your system, disable/remove it first via Software & Updates -> Other Software tab.

1. Launch terminal from App Launcher, or via Ctrl+Alt+T shortcut key. When it opens, paste below command and run to add the stable Spotify repository for Linux:

echo deb http://repository.spotify.com stable non-free | sudo tee /etc/apt/sources.list.d/spotify.list

Stable Spotify Repository for Linux

Type in your password (no visual feedback when typing) when it asks and hit Enter.

2. Add the key so that your Ubuntu will trust the packages from that repository:

sudo apt-key adv --keyserver hkp://keyserver.ubuntu.com:80 --recv-keys BBEBDCB318AD50EC6865090613B00F1FD2C19886

3. Finally install the client via Synaptic Package Manager (after clicked Refresh button), or by running below commands in terminal one by one:

sudo apt-get update

sudo apt-get install spotify-client

Mozilla Firefox

Mozilla Firefox web browser has reached version 45. Ubuntu 15.10, Ubuntu 14.04, Ubuntu 12.04, and their derivatives can now upgrade it via Software Updater.

Firefox 45 comes with following changes:

  • Instant browser tab sharing through Hello
  • Tabs synced via Firefox Accounts from other devices are now shown in dropdown area of Awesome Bar when searching
  • Synced Tabs button in button bar
  • a new preference (network.dns.blockDotOnion) to allow blocking .onion at the DNS level
  • Tab Groups (Panorama) feature removed
  • HTML5 improvements with ES6 classes, a Web Speech synthesis API, and Push API support
  • For more, see the release notes

Firefox 45

Upgrade to Firefox 45 in Ubuntu:

Ubuntu Team has made the new release into updates/security repositories for all current Ubuntu releases.

So just launch Software Updater, and you’ll see Firefox 45 available in update list after checking for updates:

Upgrade to Firebox 45

If you don’t see it, please launch Software & Updates and do:

  • switch to “Main Sever” after “Download from” drop-box in first tab.
  • make sure the “important security updates” and “recommended updates” are enabled in Updates tab

Finally, relaunch Software Updater to upgrade Firefox web browser.

Variety Wallpaper Changer

The open-source Variety wallpaper changer has reached the 0.6.0 release with a major new feature – Variety Slideshow.

Variety Slideshow allows you to create a slideshow as desktop background, fullscreen screensaver, or in a normal window with given wallpapers, time interval, and other parameters.

https://www.youtube.com/watch?v=xIdPUFziZHc

The slideshow can be installed as a standalone application, but the options are command-line only. Variety provides the configuration GUI in its Preferences.

Variety Slideshow configurations

The 0.6.0 release also brings other small updates, and i3, openbox, Awesome WM support.

How to Install Variety 0.6.0 in Ubuntu:

For Ubuntu 16.04 LTS, Variety has been made into the universe repositories. Just search for and install it via Software Center.

For Ubuntu 15.10, Ubuntu 14.04, Ubuntu 12.04, and derivatives, launch terminal and run below commands one by one to get it from PPA:

sudo add-apt-repository ppa:peterlevi/ppa

sudo apt-get update

sudo apt-get install variety variety-slideshow

For those who don’t want to add PPA, grab both .deb packages from the PPA packages page.

via: peterlevi.com

CPU-G

The development of CPU-G, a CPU-Z hardware stat tool for Linux, now is continued!

CPU-G is a simple tool that collects and displays information about your CPU, RAM, Motherboard, some general information about your system and more.

This is an application initially developed by Fotis Tsamis and subsequently by Michael Schmöller, Michał Głowienka, Michał Olber. Atareao Team have now decided to continue this project, port it to GTK3 + and improve it as much as possible.

New version of CPU-G is available in PPA for Ubuntu 16.04, Ubuntu 15.10, 14.04, and their derivatives.

CPU-G processor CPU-G motherboard
CPU-G RAM CPU-G system
CPU-G graphics CPU-G about

How to Install CPU-G:

Select download the latest .deb package of the tool at the link below and click install via Software Center:

Download CPU-G

For those who want to receive future updates for this software via System Updater, launch terminal and run below command to add the atareao team PPA:

sudo add-apt-repository ppa:atareao/atareao

Type in your password (no visual feedback) when it asks and hit Enter to continue.

Transmission BitTorrent

Transmission, the default BitTorrent client of Ubuntu, has reached the 2.90 release. Now it’s available in PPA for Ubuntu 15.10, Ubuntu 14.04, Ubuntu 12.04, and their derivatives.

Transmission 2.90 brings miniupnpc API v14, CyaSSL/WolfSSL and PolarSSL cryptographic backends support, various bug fixes and performance improvements to GTK & Qt clients. Read the changelog for details.

Transmission 2.90

Transmission 2.90

How to Install Transmission 2.90 in Ubuntu:

For Ubuntu 15.10, Ubuntu 14.04, Ubuntu 12.04, and derivatives, follow the steps below to install or upgrade the GTK and/or CLI version:

1. Add Transmission PPA.

Launch terminal from App Launcher or via Ctrl+Alt+T shortcut key. When it opens, paste below command and hit run:

sudo add-apt-repository ppa:transmissionbt/ppa

Transmission PPA

Type in your password (no visual feedback when typing) when it asks and hit Enter to continue.

2. Launch Software & Updater and you’ll see the 2.90 release of Transmission available in update list after checking for updates.

Upgrade Transmission

3. (Optional) For any reason you want to revert the changes and downgrade to the stock version of transmission available in your Ubuntu release, purge the PPA via ppa-purge:

sudo apt-get install ppa-purge

sudo ppa-purge ppa:transmissionbt/ppa

That’s it. Enjoy!

Corebird Twitter Client

Corebird discontinued! Try Cawbird as an alternative.

Corebird, an open source twitter client for Linux, just got a new release after almost half a year of development.

The new Corebird 1.2 brings some UI changes, improvements to HiDPI displays, and more. See the full changelog:

  • Inline media and avatars are no longer cached on disk
  • Videos now indicate download progress showing a preview thumbnail with a circular progress overlay
  • We download higher-resolution avatars on HiDPI displays now
  • The build system usage has seen a major refactoring an cleanup, thanks to Rico Tzschichholz
  • The sidebar is now at the top and dark
  • Favorites now us a heart icon
  • Sending tweets is now cancellable (e.g. when multiple images are attached, in which case it might take a while)
  • Inline media are now displayed “full-size”, scaled to the current window size.
  • Instagram videos are now correctly marked as videos, instead of was images
  • If you have GTK+ >= 3.19, there’s now a GtkShortcutsWindow accessible from the app menuexplaining the various keyboard shortcuts. Note that Corebird still compiles and runs with GTK+ 3.16
  • The big “add media” button in the compose window has been replaced with a regular text button. The added images are scaled down and displayed below it
  • You can quote your own tweets now
  • The settings dialog now contains a setting to hide “inappropriate content”, and it is enabled by default.
  • The file selection dialog in the compose window now keeps you from selecting files > 3MB.
corebird in Gnome corebird compose

How to Install Corebird 1.2 in Ubuntu:

There’s no official Corebird binary packages. Unofficial builds are available in PPA for Ubuntu 15.10 and Ubuntu 16.04. Since it requires GTK+ 3.16, Ubuntu 14.04 LTS is not supported.

1. Launch terminal from App Launcher or via Ctrl+Alt+T shortcut key. When it opens, paste below command and hit run:

sudo add-apt-repository ppa:ubuntuhandbook1/corebird

Type in password (no visual feedback when typing) when it asks and hit Enter to continue.

Install Corebird Twitter Client from PPA

2. Then refresh your system cache and install the software:

sudo apt-get update

sudo apt-get install corebird

For those who don’t want to add PPA, grab the .deb package (select i386 for 32bit, amd64 for 64bit) from THIS PAGE, and click install via Software Center.