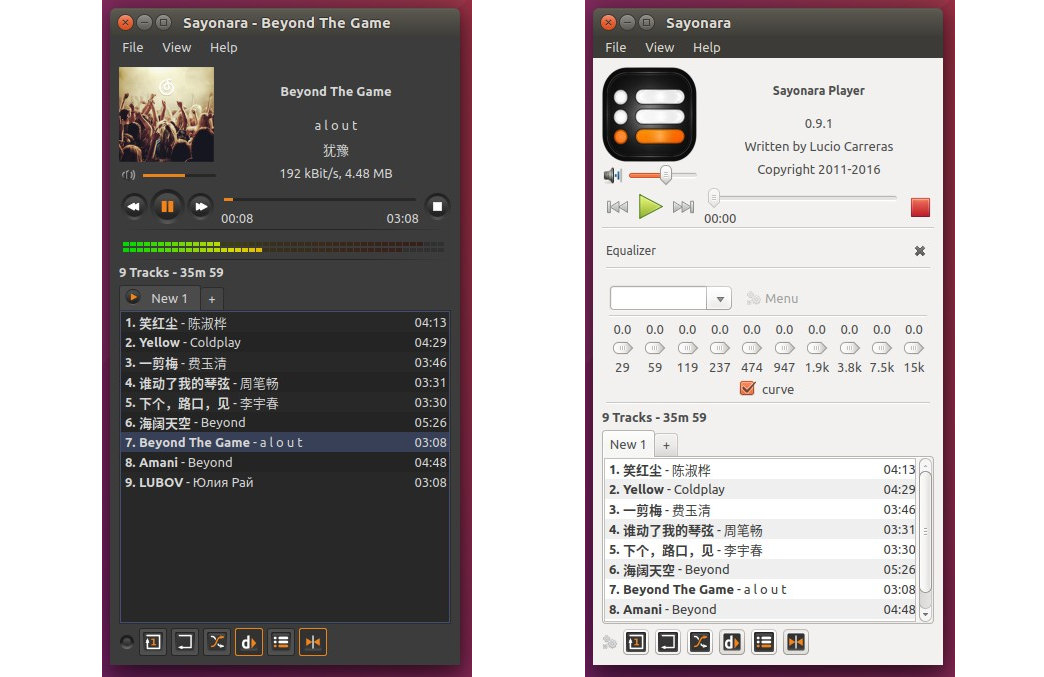
Archives For November 30, 1999

cinelerra 4.6

Cinelerra video editing and compositing software now is at version 4.6. The 64-bit binary for Ubuntu 14.04 is available from Heroine Warrior.

The Cinelerra HV version is produced by Heroine Virtual, and is free software distributed under the GNU General Public License. Cinelerra also includes a video compositing engine, allowing the user to perform advanced compositing operations such as keying and mattes.

What’s New in Cinelerra HV 4.6:

  • Split pane editing.
  • OpenGL supported on Intel HD.
  • Titler improvements.
  • Bugfixes.

Install Cinelerra 4.6 in Ubuntu 14.04 64-bit:

1. Download the 64-bit binary from the link below:

Download Cinelerra HV 4.6

2. Press Ctrl+Alt+T on keyboard to open the terminal. When it opens, run the command below to open Archive Manager with root permission:

gksudo file-roller

When the Archive Manager opens:

  • Click the Open icon, navigate and select open Cinelerra package.
  • When the package opens, click the Extract button, select extract to /opt/ folder.

extract-cinelerra

When done, you can start the Cinelerra video editor by running command /opt/cinelerra/cinelerra in terminal.

3. Create launcher shortcut for Cinelerra

Press Ctrl+Alt+T to open terminal. When it opens, run command to create a launcher file and open it with Gedit text editor:

gksudo gedit /usr/share/applications/cinelerra-hv.desktop

When the editor opens, paste below into the file and save it.

[Desktop Entry]
Name=Cinelerra-HV
Comment=Video Editor
Categories=Application;AudioVideo;Multimedia;VideoEditing;
Encoding=UTF-8
Exec=/opt/cinelerra/cinelerra
Icon=
Terminal=false
Type=Application

You can grab a shortcut icon from web and input the file path after Icon= in above content.
cinelerra-launcher

When done, you can search for and open Cinelerra video editor from Unity Dash. Enjoy!

QuiteRSS newspaper view

QuiteRSS news reader now is at version 0.17.0. The new release allows to browse feeds in newspaper layout.

QuiteRSS is a free and open source RSS/Atom feed reader available for Windows, Mac OS X, and Linux. It aims to be quite fast and comfortable to user, and features embedded browser (Webkit core), Unity indicator, adblock, click to flash, and more.

QuiteRSS in Newspaper mode

According to the release note, since QuiteRSS 0.17.0 it allows to switch between the classic and newspaper layout mode through menu View -> Layout.

QuiteRSS switch layout

It has been found that the newspaper mode has an issue on news deletion. The developer commented that it will be fixed in next release.

Besides the newspaper mode, this release contains:

  • Added: Socks5 proxy support
  • Changed: News opening in external browser
  • Fixed: Sorting by feed title in news list

Install / Upgrade QuiteRSS in Ubuntu:

The latest release has been made into the official PPA repository, available for Ubuntu 14.04, Ubuntu 12.04 and derivatives.

Press Ctrl+Alt+T on keyboard to open the terminal. When it opens, paste the commands below and run one by one will add the PPA and install the latest QuiteRSS packages:

sudo add-apt-repository ppa:quiterss/quiterss

sudo apt-get update

sudo apt-get install quiterss

install-quiterss-from-ppa

After added the PPA, you can receive future updates by running regular system updates via Software Updater.

Don’t want to add PPA? Grab the .deb directly from the Launchpad Page and install it via Software Center.

SMPlayer Ubuntu

The latest SMPlayer 14.9 has been released recently with Youtube playback fixed. The official PPA is ready for Ubuntu 14.10, Ubuntu 14.04, and Ubuntu 14.04.

SMPlayer is a free and open-source GUI for MPlayer based on QT. It features audio and video filters & equalizer, multiple speed playback, configurable subtitles (Internet fetch), build-in Radio, TV, and Youtube browser support.

SMPlayer in Ubuntu

The new version 14.9 was released recently on September 7, 2014. According to the release note, the new release brings:

  • a new fix for Youtube playback
  • improved the option to search for subtitles
  • ability to shut down the computer after playback.

Install / Upgrade SMPlayer in Ubuntu:

The new release has been made into the PPA, available for Ubuntu 14.10, Ubuntu 14.04, Ubuntu 12.04 and derivatives.

To add the PPA, press Ctrl+Alt+T on keyboard to open terminal. When it opens, run:

sudo add-apt-repository ppa:rvm/smplayer

After that, update the system package lists and install the player:

sudo apt-get update; sudo apt-get install smplayer smtube smplayer-themes smplayer-skins

Install SMPlayer from PPA in Ubuntu

That’s it. Enjoy!

faenza icons 1.3.1 ubuntu 14.10

Faenza is a legendary icon pack for Gnome provides monochromatic icons for panels, toolbars and buttons and colourful squared icons for devices, applications, folder, files and Gnome menu items. Four themes are included to fit with light or dark themes/panels.

The icon theme is created by tiheum. The sources can be downloaded from Google Code.

The creator has built the Ubuntu binaries into PPA so that we can easily install the Faenza icon theme in Ubuntu via below steps:

1. Click the link below to download the .deb package from the developer’s PPA repository:

Faenza-icon-theme 1.3.1 DEB

2. Double-click the package to open with Ubuntu Software Center and click the install button:

Install Faenza Icon Theme

3. After installed the theme, open Unity Tweak Tool (install it from Ubuntu Software Center) and navigate to Appearance -> Icons.

You’ll see the Faenza themes available in the list. Choose one to apply the icons immediately.

apply faenza icons

That’s it. Enjoy!

xfce4 window titlebar & buttons on panel

This simple tutorial shows Xubuntu or Xfce4 users how to get the titlebar & control buttons of maximized window on the panel using Windowck plugin.

First take a look at the result (Ubuntu 14.04 with Xfce 4.10). You’ll see the title of current Firefox tab on top panel and the window control buttons on the top-right.

xfce4-titlebar-on-panel

To get started:

1. Install the xfce4-windowck-plugin, written by Alessio Piccoli and Cédric Leporcq.

Download the binary from the link below that matches your OS type:

  1. 64-bit system – xfce4-windowck-plugin_xxx~trusty_amd64.deb
  2. 32-bit system – xfce4-windowck-plugin_xxx~trusty_i386.deb

Download Xfce4-windowck-plugin

Then double-click the package to open with Software Center and click the install button to install it.

2. Add the ‘Window Header – Title’ and ‘Window Header – Buttons’ to panel.

Now right-click on panel and navigate to panel -> panel preferences. Add the two panel items ‘Window Header – Title’ & ‘Window Header – Buttons’ and move them to appropriate locations:

xfce-add-panel-items

After that, maximize a window and you’ll see the window title and buttons on the panel.

3. To get better appearances, do:

  • Use Window Menu instead of Window Buttons in panel, see above picture
  • Hide the original titlebar when the window is maximized.

    To do so, press Ctrl+Alt+T on keyboard to open the terminal. When it opens, run the commands below one by one:

    sudo apt-get install maximus
    
    gconftool-2 --set /apps/maximus/no_maximize --type=bool true

    Log out and back in to get it work.

4.(Optional) Uninstall.

Just remove the two panel items from the above picture and run below command to restore maximized window decorations:

gconftool-2 --set /apps/maximus/no_maximize --type=bool false

via: xfce.org

Install PlayOnLinux Ubuntu

PlayOnLinux, Wine GUI for installing Windows applications and games in Linux, has just released version 4.2.5 which added compatibility with Debian 8 & Mac OS 10.10.

PlayOnLinux is a graphical front-end for the Wine software compatibility layer which allows Linux users to install Windows-based video games, as well as many other applications such as Apple iTunes, Safari, Microsoft Office (2000 to 2010), Microsoft Internet Explorer. See a list of supported software.

PlayOnLinux

The latest PlayOnLinux 4.2.5 was released with below changes:

  • Fix reading/writing values containing ‘=’ symbol in configuration files
  • Make POL_Wine_InstallFonts preserve current directory (regression since 4.2.3)
  • Disable “Install” component button until a component is selected
  • Compatibility with wxpython 3.0, Debian 8, Mac OS 10.10
  • Mention URL in POL_Download and POL_Download_Resource error messages
  • Add POL_Config_Win16 to check if the host can run win16 programs.

How to install PlayOnLinux:

For Ubuntu, you can install always install the latest PlayOnLinux via its official repository:

1. First of first install wine. Press Ctrl+Alt+T on keyboard to open the terminal. When it opens, paste the commands below and run one by one:

sudo add-apt-repository ppa:ubuntu-wine/ppa

sudo apt-get update

sudo apt-get install wine1.7:i386

Install the latest wine in ubuntu

2. Then install PlayOnLinux from its repository. For Ubuntu 12.04, replace trusty with precise in the code.

wget -q "http://deb.playonlinux.com/public.gpg" -O- | sudo apt-key add -

sudo wget http://deb.playonlinux.com/playonlinux_trusty.list -O /etc/apt/sources.list.d/playonlinux.list

sudo apt-get update

sudo apt-get install playonlinux

Install the latest PlayOnLinux in Ubuntu

For Debian, Fedora and other Linux Distributions see the official download page.

Install UberWriter in Ubuntu

This quick tutorial shows you how to install UberWriter, a free word processor for markdown, via the official PPA in Ubuntu 14.04.

UberWriter is free and open source word processor, text editor for Ubuntu with markdown support. It provides a very clean interface with out of box spellcheck.

The UI now is based on GTK3 with client-side decorations support. If offers Focus, Fullscreen, Dark, and preview mode and allows to search and replace texts.

Through pandoc, it is possible to export to PDF, HTML, ODT and even more formats through the Advanced Export option.

Watch the video to see it in action:

Install UberWriter in Ubuntu:

UberWriter is available in Ubuntu Software Center, but it costs $5.

For the latest release and receiving future updates, the developer offers a launchpad PPA for Ubuntu 14.04. The PPA also provides old versions for Ubuntu 13.10, Ubuntu 12.04.

Press Ctrl+Alt+T to open the terminal. When it opens, paste the commands below and run one by one:

sudo add-apt-repository ppa:w-vollprecht/ppa

sudo apt-get update

sudo apt-get install uberwriter

install-uberwriter

Above commands will add the developer’s PPA and install UberWriter in your system for free.

Note: UberWriter uses client-side decorations. The Unity integration is not entirely done yet. (Adwaita theme looks much better and inconsolata is missing in the dependencies.)

Install AVRDude in Ubuntu

This quick tutorial shows you how to install the latest AVR Downloader/UploaDEr 6.1 in Ubuntu 14.04 while Software Center provides an old version.

AVRDUDE, stands for AVR Downloader/UploaDEr, is software for programming Atmel AVR Microcontrollers. It provides a command-line interface for all downloading and uploading features. Supports a wide range of programming hardware, from cheap ISP plugs that connect the AVR’s ISP interface directly to a computer’s parallel port or serial port. Supports Intel Hex, Motorola S-Record, and raw binary files for input and output.

The latest version 6.1 was released with below changes:

  • Atmel EDBG protocol support added (JTAGICE3, XplainedPro, Atmel-ICE)
  • Atmel DFU, using FLIP protocol version 1 (AT90USB and ATmega*U* devices), or version 2 (Xmega devices) support.
  • Atmel-ICE (ARM/AVR), JTAG, PDI, debugWIRE, ISP modi support.
  • Fixed:
    • AVRDUDE segfaults when writing eeprom
    • Typo fix in fuses report (for 6.1-svn-20130917)
    • verify errors for object size > 16 k on x32e5 due to typo in avrdude.conf
    • Elf file support (possibly) not working on 6.0.1 windows build
    • AT Mega2560 not correctly programmed with stk500(v1) ISP (solution patch)
    • OS X: Avrdude messes with the usb stack?
    • dfu.c missing include
    • DFU FLIPv2 programming support
  • (Some) programmers can take a list of USB PIDs now.

AVRDude 6.1 is available in a third-party repository for Ubuntu 14.04 LTS. To install it, run commands below one by one in terminal:

sudo add-apt-repository ppa:pmjdebruijn/avrdude-release

sudo apt-get update

sudo apt-get install avrdude

Once installed, run man avrdude to get help or read the documents.

Mega Cloud Storage Sync Client for Ubuntu

MEGA, a cloud storage and file hosting service, now provides an official sync client for Linux Desktop. So far, Ubuntu 14.04, Ubuntu 12.04, Ubuntu 13.10, Ubuntu 12.10 and Nautilus integration are supported.

MEGA features that all files are encrypted client-side using the AES algorithm before they are uploaded. Since Mega does not know the encryption keys to uploaded files, they cannot decrypt and view the content. It provides 50 GB of storage space are available for free and up to 4 TB for paid accounts.

More about MEGA at wikipedia

Recently, MEGA has provided an official sync client for Linux desktops, available for Debian, Fedora, openSUSE, and Ubuntu.

The new client for Ubuntu, MEGAsync features:

  • an Unity indicator
  • Sync with MEGA folder in Nautilus browser with full drag & drop support
  • System notification support.
  • Select sync full or single folder of your MEGA account.
  • Select upload to MEGA via file folders’ context menu
MEGA client: Unity indicator & sync folder in Nautilus

MEGA client: Unity indicator & sync folder in Nautilus

MEGAsync status

MEGAsync status

Upload to MEGA via Context Menu

Upload to MEGA via Context Menu

Download & Install MEGA sync client:

First you may check out your OS type, 32-bit or 64-bit via System Settings -> Details.

Go to the official page via the link below:

Download MEGAsync

Navigate to Your OS edition -> OS Type: amd64 = 64-bit, i386 = 32-bit -> For Ubuntu download both .deb packages.

Select your OS type and click ‘Free Download for Linux’ and also MEGA Nautilus extension.

Finally double-click the package to open it with Ubuntu Software Center and click install, in below order:

  1. megasync_x.x.xx_amd64/i386.deb
  2. nautilus-megasync_x.x.xx_amd64/i386.deb

Once installed, open the client from Unity Dash. Follow the setup wizard to sign in or sign up and select sync full account or single folder.

mega sync client

That’s it. Enjoy!

HotShots screen capture tool

HotShots, a screenshot and annotation tool, now is at version 2.2.0. PPA has updated for Ubuntu 14.10, Ubuntu 14.04, Ubuntu 12.04 and derivatives.

Hotshots is a screenshot tool with some editing features. It is particularly suitable for writing documentation (as used in the following chapters) but you can use it to highlight some details on a map image or what ever you want.

Besides basic screen capturing and editing features, HotShots allows to send image directly to printer or to web services, such as FTP, imgur.com, imageshack.us, canardpc.com, freeimagehosting.net.

HotShots Main window and Unity indicator

HotShots Main window and Unity indicator

HotShots Editor

HotShots Editor

HotShots is a good and lightweight alternative to Shutter except:

  • Undo/Redo buttons are grayed out.
  • Does not support Dropbox.

Install HotShots 2.2.0:

Press Ctrl+Alt+T on keyboard to open the terminal. When it opens, paste the commands below and run one by one:

sudo add-apt-repository ppa:ubuntuhandbook1/apps

sudo apt-get update

sudo apt-get install hotshots

If you don’t want to add the PPA, grab the .deb package directly from Launchpad Page.