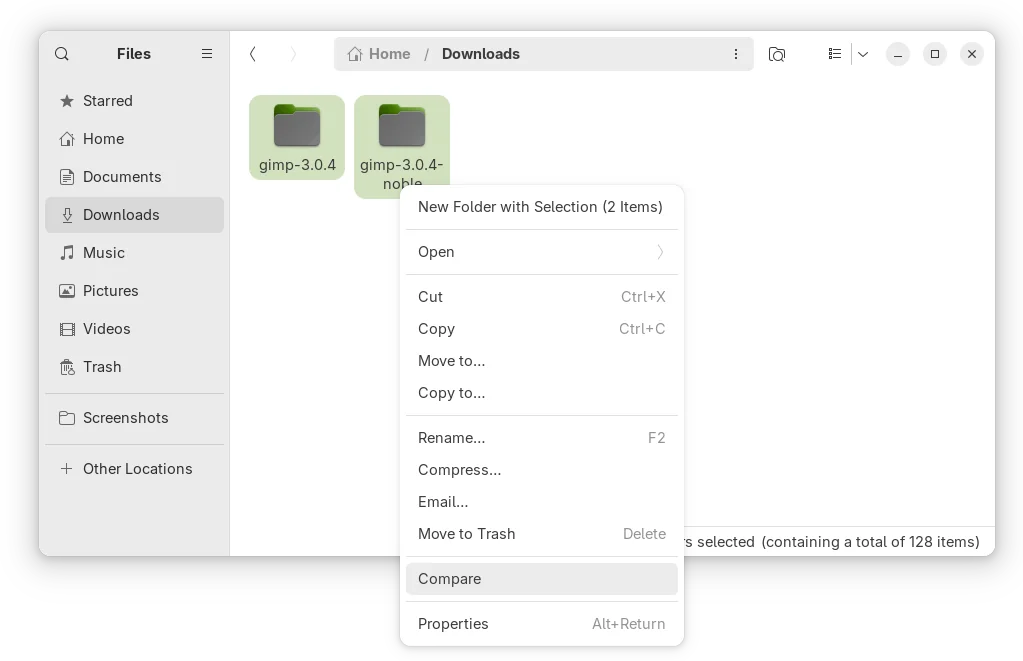
Archives For November 30, 1999

The Audacity audio tag editor announced the new 3.3.0 release. Here’s how to install it in Ubuntu 18.04, Ubuntu 20.04, Ubuntu 22.04, and Ubuntu 23.04.

Audacity 3.3.0 is a new major release that features initial version of Beats and Measures. Some built-in effects (such as, Bass & Treble, Distortion, Phaser, Reverb and Wahwah) are now realtime capable.

The new release also added “Shelf Filter” function which is vailable in ‘Effect -> EQ and Filters’ menu.

Other changes in Audacity 3.3.0 include:

  • New “Time Signature Toolbar” (hidden by default)
  • New ruler, Linear (dB)
  • Add delete button to the Cut/Copy/Paste toolbar.
  • FFmpeg 6.0 support.

How to Install Audacity 3.3.0 in your Linux

Option 1: AppImage

Audacity now provides official Linux package through AppImage. It’s non-install software package that can be run directly to launch the application.

First, download Audacity from the link below (under ‘Assets’ section):

Then, right-click on the AppImage in file manager, go to “Properties” and enable ‘allow executing file as program‘ under Permissions tab. Finally, click run the AppImage to launch Audacity audio editor.

Ubuntu 22.04 and higher does not support AppImage out-of-the-box, press Ctrl+Alt+T on keyboard and run command to enable it:

sudo apt install libfuse2

And, if you want to create app shortcut for this AppImage package, here’s an application to automate the process.

Option 2: Flatpak

Audacity is also available to install as Flatpak package, though it’s not updated at the moment of writing.

1. First, press Ctrl+Alt+T on keyboard to open terminal. When it opens, make sure Flatpak support enabled by running command:

sudo apt install flatpak

NOTE: Ubuntu 18.04 needs to add this Ubuntu PPA first before running the command above.

2. Then, just run the single command to install Audacity as Flatpak package:

flatpak install https://dl.flathub.org/repo/appstream/org.audacityteam.Audacity.flatpakref

For the future updates, just run flatpak update org.audacityteam.Audacity every time in terminal.

Once installed, search for and launch Audacity from start menu or ‘Activities’ overview depends on your desktop environment and enjoy!

Option 3: Ubuntu PPA

For those who prefer the classic .deb package, I’ve upload the software package into this unofficial PPA for Ubuntu 22.04 and higher.

Just launch terminal, and run commands below one by one to add PPA and install the editor:

sudo add-apt-repository ppa:ubuntuhandbook1/audacity
sudo apt update
sudo apt install audacity

Uninstall Audacity

For the Appimage package, just remove the file and done.

For Flatpak package, open terminal (Ctrl+Alt+T) and run command:

flatpak uninstall --delete-data org.audacityteam.Audacity

Also run command to remove unused runtime libraries to free up disk space:

flatpak uninstall --unused

For the PPA package, remove it via command:

sudo apt remove --autoremove audacity audacity-data

Also remove the Ubuntu PPA by running command:

sudo add-apt-repository --remove ppa:ubuntuhandbook1/audacity

This simple tutorial shows how to install Adobe Acrobat Reader 9.5.5 in Ubuntu 24.04, Ubuntu 22.04, Ubuntu 20.04, and most other Linux.

Adobe has discontinued Linux support for its Acrobat PDF reader for many years! There are now many free open-source Linux apps for reading and/or editing PDF files.

However, if you like, the old Adobe Acrobat Reader 9.5.5 is still can be installed in current Ubuntu and other Linux, though it’s unmaintained and may contain security vulnerabilities.

NOTE: Adobe Reader 9.5.5 discontinued in 2013, it may have bugs and security issues! Install and use it at your own risk!

Thanks to @Ray Schumacher (see the comment below), Adobe website still provide native .deb package for the v9.5.5 version. It did install in my case in Ubuntu 24.04, however refused to launch due to the error below:

/opt/Adobe/Reader9/Reader/intellinux/bin/acroread: error while loading shared libraries: libgdk_pixbuf_xlib-2.0.so.0: cannot open shared object file: No such file or directory

The libgdk-pixbuf-2.0-0:i386 package offers the missing library, but it somehow refused to install in my test. So, this tutorial shows you how to install the Flatpak package instead, which works in all current Ubuntu releases, Fedora, Debian, Arch, and most other Linux.

Install Abode Reader 9.5.5 via Flatpak package

Flatpak is an universal Linux package format that runs in sandbox environment. It takes more disk space due to shared run-time libraries, however can be more safe since it runs in container.

1. Enable Flatpak Support

Ubuntu does NOT support Flatpak out-of-the-box, due to favor of Snap. It’s however easy to add it support by doing the steps below one by one.

1. (Ubuntu 16.04|18.04 only) For the old Ubuntu 16.04 and Ubuntu 18.04, press Ctrl+Alt+T on keyboard to open terminal. And, run command to add the Flatpak official PPA.

sudo add-apt-repository ppa:flatpak/stable

Then, update system package cache via:

sudo apt update

2. Press Ctrl+Alt+T on keyboard to open terminal. When terminal opens, run command to enable Flatpak support:

sudo apt install flatpak

For other Linux, follow this official setup guide instead for Flatpak support.

2. Install Adobe Reader Flatpak package

Once you got the file format support, then run the command below to install the Flatpak app package:

flatpak install https://dl.flathub.org/repo/appstream/com.adobe.Reader.flatpakref

Flatpak runs in sandbox. Though, the PDF reader itself only takes 59 MB, it needs also download & install hundred of MB run-time libraries.

Once installed, either right-click on your PDF file and select “Open With Other Application” to choose Adobe Reader, or just search for and launch it from the overview screen.

NOTE: If this is the first app installed as Flatpak package in your system, you may need to log out and back in to make app icon visible.

3. Add Printer Support & Grant other Permissions

As mentioned, the Flatpak package runs in sandbox environment, which has NO permission by default to access printing system.

To enable this feature, first, open terminal (Ctrl+Alt+T) and run command to install Flatseal app:

flatpak install https://dl.flathub.org/repo/appstream/com.github.tchx84.Flatseal.flatpakref

Then, launch the “Flatseal” app, navigate to “Adobe Reader” in left pane of the pop-up app window, finally scroll down in right, find-out and turn on the toggle option for “Printing system”.

NOTE: If you intent to use network printer, then you also need to enable “Network” toggle option for this app package.

Uninstall Adobe Reader

To remove the software package, also open terminal (Ctrl+Alt+T) and run command:

flatpak uninstall --delete-data com.adobe.Reader

You may also run command to remove unused runtime libraries to free up disk space.

flatpak uninstall --unused

KDE’s Kdenlive video editor has released version 23.04, here are the new features and how to install guide for (K)Ubuntu 22.04 & (K)Ubuntu 22.10 via PPA.

According to the KDE Gear 23.04 release note, Kdenlive 23.04 features new nested timelines.

The new feature allows user to select several video clips from tracks, and use right-click menu option “Create sequence from selection” to group them together as one single sequence. User can then edit the sequence, apply effects, and add transitions between nested and regular clips.

For more about Kdenlive 23.04, see the official release note which will be available soon tomorrow.

How to Install Kdenlive 23.04 in Ubuntu

The official PPA has built the new release package for Ubuntu 22.04 and Ubuntu 22.10, though it somehow does not support Ubuntu 23.04 yet.

1. First press Ctrl+Alt+T on keyboard to open terminal, or search for and launch ‘Konsole‘ from start menu. When it opens, run command:

sudo add-apt-repository ppa:kdenlive/kdenlive-stable

Type user password (no asterisk feedback) when it asks and hit Enter to continue.

2. After adding PPA, user can either open Software Updater (or Update Manager) to update the software package from an installed version:

Or run the command below to install or update the video editor:

sudo apt install kdenlive

NOTE: Linux Mint user has to run sudo apt update first to manually refresh package cache

And, if you got overwriting files issue due to the old dependencies: libmlt-data and melt, run command to remove them and then re-run the apt command above:

sudo dpkg -r melt libmlt-data

Once installed, press Super (Windows logo key) to open ‘Activities’ overview or start menu, and search for and open Kdenlive.

Uninstall Kdenlive

To remove Kdenlive, either use your system package manager or run the command below in a terminal window:

sudo apt remove --autoremove kdenlive

And remove the Ubuntu PPA either by running command in terminal:

sudo add-apt-repository --remove ppa:kdenlive/kdenlive-stable

Or use “Software & Updates” utility to remove the source line under “Other Software” tab.

Since Ubuntu 23.04 Lunar Lobster, the default system fonts for the texts in system menus, documents, and app windows have been changed.

The new font is slim. And, I’ve written a tutorial about how to try it out in Ubuntu 22.04 and 20.04. If you prefer the old one, here’s how to revert it back in Ubuntu 24.04 LTS.

Compare to Ubuntu 23.04/23.10, the new font in Ubuntu 24.04 looks better now in my opinion. Because, the default fonts have been changed:

  • from ‘Ubuntu Regular‘ to ‘Ubuntu Sans‘ for interface text.
  • from ‘Ubuntu Mono Regular‘ to ‘Ubuntu Sans Mono‘ for monospace text.

Default fonts changed in Ubuntu 24.04

Install old Ubuntu Fonts in Ubuntu 24.04

1. Install the classic font

Since Ubuntu 23.10, a new package fonts-ubuntu-classic is available in system repository for those who prefer the classic font.

To install the package, press Ctrl+Alt+T on keyboard to open up a terminal window. Then, run command:

sudo apt install fonts-ubuntu-classic

You may run sudo apt update to refresh system package cache first if the command above somehow does not work for you.

After installing the classic fonts, text in terminal may become un-readable. In the case, just log out and back in.

2. Download & install classic font for Console (Optional)

The classic font for console (terminal) so far is NOT available in Ubuntu 24.04 repository. For choice, you may manually download and install the package for Ubuntu 22.04.

To do so, launch a terminal window (Ctrl+Alt+T), and download the classic font for console package via command:

wget -c https://launchpad.net/ubuntu/+archive/primary/+files/fonts-ubuntu-console_0.83-6ubuntu1_all.deb

Next, install the package by running command:

sudo apt install ./fonts-ubuntu-console_0.83-6ubuntu1_all.deb

3. Apply the classic fonts

Option 1: Use Gnome Tweaks to apply classic fonts:

After installed the classic fonts, it won’t apply automatically, because the default font names have changed as mentioned.

To switch back the old ones, first search for and install GNOME Tweaks from App Center.

Next, launch Gnome Tweaks, and in the first “Fonts” tab:

  • Select Ubuntu Regular as Interface Text font. It will be displayed as ‘Ubuntu’ after selection.
  • And select Ubuntu Mono Regular for Monospace Text, if you also installed the classic font for console.

Option 2: use Linux commands to apply the classic fonts
For those who are OK with Linux commands, open up a terminal window (Ctrl+Alt+T) and run the commands below one by one instead:

gsettings set org.gnome.desktop.interface font-name "Ubuntu 11"
gsettings set org.gnome.desktop.interface monospace-font-name "Ubuntu Mono 13"

Lock & Prevent updating to new fonts

To prevent your system from automatically updating to the new fonts, you have to lock the old fonts packages that were just installed via the previous step.

Thanks to @Alex Farran, lock package version via Synaptic package manager only prevents itself and ‘Software Updater’ from upgrading the package. However, apt command and may be other tools can still upgrade the fonts. So, the best choice can be running the command below in terminal:

sudo apt-mark hold fonts-ubuntu fonts-ubuntu-console

For the graphical way (NOT work for apt), first open App Center, search for and install Synatic Package Manager.

Then launch “Synaptic”, click “Search” and search “fonts-ubuntu“. Finally, do:

  • Press and hold Ctrl then highlight both “fonts-ubuntu” and “fonts-ubuntu-console” packages.
  • Go to menu “Package -> Lock Version”.

How to go back the new Ubuntu Fonts

First, open terminal (Ctrl+Alt+T) and run command to unlock the font packages:

sudo apt-mark unhold fonts-ubuntu fonts-ubuntu-console

Then, also search for and launch Synaptic package manager.

When it opens, search “fonts-ubuntu“. Then do:

  • highlight both “fonts-ubuntu” and “fonts-ubuntu-console” packages via Ctrl + mouse click.
  • Go to menu “Package” and un-check “Lock Version” (skip if NOT enabled).
  • Next, right-click on both packages and select “Mark for Upgrade“.
  • Finally, click on “Apply” button.

When done, reset the font names by running commands in terminal (Ctrl+Alt+T) one by one:

gsettings reset org.gnome.desktop.interface font-name
gsettings reset org.gnome.desktop.interface monospace-font-name

Ubuntu 23.04 has been released! Besides installing from new .iso image, here’s a step by step guide shows how to upgrade from Ubuntu 22.10.

NOTE: The Upgrade process may fail! So it’s HIGHLY recommended to backup your important data first!! And, Ubuntu 22.04 LTS can even follow this tutorial twice to upgrade to 22.10 first, and then to 23.04.

Before getting started:

Backup! Backup! Backup! The most important thing to do first is to backup your important data! The upgrade process could fail due to various reasons, such as power interruption, network issue, or even poor software packages on your system.

1. Before getting started, search for and open “Software & Updates” utility. When it opens, navigate to “Other Software” tab, then disable or remove all third-party PPAs.

2. Also, in “Software & Updates” utility, navigate to “Additional Drivers” tab. Then, select and apply open-source driver, if a proprietary driver is in use.

3. In “Software & Updates“, switch to “Updates” tab. Then, select “For any new version” for “Notify me of a new Ubuntu version” drop-down box.

4. Also, search for and launch “Extension Manager” or “Gnome Extensions” app depends on which one you installed, and disable all user-installed Gnome Shell Extensions to avoid compatibility issues.

Upgrade to Ubuntu 23.04

Now, search for and open “Software Updater” from either overview or ‘Show Applications’ screen. When it opens, install all available package updates.

When done, restart your computer if it prompts to.

Finally, press Ctrl+Alt+T on keyboard to open terminal. And, run command to start software updater and check distribution upgrade!

update-manager -c

If all package updates are properly installed, and useless packages removed, then it should prompt that Ubuntu 23.04 is available.

Just click on “Upgrade” button. Then it will open the release note dialog for Ubuntu 23.04. In my case, it shows a blank page, though it’s not a big deal.

Click “Upgrade” button again. Then it opens the wizard to download and setup the software sources.

When done “Setting new software channels”, it will ask for confirm again. Before clicking “Start Upgrade” button, it’s the last chance to cancel the upgrading the process!

Once you clicked “Start Upgrade” button, it starts downloading and installing all required packages. It can take quite a few minutes depends on your network speed and computer specs.

Before “Cleaning up”, you need to do one more mouse click to confirm.

If everything’s going well, it will ask to restart computer when done.

After all, verify your Ubuntu edition, either by opening “Settings” and navigate to ‘About’ page, or run command in terminal (Ctrl+Alt+T):

cat /etc/issue

That’s all. Enjoy!

The Ubuntu Team announced the Ubuntu 23.04 yesterday!

Ubuntu 23.04, code-name “Lunar Lobster”, is a short term release with 9-month support until January 2024.

The release is powered by the latest Linux Kernel 6.2. The Ubuntu Kernel supports for building and running external kernel modules using Rust programming language.

The desktop edition features GNOME 44, with following changes:

  • “background apps” section (only for flatpak apps) in top-right system menu.
  • QR code support when enabling Wi-Fi hotspot.
  • Wireguard VPN support in Network settings.
  • Redesigned ‘Mouse & touchpad’, ‘Accessibility’ settings page.
  • Icon view support in native file chooser.
  • Bigger avatar icon and bold username in login/lock screen.
  • Save image link and paste into new file in Nautilus.

The release also introduced new installer. It’s a flutter app that has a fast response and modern look and feel. The old installer is still available in case of issues with the new installer.

Lunar new installer wizard

Other changes in Ubuntu 23.04 include:

  • Support for Intel Arc graphics DG2/Alchemist
  • New Intel TDX guest driver
  • Support for Sony DualShock 4 gamepads
  • OpenJDK v17, .NET 7, Python 3.11, go language 1.20, Rust 1.67, Ruby 3.1.
  • New default fonts.
  • LibreOffice is now available on RISC-V
  • Support for enterprise proxy, app confinement and network shares
  • See here for more details.

Get Ubuntu 23.04

The iso images for Desktop, Server and Network install are available for download at the link below:

For cloud, loT, and other images, go to the official download page.

Ubuntu 22.10 users can now upgrade to Ubuntu 23.04. Just install all available updates via “Software Updater“, restart if asked, and finally run update-manager -c command to check distribution upgrades.

This simple tutorial shows how to install or completely remove the XFCE4 desktop environment in Ubuntu 22.04 and/or Ubuntu 24.04.

XFCE4 is lightweight Linux desktop environment aims to be fast and low on system resources. To try it out, I’d recommend to install XUbuntu, Linux Mint, Linux Lite or other Linux with XFCE4 as default.

But for lazy men who don’t want to backup personal data, re-install and re-configure favorite applications again and again, install XFCE4 Desktop on top of the current Ubuntu system is a good choice. And, here’s how to do the job step by step.

Install XFCE4/XUbuntu Desktop in Ubuntu

1. First, open terminal either by pressing Ctrl+Alt+T on keyboard, or by searching from ‘Activities’ overview.

2. When terminal opens, it’s recommended to first run command to update your system package index:

sudo apt update

3 Then, either install XFCE4 desktop, and core apps without changing startup animation, login screen, etc.

sudo apt install xfce4

As you can see in the screenshot, the installation only takes 88.5 MB (126 MB for 24.04) disk space in my case.

Or, install the whole XUbuntu Desktop environment, to make your Ubuntu just look like XUbuntu

sudo apt install xubuntu-desktop

Though, it will install more packages and takes 550 MB (905 MB for 24.04) disk space in my case.

In the case, it also asks to choose which login screen interface to use (Display Manager). Either choose gdm3 to keep original login screen, or use lightdm to switch to the one that is default in XUbuntu. Finally, hit Tab to highlight OK and hit Enter.

Log in XFCE4 Desktop

After installation, restart your computer!

Depends on which display manager you chose in previous step, either select your user and choose “Xfce Session” via the bottom right gear button menu.

Or, directly choose user and type password to login, if you selected lightdm display manager.

After login, you may want to tweak something. In my case, I’d like to right-click on top-panel and go to “Panel -> Add New Items”, then add Whisker Menu to replace the default application menu. In case you don’t see the widget in the list, run command to install it:

sudo apt install xfce4-whiskermenu-plugin

How to Completely Remove XFCE4/XUbuntu Desktop

1. If you installed the ‘xubuntu-desktop’ package and replaced the login screen, open terminal and run command to open the configuration again and choose “gdm3” to restore the original login screen:

sudo dpkg-reconfigure lightdm

2. Also, to restore the original startup animation screen, run command:

sudo update-alternatives --config default.plymouth

In terminal output, type the number for bgrt.plymouth theme and hit Enter.

3. Before removing the packages, it’s HIGHLY recommend to restart or log out, and choose either “Ubuntu” or “Ubuntu on Xorg” session to log in.

Finally, open terminal and run the single command to remove XFCE4 or XUbuntu Desktop packages:

sudo apt remove --autoremove xubuntu-desktop xfce4 xfce4-* libxfce4* espeak-data gnome-software-common libexo-common libgarcon-common thunar-data tumbler-common xiccd atril-common brltty-x11 wslu plymouth-theme-xubuntu* adwaita-icon-theme-full pinentry-gtk2 xterm mesa-utils lm-sensors libxapian30

This command will remove the most packages installed along with ‘xfce4’ or ‘xubuntu-desktop’ package. However, it’s recommended to keep an eye on terminal output to see which packages it’s going to remove, before typing ‘y’ to confirm.

digiKam, the popular KDE photo management software, released new major 8.0.0 version! Here are the new features and how to install guide for Ubuntu users.

digiKam 8.0.0 is a big release after two year of development. It features new online documentation that is well written with plenty of screenshots and screencasts. An EPUB is also available for offline use.

Image support has been greatly improved in this release. It added support for 16-bit float (half float) images in the TIFF Loader, and JPEG-XL, WEBP, and AVIF export settings everywhere.

Other changes include new OCR over scanned text via Tesseract engine, and:

  • Port to Qt6, and still compatible with Qt 5.15 LTS.
  • Spell-checking in the captions/information/properties edit-text widgets
  • Add convert to lossless JPEG-XL, WEBP, and AVIF while importing from camera.
  • Add JPEG-XL, WEBP, and AVIF converters in Batch Queue Manager.
  • Database search by the number of face regions or without face regions.
  • New option to write metadata to files with ExifTool backend.
  • Add support for SQLite WAL (Write-Ahead-Logging) mode.
  • Update G’MIC-Qt tool to last version 3.2.2.
  • Phase One/Leaf IIQ-S v2 support Canon CR3 filmrolls/RawBurst Canon CRM (movie) files Tiled bit-packed (and 16-bit unpacked) DNGs (non-standard) Deflate-compressed integer DNG files are allowed Canon EOS R3, R7 and R10 Fujifilm X-H2S, X-T30 II OM System OM-1 Leica M11 Sony A7-IV (ILCE-7M4) DJI Mavic 3

How to Install digiKam 8.2.0 in Ubuntu & other Linux

The new digiKam release is available to install via both Flatpak and AppImage. Choose either one that you prefer.

Option 1: digiKam Flatpak

1. For digiKam Flatpak package, first press Ctrl+Alt+T on keyboard to open terminal. When it opens, run command to enable Flatpak support.

sudo apt install flatpak

2. Then, run command to install digiKam as flatpak package:

flatpak install https://dl.flathub.org/repo/appstream/org.kde.digikam.flatpakref

As you see in the screenshot below, the flatpak package however will do many downloads for the run-time libraries.

Option 2: digiKam AppImage

Some users do NOT like Flatpak, because it take much more disk spaces. In the case, you can choose to use the non-install AppImage package.

1.) First, select download the latest AppImage package from the link below:

2.) Then, open the Downloads folder in your file manager. And, do following steps to launch digiKam:

  1. Right-click on the AppImage package, and click open “Properties”.
  2. Navigate to “Permissions” tab, and enable “Allow executing file as program”.
  3. Close the “Properties” dialog.
  4. Finally, right-click on AppImage, and click “Run” to launch digiKam.

Create shortcut for the digiKam AppImage

Click run the AppImage launches the digiKam software directly. If you want to add a shortcut into app launcher (search results in ‘Show Applications’ and/or ‘Activities’ overview), do following steps one by one.

1. First, it’s recommended to put the AppImage package into a certain folder for long time use. Here I chose the “.local/bin” directory.

Just, press Ctrl+H in Files, and navigate to .local -> bin (create bin folder if not exist). Then, copy or move the digiKam AppImage into this folder.

2. Then, download the logo icon from web. Just, go to its website, right-click on the logo in top-left and select “Save image as” to download the file.

Finally, rename the file to digikam.svg, and store in “.local/share/icons” (also, create the ‘icons’ sub-folder if not exist).

3. Finally, open terminal (Ctrl+Alt+T) and run command to create the shortcut config file:

gedit ~/.local/share/applications/org.kde.digikam.desktop

Replace gedit with gnome-text-editor for Ubuntu 23.10+, or use nano instead.

When file opens in text editor (or terminal for nano), paste follow lines and save it. For nano, press Ctrl+X, type y and hit Enter to save file.

[Desktop Entry]
Name=digiKam
Comment=digiKam photo management tool
Exec=digiKam-8.0.0-x86-64.appimage
Icon=digikam
Categories=Graphics;
Type=Application
Terminal=false

NOTE: if the bin folder under .local was previously not exist. You need to log out and back in to make it in your PATH.

4. After that, you should be able to search for and launch digiKam from app launcher.

That’s all. Enjoy!

The bluefish text editor released version 2.2.15 recently. Here’s how to install it in Ubuntu 24.04, Ubuntu 22.04, and Ubuntu 20.04 via PPA.

Bluefish is a powerful GTK3 text editor for web and software development. It supports many programming and markup languages, but it focuses on editing dynamic and interactive websites.

The development of Bluefish editor is quite slow. The new 2.2.13 was released as the latest version more than 2 years since the last. And, it’s a very minor maintenance release that features:

  • Greatly improved CSS syntax support.
  • Few user interface improvements.
  • Some minor improvements for the syntax highlighting
  • And some minor bug-fixes.

How to Install Bluefish Editor (2.2.15 Updated) in Ubuntu

The editor only provides source tarball for downloading at the sourceforge web-page.

To make it easy to install in all current Ubuntu releases, I’ve upload the software package into this unofficial PPA. And, it is built against the rules from Debian upstream.

The PPA supports Ubuntu 18.04 (stick to v2.2.14), Ubuntu 20.04, Ubuntu 22.04, Ubuntu 24.04, and their based systems with both x86_64 and arm64/armhf CPU architecture types.

1. First, press Ctrl+Alt+T on keyboard to open terminal. When it opens, run command to add the PPA:

sudo add-apt-repository ppa:ubuntuhandbook1/bluefish

Type user password (no visual feedback) when it asks and hit Enter to continue.

2. For the old Ubuntu 18.04 and Linux Mint users, manually refresh the system package cache by running command:

sudo apt update

3. Finally, either run command to install the text editor:

sudo apt install bluefish

Or, open “Software Updater” and use the tool to upgrade the previous Bluefish package to the latest.

Uninstall or Restore Bluefish

For any issue, you can easily restore to the previous 2.2.12 (or 2.2.11 depends on your Ubuntu version), by purging the PPA repository. To do so, open terminal and run command:

sudo apt install ppa-purge && sudo ppa-purge ppa:ubuntuhandbook1/bluefish

Or, you may directly remove the text editor by running command:

sudo apt remove --autoremove bluefish

And, remove the PPA either by running command in terminal:

sudo add-apt-repository --remove ppa:ubuntuhandbook1/bluefish

or by removing the source line under “Other Software” tab in “Software & Updates” utility.

This simple tutorial is going to show you how to check MD5, SHA1, SHA256, SHA512 file hash in Ubuntu and most other Linux systems.

After downloading a file from the web, it’s important to verify the file integrity. This can be done by checking the hash code of the local file, then compare to the one from the download page. The hash code of local file and the one from download page should be same, before safe for use.

Method 1: Single command to check MD5 or SHA Hash

For most Linux, there’s built-in command line tool to check the file hash.

1. First, open file manager and navigate to the folder that contains the file you want to check. Then, right-click on blank area and select ‘Open in Terminal‘ (or ‘Open Terminal Here’)

2. When terminal opens, type sha and hit Tab key will show you available commands to do the job.

For example, to check sha256 checksum, use command:

sha256sum file_name_here

To check sha1 checksum, use command:

sha1sum file_name_here

Or use command below instead by replacing number 256 with 1, 224, 384, 512, 512224, 512256 accordingly:

shasum -a 256 file_name_here

To check MD5, use command:

md5sum file_name_here

Depends on your machine, the command will take a few seconds to output the hash code. Then, you can compare it with the one from the file download page.

Method 2: Check File Hash in File Manager

Without running a Linux command every time, user can choose to install a file browser extension. So, it’s possible to right-click on the file, and go to its “Properties” dialog to check the file hash.

1. First, press Ctrl+Alt+T on keyboard to open terminal. When it opens, run command to to install the file manager extension:

sudo apt install nautilus-gtkhash

Depends on your Desktop Environment, replace nautilus-gtkhash with:

  • thunar-gtkhash for XFCE desktop’s file manager.
  • nemo-gtkhash for Cinnamon desktop’s nemo file manager.
  • caja-gtkhash for MATE desktop.

2. Once installed, run command to quit file manager:

nautilus -q

Also, replace nautilus depends on which file manager you’re using.

3. Finally, open the folder that contains the file to check the hash. Right-click on it and click on “Properties“.

4. In pop-up dialog, navigate to the last “Digests” tab. Tick the desired hash function, and click on the bottom right “Hash” button to start checking.

When done, compare the hash code with the one from the download page and done!