Archives For Howtos

Want to install and use Google Sketchup on Ubuntu 13.04 Raring? Well, this simple tutorial will show you how to do it. With the help of Wine software, you can install and use Windows software easily in Ubuntu.

Wine is a compatibility layer capable of running Windows applications on several POSIX-compliant operating systems, including Ubuntu Linux. It’s free and open-source software. Wine now is getting a lot better at handling Windows software on Linux systems.

To get started with installing Sketchup 2013 in Ubuntu, download the lastest version of wine. To do that, press Ctrl + Alt + T on your keyboard to open the terminal. When it opens, run the commands below to add its PPA.

sudo add-apt-repository ppa:ubuntu-wine/ppa

Then run below command to update package lists and install wine1.5 (Now the latest wine1.7 is recommended):

sudo apt-get update; sudo apt-get install wine1.5

Once wine is installed, run below command to configure it so that Sketchup could be installed. You may need to log out and log back:

winecfg

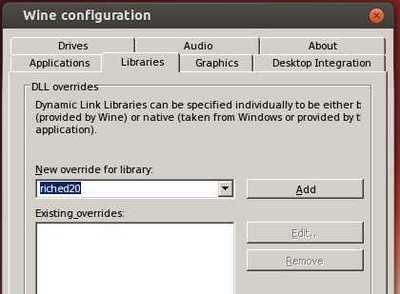
Next, navigate to Libraries tab, then select ‘Riched20’ library from the drop-down list and add it. When done, click OK

wine-configuration

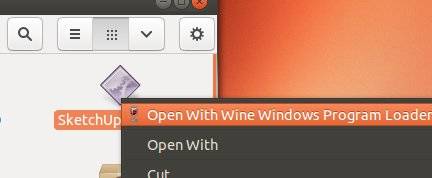
Download Google Sketchup from http://sketchup.google.com/intl/en/download/gsu.html. Then navigate to the Downloads folder and right-click on the EXE to ‘Open with Wine Windows Program Loader’.

open-with-wine

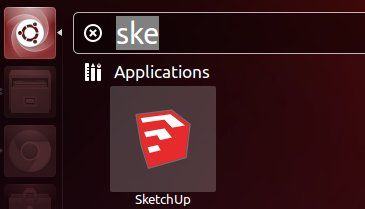
Follow the setup wizard and finally you’ll get the shortcut on the desktop and Unity dash.

sketchup

That’s it. Enjoy!

UPDATE: If Sketchup hangs after choosing a template, try launching it with /DisableRubyAPI as a workaround. Or read the new post about install Sketchup 2014 in Ubuntu 14.04.

Install Cuckoo Alarm Clock on Ubuntu 13.04

Last updated: July 17, 2013

Cuckoo is a simple alarm application that is designed specifically for Ubuntu. It supports the Ubuntu Unity Launcher, HUD, and Indicator interfaces which allows for you to control Cuckoo faster.

Objectives:

  • Install Cuckoo Alarm Clock app on Ubuntu
  • Enjoy!

Since cuckoo is no longer available in Ubuntu Software Center, you can install it from the ppa repository. Press Ctrl+Alt+T to open terminal.

Open Terminal to run commands

Then run below 3 commands one by one to install cuckoo:

sudo add-apt-repository ppa:john.vrbanac/cuckoo

sudo apt-get update

sudo apt-get install cuckoo

If you don’t want to add the ppa, download the DEB from the link below:

cuckoo_1.0.8-1~raring_all.deb

Then install it via:

sudo dpkg -i ~/Downloads/cuckoo_*.deb; sudo apt-get -f install

cuckoo-alarm

Install uTorrent on Ubuntu 13.10

Last updated: November 3, 2013

This tutorial shows you how to easily install uTorrent sever on Ubuntu and Linux Mint. There’s no command, just a few clicks!

First, download uTorrent server: http://www.utorrent.com/downloads/linux. Check 32-bit or 64-bit by top-right corner shutdown menu (gear icon) -> About This Computer.

download-utorrent

After downloading, navigate to the package in Nautilus file browser. Then decompress it.

Go into the extracted folder, right-click on utserver and select Properties.

utserver-executable

Make sure that the box before “Allow execute as a program” is checked.

utserver-executable1

Before starting this service, search for and install libssl0.9.8 (SSL shared libraries) from Ubuntu Software Center.

NOTE: If you’re on 64-bit Ubuntu, press Ctrl+Alt+T and install the libssl0.9.8 with command below in terminal to fix utserver not launching problem:

sudo apt-get install libssl0.9.8:i386

Then double click utserver to start uTorrent server (or run ~/Downloads/utorrent-server-v3_0/utserver command to start it). That’s right you see nothing happens because the server is running as a background program.

Launch your web browser and go to http://localhost:8080/gui/. Type:

username: admin
password: leave password empty

You’re done!

utorrent client in firefox

This brief tutorial will show you how to install the Rigs of Rods on Ubuntu 13.04 Raring and Linux Mint using the official repository.

Rigs of Rods (“RoR”) is an open source multi-simulation game which uses soft-body physics to simulate the motion and deformation of vehicles. The game was built using a specific soft-body physics engine called Beam, which simulates a network of interconnected nodes (forming the chassis and the wheels) and gives the ability to simulate deformable objects. With this engine, vehicles and their loads flex and deform as stresses are applied. Crashing into walls or terrain can permanently deform a vehicle.

The official ppa repository for Ubuntu 12.04 has been announced. So far it supports Ubuntu 13.04, 12.10, 12.04 and 11.10. Here’s how to install it:

Press Ctrl+Alt+T to open terminal, run command to add the ppa:

sudo add-apt-repository ppa:aapo-rantalainen/rigsofrods

rigs of rogs official repository

Then update package lists and install the package:

sudo apt-get update; sudo apt-get install rigsofrods

install rigs of rods ubuntu

Discuss: http://www.rigsofrods.com/threads/97932-Announcement-PPA-for-Ubuntu-12-04

For applications that don’t have launcher icons for Ubuntu, you can manually create them to make available from the Unitys search results.

Yestoday I installed Celtx 2.9.7 on my Ubuntu which doesn’t have a launcher icon by default. I need to run a command in terminal to open it everytime.

Finally I got it fixed, and here’s how:

1.) Open terminal by pressing Ctrl+Alt+T or from Unity Dash.

terminal

2.) Run below command to install required package gnome-panel without installing the recommends.

sudo apt-get install gnome-panel --no-install-recommends

install-gnome-panel-no-recommends

3.) From now, you can create a custom launcher by running this command:

sudo gnome-desktop-item-edit /usr/share/applications/ --create-new

It brings up a dialog, where you can set the launcher icon, name, and command to run it.

The Celtx was installed into /usr/local/celtx/ directory, and run by root. So I found the icon from that directory, and type in command with gksudo at beginning.

celtx-launcher

Once done,click OK. Search in Unity, and you’ll find it!

celtx-unity-dash

This simple tutorial shows how to assign Ctrl+Alt+Del shortcut key for launching system monitor (aka task manager) in Ubuntu Desktop.

The Ctrl+Alt+Del is a well-known keyboard shortcut for launching Task Manager in Windows. In Ubuntu, the key combination by default triggers the log-out dialog, however, it’s easy to re-assign it to a custom action.

Mission Center

Tips: For users switching from Windows, Mission Center (see the screenshot above) is great alternative system monitor and task manager app with similar layout that works on Linux.

Re-assign Ctrl+Alt+Del to launch Task Manager

NOTE: The steps below are only for GNOME, the default desktop in Ubuntu and Fedora Workstation.

1. First, launch “Settings” from top-right corner system menu. Then, navigate to Keyboard in left, Keyboard Shortcuts -> View and Customize Keyboard Shortcut in right.

For Ubuntu 20.04, just click “+” in bottom right after navigating to Keyboard Shorcuts pane in Settings.

2. Next, click Custom Shortcuts and then “+” in pop-up dialog to add new keyboard shortcut. In next pop-up dialog, set:

  • Name: launch task manager.
  • Command: gnome-system-monitor
  • Shortcut: set to Ctrl+Alt+Del

If you installed the “Mission Center” app mentioned above, insert flatpak run io.missioncenter.MissionCenter instead for the Command box, then the keyboard shortcut will launch this app instead.

That’s it. Enjoy!

Nixnote

This tutorial shows how to install NixNote (formerly NeverNote) on Ubuntu 22.04 and Ubuntu 20.04.

NixNote, previously known as NeverNote is an open-source client for Evernote on Ubuntu Linux. It has following features:

  • Synchronizes with Evernote servers
  • Local data caching
  • Cross platform
  • Local-only and synchronized notebooks supported
  • Database may be encrypted locally

There’s a ppa repository contains the latest packages for Ubuntu and Linux Mint users. To install it, press Ctrl+Alt+T to open terminal, then follow the below steps:

NOTE: Don’t know why, but the PPA so far does NOT support Ubuntu 24.04. Check the PPA web page.

1.) Copy and paste this command, and run. It adds the stable ppa repository to your system:

sudo add-apt-repository ppa:nixnote/nixnote2-stable

2.) If you’ve installed Synaptic Package Manager, open it and click Reload button to update package lists. Then search for and install nixnote:

nixnote-synaptic

or, run this command instead to update package cache and install the software:

sudo apt-get update; sudo apt-get install nixnote2

Uninstall Nixnote

To uninstall the app, open terminal (Ctrl+Alt+T) and run command:

sudo apt remove --autoremove nixnote2

Also remove the Ubuntu PPA by running command:

sudo add-apt-repository --remove ppa:nixnote/nixnote2-stable

This tutorial shows you how to install the most recent Rubyripper on Ubuntu 22.04, Ubuntu 20.04, and Linux Mint 21.

Rubyripper is a secure audiodisc ripper for Linux and macOS. It uses cdparanoia in a sophisticated way to make sure that a CD rip is done successfully and accurately. It is very similar to and inspired by EAC. Rubyripper is written in the ruby programming language.

Install RubyRipper in Ubuntu via PPA

Besides building the app from source code, there’s an Ubuntu PPA that so far contains the app packages for Ubuntu 23.10, Ubuntu 22.04, Ubuntu 20.04, and even Ubuntu 18.04.

1. To add the PPA, press Ctrl+Alt+T on keyboard to open up a terminal window. Then run command:

sudo add-apt-repository ppa:alex-p/rubyripper

Type user password (no asterisk feedback) when it asks and hit Enter to continue.

2. Then, refresh system package cache, though it should be done automatically in current Ubuntu releases.

sudo apt update

3. Finally, run command to install the app from PPA:

sudo apt install rubyripper

Once installed, search for and launch it from either start menu or overview screen depends on your desktop environment, and enjoy!

Uninstall Rubyripper

To uninstall the app package, open terminal (Ctrl+Alt+T) and run command:

sudo apt remove --autoremove rubyripper

Also remove the Ubuntu PPA by running command:

sudo add-apt-repository ppa:alex-p/rubyripper-daily

Finally refresh cache via sudo apt update command if it’s not done automatically.

How to Install Celtx 2.9.7 on Ubuntu Linux

Last updated: April 24, 2024

UPDATE: Celtx no longer support offline mode. See support.celtx.com

This brief tutorial is going to show you how to properly install Celtx on Ubuntu 13.10 Saucy, 13.04 Raring, 12.10 Quantal, and Linux Mint.

Celtx is the world’s first fully integrated software for Pre-Production and collaboration of film, theatre, radio, AV and comics. It has all the tools media creators need to bring their stories to life while combining intelligent writing and planning tools, storyboarding, and scheduling with internet-friendly technologies. It’s free and open-source.

celtx

To get started, click below link to download Celtx 2.9.7:

Celtx-2.9.7 for Linux 32-bit

Celtx-2.9.7 for Linux 64-bit

Press Ctrl+Alt+T to open terminal, then run below commands one by one to extract to /usr/local/:

cd

tar xjf ~/Downloads/Celtx-*.tar.bz2

sudo mv ~/celtx/ /usr/local/

Now create a shortcut launcher for Celtx:

1.) Install required package:

sudo apt-get install gnome-panel --no-install-recommends

2.) Run this command to Create Launcher.

sudo gnome-desktop-item-edit /usr/share/applications/ --create-new

Select icon from /usr/local/celtx/icons/ folder. Type /usr/local/celtx/celtx in command area.

create celtx launcher for Ubuntu

Now search and open celtx in Unity Dash.

Enjoy!