Archives For Howtos

Install Shutter 0.90 in Ubuntu 13.04 via PPA

Last updated: March 11, 2015

This simple tutorial shows you how to install the latest Shutter 0.90 on Ubuntu 13.04 Raring Ringtail using its PPA repository.

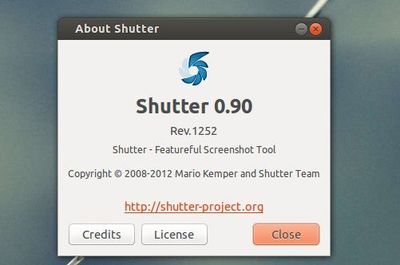
shutter 0.90

This release fixes bugs and removes some error prone (or unused) features. Some of the error prone features has been removed in order to keep Shutter’s codebase easier to maintain.

Due to licensing issues it was necessary to remove three plugins (3Dreflection, 3Drotate, bordereffects). The plugins are based on scripts written by Fred Weinhaus and he asked to remove them from Shutter.

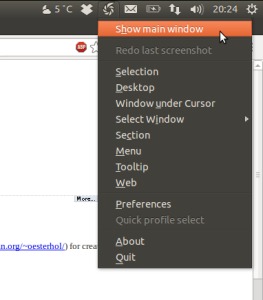
Shutter 0.90 indicator adds a new option to show the main window, it’s convenient for Unity users.

shutter show main window

This release removes the following dependency: libgnome2-gconf-perl (Gnome2::GConf)

Install Shutter from PPA:

The Shutter PPA is ready for Ubuntu 13.04, 12.10, 12.04 and 10.04 users. Press Ctrl+Alt+T on your keyboard to open terminal. When it opens, run below command to add the ppa:

sudo add-apt-repository ppa:shutter/ppa

Then you can install it via below command:

sudo apt-get update; sudo apt-get install shutter

This simple tutorial shows how to reduce / increase the number of workspaces on Ubuntu 12.04, 12.10, 13.04 and upcoming 13.10 Unity Desktop.

6 number of workspaces

There are quite a few Ubuntu configuration tools that allow to manage number of workspaces on Unity Desktop, such as Ubuntu Tweak, Unity Tweak Tool, Unsettings, CompizConfig Settings Manager, etc.

NOTE: For Ubuntu 13.04 and higher, you may first enable workspaces from System Settings -> Appearances -> Behavior tab -> Enable Workspaces.

To change number of workspaces via Ubuntu Tweak:

Ubuntu Tweak is very popular Ubuntu Configuration tool which was started in 2008. The first supported release is Ubuntu 7.10 Gutsy Gibbon.

To install Ubuntu Tweak, first download the .deb file from launchpad.net/ubuntu-tweak. Or use below command to download it (Press Ctrl+Alt+T to open terminal for running commands):

cd ~/Downloads/ && wget https://launchpad.net/ubuntu-tweak/0.8.x/0.8.5/+download/ubuntu-tweak_0.8.5-1_all.deb

To install Ubuntu Tweak, run:

sudo dpkg -i ~/Downloads/ubuntu-tweak_*.deb; sudo apt-get -f install
Once installed, open the tool and navigate to Tweaks -> Workspace. Change the value of horizontal and vertical workspace and that’s it!

number of workspaces via ubuntu tweak

To change number of workspaces via Unity Tweak Tool:

Unity Tweak Tool is a settings manager for Unity Desktop. It has a user friendly GUI. If you’re running on Ubuntu 13.04 Raring and higher, this can be a good way to add or remove virtual workspaces. Because Unity Tweak Tool is available in Ubuntu Software Center by default. You can click the link below to launcher USC and install it.
Install Unity Tweak Tool

Once installed, open it. Under Window Manager click Workspace Settings. Then you’ll be able to change the number of workspaces:

number of workspaces tweak tool

Use CompizConfig Settings Manager to Change number of Workspaces:

Compiz is a compositing window manager for the X Window System. It’s the default in Ubuntu system. CompizConfig Settings Manager (CCSM) is the GUI tool for configuring Compiz effects.

To install CCSM, click link below to launch Ubuntu Software Center and click install button.

install CCSM

Once installed, open it from Unity Dash. Navigate to General -> General Options -> Desktop size tab, there you’ll see the options to change number of horizontal and vertical workspaces.

number of workspaces CCSM

This tutorial shows you how to install the latest Midori (0.5.4) from Midori PPA on Ubuntu 13.10 Saucy, 13.04 Raring, 12.04 Precise and also 12.10 Quantal.

midori 0.5.4

Midori is a lightweight, fast, and free web browser. It is also the default browser of the beautiful elementary os. Midori is release under the GNU Lesser General Public License, version 2.1, which makes it suitable for inclusion in both proprietary and free, open-source programs.

Highlights in Midori 0.5.4:

  • Error pages are looking quite a bit nicer now and also try to be more informative.
  • Bookmarks are also improving at an increasing pace thanks to André. Several bigger changes are already in the pipeline for the next cycle.
  • Glib 2.23.3, GTK+ 2.24, Vala 0.16.0 and WebKit 1.8.3 are required now.

Install Midori:

The Midori PPA contains the latest packages for Ubuntu 13.10 Saucy, 13.04 Raring, 12.10 Quantal, and 12.04 Precise.

To add the ppa, press Ctrl+Alt+T on your keyboard to open terminal. When it opens, run below commands:

sudo add-apt-repository ppa:midori/ppa

add midori ppa

Then update system package lists and install the browser via commands:

sudo apt-get update; sudo apt-get install midori

install midori

midiro in unity dash

LibreOffice 4.1 has been officially released. It’s available for Ubuntu 13.04 Raring and 12.04 Precise users from the main LibreOffice PPA repository.

LibreOffice 4.1 main window

LibreOffice 4.1 features a large number of improvements in the area of document compatibility, which increases the opportunities of sharing knowledge with users of proprietary software while retaining the original layout and contents.

New Features:

  • Rotate images in Writer in 90 degree increments
  • Writer, Calc and Impress now allow embedding fonts in their documents.
  • It is now easy to include a series of photos in Impress with the “Photo Album” feature.
  • Add a Stepped Lines line type to Line and XY (Scatter) graphs
  • Especially for migrations, LibreOffice adds a number of significant improvements of interoperability with MS Office formats.
  • A very large number of bugs have been fixed
  • More.

Install LibreOffice 4.1

Press Ctrl+Alt+T on your keyboard to open terminal. When it opens, run below commands to add the LibreOffice Main repository.

sudo add-apt-repository ppa:libreoffice/libreoffice-4-1

After that, update your package lists and install the office suit. To do so, run below command:

sudo apt-get update; sudo apt-get install libreoffice

LibreOffice 4.1 about

Now you can start LibreOffice 4.1 from the Unity Dash. Enjoy!

The JoliCloud Desktop Environment finally is available for Ubuntu 12.04 Precise, 13.04 Raring and 12.10 Quantal. Here’s how to install it via ppa repository.

jolicloud ubuntu

As you may know, JoliCloud Desktop Environment puts a HTML5 launcher with shortcuts to popular websites and services front and center, such as Facebook, Twitter, Gmail, Wikidedia, Angry birds, and more.

Install JoliCloud Desktop

To get started, press Ctrl+Alt+T on your keyboard to open terminal. When it opens, run below command to add the JoliCloud official ppa repository:

sudo add-apt-repository ppa:jolicloud-team/ppa

add jolicloud desktop ppa

After that, update the package lists to make it avaiable and finally install the session. To do so, run below command:

sudo apt-get update; sudo apt-get install jolicloud-desktop-environment

install jolicloud ubuntu

Once installed, log out current session. Click on the gear icon and choose Jolicloud for Ubuntu login.

jolicloud unity login

This simple tutorial shows how to install latest Komodo edit on Ubuntu 13.04 Raring, 12.10 Quantal, 12.04 Precise via ppa repository.

komodo ubuntu

Komodo Edit, based on the award-winning Komodo IDE, offers sophisticated support for all major scripting languages, including in-depth autocomplete and calltips, multi-language file support, syntax coloring and syntax checking, Vi emulation, Emacs key bindings. It provides dynamic language expertise for Perl, PHP, Python, Ruby, and Tcl, plus JavaScript, CSS, HTML, and XML, and template languages like RHTML, Template-Toolkit, HTML-Smarty and Django.

Install Komodo Edit

A PPA repository has been created for Ubuntu users. So far it supports Ubuntu 13.04, 12.04 and 12.10.

To add the repository, press Ctrl+Alt+T on your keyboard to open terminal. When it opens, run below commands:

sudo add-apt-repository ppa:mystic-mirage/komodo-edit

After that, update your package lists and install this tool via command below:

sudo apt-get update; sudo apt-get install komodo-edit

Once installed, open it by running komodo command. You may need to manually create launcher shortcut

This simple tutorial shows you how to install the latest RawTherapee 4.0.11 on Ubuntu 13.04 Raring, 12.10 Quantal, 12.04 Precise using PPA repository.

RawTherapee main window

RawTherapee is a cross-platform raw image processing program written in C++, using a GTK+ front-end and a patched version of dcraw for reading raw files. It is notable for the advanced control it gives the user over the demosaicing and developing process.

“The 4.0.11 release includes a number of new features which you can read about below, but just as importantly it contains a large number of speed improvements and bug fixes, so we recommend you update straight away!”

New features:

  • CIECAM02 “Adaptation scene luminosity” now calculated automatically
  • CIECAM02 hot/bad pixel fixer to prevent bright pixels from appearing
  • The Defringe tool is now able to target a range of specific colors without touching others
  • New bundled processing profiles
  • New keyboard shortcuts to apply rank and color labels and a new direct popup menu for color labels, all in the File Browser
  • “Profile Fill Mode” button controls whether to replace missing processing profile values with default ones or not
  • Keyboard shortcuts to open the next/previous image and to synchronize the File Browser strip with the currently opened image
  • New demosaicing algorithms for noisy photos:
    • LMMSE
    • IGV
  • More zoom levels
  • Redesigned save window
  • New functionality of the minima/maxima control points curves editor, see the RawTherapee Manual
  • Support for TIFFfiles with alpha channels
  • Support for 32-bit TIFF files (HDR)
  • Preferences/Batch processing options: all to ‘Add’ and all to ‘Set’
  • Support for
    • Nikon D5200
    • Nikon D7100
    • Nikon COOLPIX A
    • Panasonic Lumix DMC-G5

Install RawTherapee:

The latest release is available for Ubuntu 13.04 Raring, 12.10 Quantal, Ubuntu 12.04 Precise from the ppa repository.

To add the ppa, press Ctrl+Alt+T on your keyboard to open a terminal window. When it opens, run below command:

sudo add-apt-repository ppa:dhor/myway

Then update package lists and install via Synaptic Package Manager. Or you can run below command instead:

sudo apt-get update; sudo apt-get install rawtherapee

RawTherapee unity dash

In this tutorial I’ll show you a lightweight sticky notes software for Ubuntu users. It’s indicator-stickynotes which allows you to jot down thoughts, lists, and reminders on your desktop. This simple tool works on Unity, Gnome Shell, XFCE/Xubuntu, with partial support for KDE/Kubuntu and Linux Mint (MATE and Cinnamon).

Sticky-Notes-indicator

Objectives:

  • Install Indicator Stickynotes on Ubuntu and Linux Mint.
  • Enjoy!

To get started, add the ppa repository which supports Ubuntu 13.04 Raring, 12.10 Quantal, 12.04 Precise and Linux Mint 13 Maya, 14 Nadia, 15 Olivia. To do so, press Ctrl+Alt+T to open a terminal window, run below commands:

sudo apt-add-repository ppa:umang/indicator-stickynotes

Then update the package lists and install the software:

sudo apt-get update; sudo apt-get install indicator-stickynotes

Sticky-Notes-indicator-unity-dash

Enjoy!

As you may know, RemoteBox is an open source VirtualBox Client with Remote Management feature. It allows you to administer an installation of VirtualBox residing on another machine such as a server, as if it was installed locally. You can also interact with the displays of the guests. This allows you to treat VirtualBox much more like an installation of Xen, KVM or VMware ESX. A summary of some of the features of RemoteBox are listed below.

In this brief tutorial I’ll show you how to install RemoteBox 1.5 on Ubuntu 13.04 Raring or Linux Mint.

To get started, press Ctrl+Alt+T to open a terminal window for running commands:

Linux Mint Terminal

Then run commands to install required packages:

sudo apt-get install libgtk2-perl libsoap-lite-perl rdesktop

Then download RemoteBox 1.5 (VirtualBox 4.2.X required):

RemoteBox-1.5.tar.bz2

Decompress the downloaded package, and it should result a new folder called RemoteBox-1.5. In terminal, navigate to this folder:

cd ~/Downloads/RemoteBox-1.5

Then start RemoteBox:

./remotebox

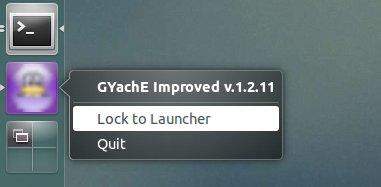
You can right-click on the icon from Unity Launcher and choose ‘Lock to Launcher’ to make it easy to launch next time. Or you can manually add it into Unity Dash.

lock-to-launcher

This is the main window of RemoteBox:

RemoteBox1.5

VDrift is an open source driving simulation made with drift racing in mind. It was available for Ubuntu and Linux Mint users from PlayDeb repository.

Vdrift

For recent Ubuntu releases, there’s a popular xtradeb games PPA contains the game package for Ubuntu 20.04, Ubuntu 22.04, Ubuntu 24.04, and Linux Mint 21/22. Not only for amd64 (Intel/AMD CPUs), it also support arm64/armhf (e.g., raspberry pi) platforms.

Objectives:

  • Install VDrift on Ubuntu and Linux Mint
  • Enjoy!

To get started, first press Ctrl+Alt+T on keyboard to open up a terminal window. Then run command below to add the PPA:

sudo add-apt-repository ppa:xtradeb/play

It will automatically refresh cache after adding PPA in Ubuntu, though Linux Mint user needs to do it manually by running command:

sudo apt update

Finally, install the game package by running command:

sudo apt install vdrift

(Optional) To uninstall the car racing game, use command:

sudo apt remove --autoremove vdrift vdrift-data

Then, use command below to remove the PPA repository:

sudo add-apt-repository --remove ppa:xtradeb/play