Archives For November 30, 1999

Linux Mint is a Linux distribution forked from Ubuntu since Classic Gnome Desktop was dropped.

Linux Mint 13

Are you still using Linux Mint 13 Maya? Well, there’s a good news! Linux Mint developer has made a few backports from Petra to Maya. Which means you can now upgrade to MDM 1.4, Cinnamon 2.0 or MATE 1.6, and the latest versions of mintwelcome, mintstick, mintnanny, mintupload, mintupdate, mintinstall, mintsystem, mintmenu, and mintdesktop in Mint 13 Maya from the Mint backport repository.

To get started:

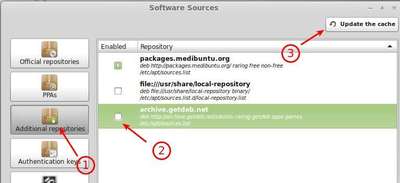
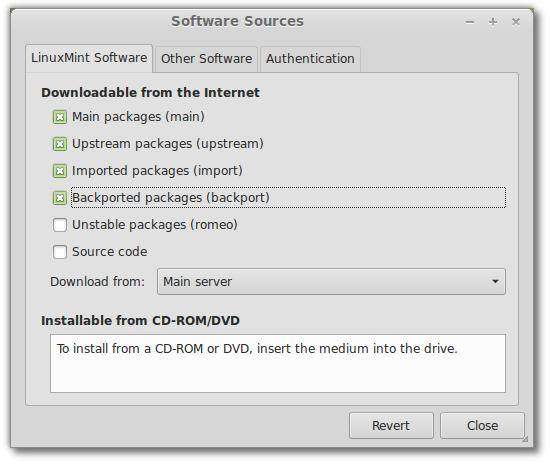
1. Open up Software Sources from start menu. In the first tab, check the box which says “Backported packages (backport)”

enable backports repository Mint

2. Launch the Update Manager from Menu. After checking for updates (Update Manager do it automatically), you’ll see a list of available updates, including Cinnamon 2.0 or MATE 1.6, MDM 1.4 and other latest packages.

Cinnamon 2.0 MATE 1.6 backports to Mint 13

3. Click on Install Updates and Enjoy!

Numix is a modern flat theme with a combination of light and dark elements. It supports Gnome, Unity, XFCE and Openbox.

This simple tutorials shows how to install Numix GTK as well as Numix icons on Ubuntu 13.10 Saucy, Ubuntu 14.04 Trusty, Ubuntu 13.04 Raring, Ubuntu 12.04 Precise and Linux Mint.

First take a look at screenshots:

numix gtk Ubuntu 13.10 Unity

numix gtk Ubuntu 13.10 Unity

numix icons ubuntu 13.10 unity

numix gtk & icons linux mint

numix gtk & icons linux mint

numix icons & gtk xfce4

numix icons & gtk xfce4

numix gtk & icons gnome shell

numix gtk & icons gnome shell

numix gtk & icons gnome shell

numix gtk & icons gnome shell

Install Numix GTK & Icons via PPA:

Numix project gets a launchpad PPA to make it easy to install Numix GTK, icons, wallpaper in Ubuntu 14.04, Ubuntu 13.10, Ubuntu 13.04, Ubuntu 12.10, Ubuntu 12.04 and their derivatives.

To get started, press Ctrl+Alt+T on your keyboard to open terminal. When it opens, run commands below one by one:

sudo add-apt-repository ppa:numix/ppa

sudo apt-get update

sudo apt-get install numix-gtk-theme numix-icon-theme numix-wallpaper-saucy

Once installed, use Gnome Tweak Tool, Unity Tweak Tool or other system tools to apply Numix theme and icons.

Cinnamon 2.0

Cinnamon Desktop 2.0 has been announced today. It will be featured in Linux Mint 16 “Petra” planned for the end of November and will then be backported to LMDE and Linux Mint 13 LTS.

What’s New in Cinnamon 2.0:

Cinnamon features a lot of bug fixes but also brand new features and many improvements:

  • Windows can now be tiled to corners and resized:
    • tiled windows no longer need to occupy half of the screen, they do so by default when tiled but you can now resize them.
    • in addition to the Left, Right, Top and Bottom edge of the screen, you can now also tile into the 4 corners of the screen.
    • when you drag a window near a tiling zone Cinnamon shows that zone to you. This is called the HUD
  • Edge-Snapping:

    Inspired by the Snap functionality of Xbox One, it is similar to Edge-Tiling but with one key difference: Maximized windows do not cover snapped windows.

    To snap a window in Cinnamon 2.0, drag it with the mouse towards an edge or a corner while pressing the “Control” key.

  • Cinnamon is now able to play sounds when you perform common events such as closing windows, switching workspaces etc…
  • Added ‘Users & Groups’ utility for system administrators
  • improved MIME handling in Nemo
  • System tray support for file operations
  • Nemo looks better and acts faster than before.
  • Better compatibility and portability in Linux Mint 13/15, Fedora 19.

See the official annoucement for more details.

Install / Upgrade Cinnamon 2.0 in Ubuntu & Linux Mint:

IMPORTANT NOTE: Cinnamon 2.0 Corrupts Unity on Ubuntu 13.10. Don’t install it if you want to keep Unity Desktop.

As the developer said, the unofficial Mint backports for Cinnamon 2.0 is ready (Cinnamon stable PPA) in coming days for Ubuntu 13.10 Saucy, Ubuntu 13.04 Raring, Ubuntu 12.04 Precise, Ubuntu 12.10 Quantal and Linux Mint 13, 14, 15.

When it’s ready, press Ctrl+Alt+T on your keyboard to open terminal. Run below commands one by one to upgrade:

sudo add-apt-repository ppa:gwendal-lebihan-dev/cinnamon-stable

sudo apt-get update

sudo apt-get dist-upgrade

Or run sudo apt-get install cinnamon to install the DE.

As you may know, RabbitVCS is a graphical front-end for version control systems which supports Nautilus and Thunar. Here’s how to install Nemo extension for RabbitVCS in Linux Mint Cinnamon.

rabbitvcs for nemo

To get started, press Ctrl+Alt+T on your keyboard to open terminal. When it opens, run below command to add the ppa, which supports Linux Mint 13 Maya, 14 Nadia, 15 Olivia, 16 Petra and also Ubuntu 13.10 Saucy, 13.04 Raring, 12.10 Quantal, 12.04 Precise.

NOTE: This PPA contains nightly builds (unstable) for the Cinnamon desktop environment. Use it at your own risk!

sudo add-apt-repository ppa:gwendal-lebihan-dev/cinnamon-nightly

After that, you can install this extension by below commands:

sudo apt-get update; sudo apt-get install nemo-rabbitvcs

Once installed, you may need to log out and back in to get it work.

How to Install Jupiter in Linux Mint 15

Last updated: July 29, 2013

This simple and brief tutorial is going to show you how to install Jupiter from JoliCloud PPA in Linux Mint 15 Olivia.

jupiter linux mint 15

As you may know, Jupiter is a powerful and lightweight power and hardware control applet. It has been retired and last supported release is up to Linux Mint 14 Nadia. However, Jupiter is available for Olivia from JoliCloud Desktop Environment PPA.

The webupd8team add the packages to the ppa and it’ll be used as a background program for JoliCloud session. I’ve installed it on my laptop and it’s working well.

Install Jupiter on Linux Mint 15:

Press Ctrl+Alt+T on your keyboard to open terminal. When it opens, run below command to add the PPA repository:

sudo add-apt-repository ppa:jolicloud-team/ppa

Then update package lists and install:

sudo apt-get update; sudo apt-get install jupiter

To install Jupiter support package for Eee PCs:

sudo apt-get install jupiter-support-eee

Xfce4 Composite Editor is a simple GUI tool that allows to configure the various Xfce4 Window Manager compositor settings that are not available via the Window Manager Tweaks control panel.

xfce4-composite-editor

The developer of Xfce Theme Manager wrote this simple tool, and it has the ability to control below settings:

  • Shadow opacity.
  • Shadow delta X, Y, width and height.
  • move window opacity.
  • inactive window opacity.
  • frame opacity.
  • resize window opacity.
  • popup opacity.

Also it provides options to swich on / off composite, dock shadow, frame shadow, pop-up shadow and Restart VM to apply changes.

xfce4 composite window

Below is what the developer said in GTK-Apps, “These settings are available via the xconf settings editor but that is one of the most awkward GUI’s I have ever used as you have to select the xfwm4 channel, expand the tree, scroll to the option you want, select it, click edit, change the setting and click save, then the tree gets collapsed and you have to start again! So this nice simple GUI to control the composite manager, the settings are self explanatory.”

Install Xfce4 Composite Editor

The PPA repository has been created to make it easy to install for (X)Ubuntu users. So far, it supports 13.04 Raring, 12.10 Quantal, and 12.04 Precise.

To add the PPA and install this app, press Ctrl+Alt+T on your keyboard to open terminal. When it opens, run below commands:

sudo add-apt-repository ppa:rebuntu16/other-stuff
sudo apt-get update
sudo apt-get install xfce4-composite-editor

Once it is installed, open it from the Xfce Settings Manager.

Getdeb is an unofficial project which provides the latest open-source and freeware applications for Ubuntu Linux, and PlayDeb provides games. As Ubuntu based Linux distribution, Linux Mint users are available to install software from this repository.

Objectives:

  • Install / add / enable GetDeb & PlayDeb repository on Linux Mint
  • Enjoy!

To get started, go to Start menu, search and open Software Sources

software-sources

Navigate to Additional repositories, check the box where it says ‘archive getdeb.net’. Click ‘update the cache’ button to update package lists.

enable getdeb repository

That’s it!

If it is not there in your Linux Mint edition, click ‘Add a new repository’ and type in

deb http://archive.getdeb.net/ubuntu raring-getdeb apps games

In the line, change raring to yours based Ubuntu release code name.

Linux Mint 14 Nadia based on Ubuntu 12.10 quantal
Linux Mint 13 Maya based on Ubuntu 12.04 precise
Linux Mint 12 Lisa based on Ubuntu 11.10 oneiric
Linux Mint 11 Katya based on Ubuntu 11.04 natty
Linux Mint 10 Julia based on Ubuntu 10.10 maverick
Linux Mint 9 Isadora based on Ubuntu 10.04 lucid

And get the key by running below commands in terminal (Ctrl+Alt+T):

wget -q -O- http://archive.getdeb.net/getdeb-archive.key | sudo apt-key add -

Enjoy!

How to Install UltraStar Deluxe on Linux Mint

Last updated: July 17, 2013

UltraStar Deluxe is a free and open-source singing game. It allows up to six players to sing along with music using microphones in order to score points, depending on the pitch of the voice and the rhythm of singing.

Objectives:

  • Install UltraStar Deluxe on Linux Mint
  • Enjoy!

Linux Mint 13 users can install it from the official ppa repository, press Ctrl+Alt+T to open a terminal window.

Linux Mint Terminal

Then run below 3 commands one by one:

sudo add-apt-repository ppa:tobydox/ultrastardx

sudo apt-get update

sudo apt-get install ultrastar-deluxe

For Linux Mint 14 and 15 users, directly download and install the debs:

ultrastar-deluxe deb for 32-bit | 64 bit

ultrastar-deluxe data for all

Then install the 2 Debs and fix dependencies:

sudo dpkg -i ~/Downloads/ultrastar-deluxe*.deb; sudo apt-get -f install

Enjoy!

This simple tutorial will show you how to install the Spotify Client on Linux Mint 13, 14, 15 from the official repository.

Spotify is a digital music-streaming service that gives you on-demand access to millions of songs on all your devices. It works on Windows, Mac, Linux, Android, iOS, Windows Phone 7/8 (7 no longer updated), BlackBerry (GSM only), Symbian.

To install it from the official repository, press Ctrl+Alt+T to open terminal.

1.) Run below command to add the repository to Linux Mint:

sudo sh -c 'echo "deb http://repository.spotify.com stable non-free" >> /etc/apt/sources.list.d/spotify.list'

add spotify repository to linuxmint

2.) Install the public key:

sudo apt-key adv --keyserver hkp://keyserver.ubuntu.com:80 --recv-keys D2C1988

install spotify key linuxmint

3.) Finally update package lists and install spotify:

sudo apt-get update; sudo apt-get install spotify-client

spotify in linuxmint

Enjoy!

How to Install uTorrent on Linux Mint 15

Last updated: July 16, 2013

Here’s a beginner’s guide to install and setup uTorrent server on Linux Mint 15. There’s no command in tutorial, just a few clicks!

1.) First, download uTorrent server for Linux: www.utorrent.com/downloads/linux. You may check 32-bit or 64-bit by going to Start Menu -> System Tools -> System Settings -> System Info. Where “Distribution Linux Mint 15: olivia (i686)” means 32-bit. x86_64 means 64-bit system.

download-utorrent

2.) Decompress the package in Downloads folder, then navigate to the extracted folder.

utorrent-server-folder

3.) Right-click on utserver and goto its Properties window. Make sure “Allow executing file as program” is checked.
utsever-executable-linuxmint

4.) Before running the utserver, install ssl share libraries from Start Menu -> Software Manager.

install ssl shared libraries

5.) Now double-click on utserver file to start it. That’s right you see nothing happens because the server is running as a background program.

6.) Open your file browser and go to http://localhost:8080/gui/. Type:

username: admin
password: leave password empty

utorrent

Done!