![]()
Jetbrains announced the release of IntelliJ IDEA 2018.2.3 a day ago with various bug-fixes and some improvements for v2018.2.
IntelliJ IDEA 2018.2.3 release highlights:
- Ability to open HTML files in Edge using the Open in Browser action.
- Fixed IntelliJ IDEA freezes.
- Git: The built-in SSH doesn’t fail when Git protocol version 2 is enabled.
- Fixed regressions in Mercurial support.
- Docker: the IDE now validates Command line options and reports unknown options.
- Docker: volume mounting now works on Windows using Linux containers.
- Minor Gradle bug-fixes.

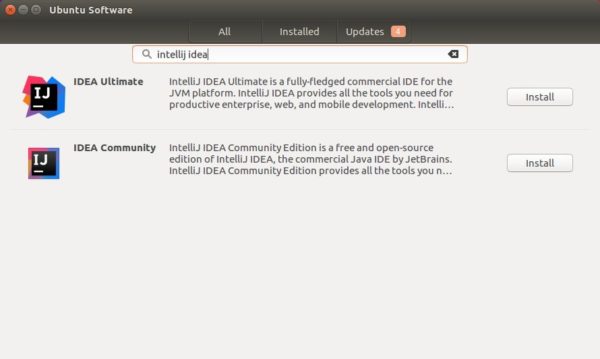
How to Insall the Latest IntelliJ IDEA in Ubuntu:
It’s quite easy to install the latest IDEA packages in Ubuntu since Jetbrains offers official snap (containerised software package) package in snappy store.
Simply open Ubuntu Software, search for and you’ll see IDEA ultimate and community packages available for install.
NOTE for Ubuntu 16.04 users who never installed a snap package, make sure snapd is installed by running command in terminal (Ctrl+Alt+T):
sudo apt install snapd snapd-xdg-open