Archives For komodo edit

Komodo 10

Due to lack of time, Mystic-Mirage has dropped PPA support for Komodo Edit with Unity Global menu integration.

For those sticking to the latest Komodo Edit (10.1.1 so far), you can use the official Linux binaries though there’s no Unity Menubar support. And below is a step by step guide shows you how to install the Komodo Edit in Ubuntu 16.04.

komodo-10-1

1. Download Komodo Edit, Linux (x86) for 32-bit or Linux (x86_64) for 64-bit OS, from the link below:

Download Komodo Edit (Linux x86 / x86_64)

2. Extract the downloaded package, and open result folder in terminal from its context menu:

open-komodo-edit-terminal

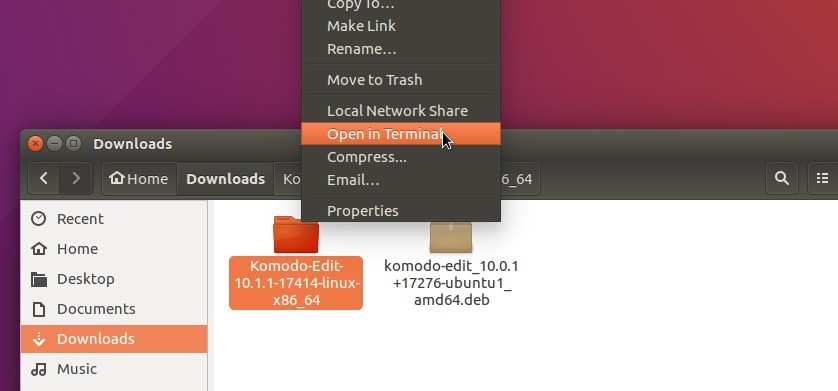
Or just run cd ~/Downloads/Komodo-Edit-* command instead in terminal to navigate to extracted folder.

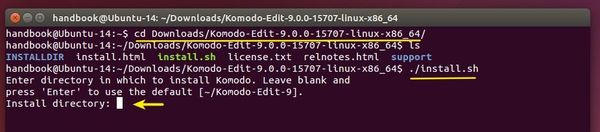
3. When the terminal opens, run the install script via command:

./install.sh

And hit Enter to install Komodo Edit to default location (user’s root directory) for single use.

komodo-install

To install Komodo Edit for global use, available for all users, run the script via sudo:

sudo ./install.sh

Then type in /opt/Komodo-Edit-10 when it asks the install directory and hit Enter.

Uninstall:

The installer does not provide uninstall option at the moment, but you can easily remove the installation by running command:

sudo rm -rf ~/Komodo-Edit* /opt/Komodo-Edit* ~/.local/share/applications/komodo-edit* /usr/local/share/applications/komodo-edit*

Komodo X 10

Komodo Edit, Active State’s open source text editor, has reached the X (10) release. Here’s how to install it in Ubuntu 16.04, Ubuntu 15.10, Ubuntu 14.04, and Ubuntu 12.04 with Unity integration.

Komodo Edit X (10) Features:

  • new user interface that is skinnable using the color scheme editor
  • a start wizard on first launch
  • new default keybindings and other editors’ keybindings support including Atom, Eclipse, Emacs, IntelliJ, Sublime, Vi.
  • PHP and JavaScript codeintel and other improvements.
  • and much more
Komodo start wizard

Komodo start wizard

Komodo Edit 10

How to Install Komodo Edit 10 in Ubuntu:

The official download page provides non-install packages for Linux, but it lacks a shortcut icon for Ubuntu.

To install this editor with Ubuntu integration, use Mystic-Mirage’s PPA repository:

1. Add PPA.

Open terminal (Ctrl+Alt+T) and run command:

sudo add-apt-repository ppa:mystic-mirage/komodo-edit

Type your password when it asks, though there’s no visual feedback, and hit Enter to continue.

Komodo PPA

2. Now install the editor via your system package manager, or run commands:

sudo apt update

sudo apt install komodo-edit

For those who don’t want to add PPA, grab the .deb package from HERE (i386 for 32bit, amd64 for 64bit), and click install via Ubuntu Software.

Install Komodo Edit in Ubuntu

Here’s a brief tutorial that shows how to install Komodo Edit with Unity integration in Ubuntu 16.04 LTS via PPA.

Komodo Edit is an open-source code editor based on Komodo IDE. Its website provides official Linux packages, but lacks global menu and application shortcut for Ubuntu Unity desktop.

Mystic-Mirage is maintaining a PPA contains unofficial Komodo Edit packages with patches for Ubuntu integration. Support for Ubuntu 16.04 was added a few days ago.

Komodo Edit 9.3

1. To add PPA

Open terminal (Ctrl+Alt+T), paste following command and hit run:

sudo add-apt-repository ppa:mystic-mirage/komodo-edit

Komodo PPA

Type in your password (no visual feedback) when it asks and then hit Enter to continue.

2. After added the PPA, search for and install komodo-edit via Synaptic Package Manager after clicking Refresh.

Or run following commands one by one:

sudo apt update

sudo apt install komodo-edit

For those who don’t want to add PPA, grab the .deb installer from PPA file archive.

Install Komodo Edit in Ubuntu

Komodo IDE finally reached the 9.3 release with language updates, new features and tons of improvements. Here’s how to install its free and open-source counterpart Komodo Edit using PPA.

Komodo 9.3 added support for PHP 7 and Python 3.5, syntax highlighting & checking support for Lua, syntax highlighting support for Swift, Mustache, R Lang.

The new release also features:

  • CSS, LESS, and SCSS auto-completions and code browsing
  • A new Console pane
  • Auto multi-caret for HTML/XML tags
  • Support for Elastic Tabstops. (disabled by default)
  • Package Manager 2.0 with more functionality, ie. uninstall, update, etc.
  • Quick Bookmarks
  • Auto-wrap delimiters while having text selected.
  • In-line Syntax Checking
  • updated language icons.
  • quick start options on new tab
  • and much more at the release page.

Komodo Edit 9.3

How to Install Komodo Edit 9.3 in Ubuntu:

Mystic Mirage is maintaining a PPA with most recent Komodo Edit packages well integrated with the default Unity Desktop. Ubuntu 15.10, Ubuntu 14.04, Ubuntu 15.04, Ubuntu 12.04 are supported so far.

1. Add Komodo Edit PPA.

Open terminal from Unity Dash, App launcher, or via Ctrl+Alt+T shortcut key. When it opens, run command:

sudo add-apt-repository -y ppa:mystic-mirage/komodo-edit

komodo-edit-ppa

Type your password in mind when it asks, since there’s no display due to security reason.

2. Install the editor in below ways.

After adding the PPA, you can install or upgrade Komodo Edit by:

  • Synaptic Package Manager:

    install-komode-edit-synaptic

  • Software Updater if a previous release installed.
  • running below commands one by one:
    sudo apt-get update
    
    sudo apt-get install komodo-edit

For those who don’t want to add PPA, grab the .deb installer directly from THIS PAGE.

Uninstall:

Remove the PPA by launching Software & Updates and navigating to Other Software tab.

Remove the editor using Synaptic Package Manger, or by running apt-get command with remove option:

sudo apt-get remove komodo-edit && sudo apt-get autoremove

Komodo Edit 9 Ubuntu

A new release of Komodo Edit text editor has been announced with UI and user experience improvements and bug fixes.

Changes in Komodo Edit 9.1 according to the release note:

  • Select Commando (Go to Anything) results by pressing ALT+number.
  • The Commando user experience has had significant usability improvements. Most notably when starting Commando you will now be presented with a convenient list of scopes that you can use to narrow down your search results.
  • Color Schemes: Use foreground color for caret color
  • Commando: Don’t preserve query when navigating backwards.
  • Commando: Escape now clears the current search.
  • SDK: Added the “shell” SDK, allowing you to easily run shell commands.
  • UI: Improved scrollbar contrast on dark color schemes.
  • UI: “Ugly border” showing around notifications on windows
  • CodeIntel: Improve PHPDoc tooltip legibility – contributed by Defman

komodo ubuntu

Install/upgrade Komodo Edit in Ubuntu:

Komodo Edit 9 with Unity integration has been made into PPA, available for Ubuntu 12.04, Ubuntu 14.04, Ubuntu 14.10 and Ubuntu 15.04.

To install it, open terminal from the Dash/Launcher or by pressing Ctrl+Alt+T on keyboard. When it opens, follow below steps:

1. Add the PPA repository, run command:

sudo add-apt-repository -y ppa:mystic-mirage/komodo-edit

2. Refresh system cache via Software Updater or by running below command:

sudo apt-get update

3. Upgrade the editor through Software Updater, or install it via below command:

sudo apt-get install komodo-edit

Done.