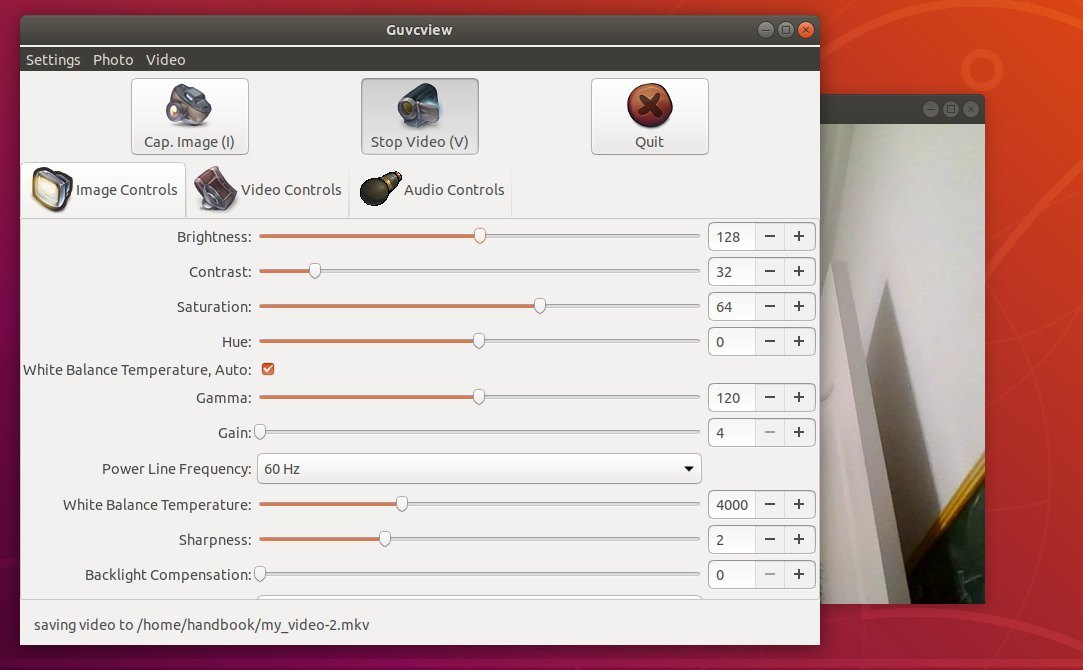
Archives For jimingkui

brackets code editor

The brackets text editor has reached the 1.10 release recently. Here’s how to install it in all current Ubuntu releases including Ubuntu 14.04, Ubuntu 16.04, Ubuntu 17.04, Ubuntu 17.10, and their derivatives.

Brackets 1.10 features:

  • Supports more than 40 different file encodings. You can Open/Save files with different encodings.
  • Search history support
  • CSS code hints support @rule and pseudo selector/element code hints.
  • Provides CSS code hints in style attribute value in html.
  • Forward/Backward navigation in edit history
  • Ability to Enable/Disable default extensions
  • HTML menus are replaced with native menus in Linux.

brackets in ubuntu

How to Install Brackets 1.10 via PPA in Ubuntu:

Although there are official .deb binaries available in the release page, an Ubuntu PPA repository is a good choice to keep the software up-to-date easily via Software Updater utility.

1. Open terminal via Ctrl+Alt+T and run command to add the brackets ppa maintained by webupd8 team.

sudo add-apt-repository ppa:webupd8team/brackets

2. Then install the editor via commands:

sudo apt-get update

sudo apt-get install brackets

Or upgrade it through Software Updater if you have a previous release installed:

check updates

Uninstall:

To remove the PPA repository, simply launch Software & Updates utility and navigate to Other Software tab.

To remove the text editor, either use your system package manager or run command in terminal:

sudo apt-get remove --autoremove brackets

JetBrains’ IntelliJ IDEA IDE has reached the new massive 2017.2 release a few days ago with many new features, performance improvements and important bug-fixes.

IntelliJ IDEA 2017.2 features:

  • Smarter code completion and control flow analysis
  • New inspections and refactorings
  • Java 9 module diagrams
  • Debugger: filtering arrays, collections, and maps
  • Kotlin 1.1.3 support
  • Groovy 2.5.0 support
  • VCS: reverting and rewording commits, formatting commit messages
  • native look and feel in Windows 10
  • Better HiDPI support for multiple display setup on Windows
  • JavaScript and TypeScript improvements and more.
  • See announcement for details.

IntelliJ IDEA 2017.2 splash

Download IntelliJ IDEA 2017.2:

The official Linux binaries are available for download at the link below:

Download IntelliJ IDEA

Extract the tarball, run idea.sh from bin folder to launch the IDE, and you may manually create an application launcher for it.

Install IntelliJ IDEA 2017.2 in Ubuntu via PPA:

An installer script, originally created by Marcel Kapfer, is available to automatically download the source tarball, extract to /opt, and create application launcher.

All you need to do is open terminal (Ctrl+Alt+T) and run following commands one by one:

sudo add-apt-repository ppa:ubuntuhandbook1/apps

sudo apt-get update

sudo apt-get install intellij-idea-community

replace intellij-idea-community in the code with intellij-idea-ultimate for ultimate version.

For those who don’t to add the PPA, grab the installer script from the link below:

intellij-idea-community_xxx.xx_all.deb

intellij-idea-ultimate_xxx.xx_all.deb

Then install it via Gdebi package manager or using dpkg command:

Once installed, launch the IDE from Unity Dash, Gnome launcher, or other app launcher and enjoy!

Ubuntu 16.10 Yakkety Yak is reaching the end of its life. Its users will no longer receive security notices, critical fixes, or updated packages after today, July 20. Even third-party PPAs will end support for Ubuntu 16.10 too.

Ubuntu 16.10 End of Life

Ubuntu 16.10 was released on October 13, 2016. It’s a short term release with a 9-month support cycle. User can choose:

  • either upgrade to Ubuntu 17.04, the latest short term release with support until Jan 2018.

  • or download Ubuntu 16.04 LTS, long-term support release with 5-year support cycle, which will end support in 2021

Virtualbox

Oracle Vritualbox got an update for its 5.1 series earlier today with lots of bug-fixes.

For Linux users, Virtualbox 5.1.24 brings fixes to Kernel 4.12 and Kernel 4.13, fixes for loading shared libraries, fixes for kernel modules built with gcc-7, makes 2D video acceleration available for older Linux distributions.

Other changes in Virtualbox 5.1.24 include:

  • VMM: mask the VME CPUID capability on AMD Ryzen processors.
  • VMM: emulate more SSE2 instructions
  • VMM: properly clear the TF and AC flags when dispatching real-mode interrupts
  • GUI: fixes to make the mini-toolbar work with recent versions of KDE / Plasma
  • GUI: fixed a potential crash when a VM with multiple screens is running in full screen / seamless mode and a host screen is removed.
  • GUI: fixed initial size hints for guests which set intermediate sizes before responding
  • GUI: prevent stopped screen updates or black screen on reboot in a multi-screen setup under certain conditions
  • Audio: many improvements for Windows 10 guests
  • Storage: fixed possible crash when using Intels SPDK
  • API: use the correct file name of the VM machine state if the VM settings directory is renamed, for example during grouping / ungrouping a VM
  • API: return the correct error code if powering up a VM fails
  • API: video recording did not automatically start at VM start when enabled in the VM settings
  • API: when relocating a medium, check that the target path is fully qualified
  • EFI: fix for VMs with more than 3504MB RAM
  • Host-only adapter: correctly determine IPv4 netmasks on Windows hosts
  • NAT network: properly do the refcounting for starting / stopping the NAT / DHCP services if the NAT network is changed while the adapter network connection type is anything else but NAT network
  • VBoxManage: fixed controlvm videocapfile
  • Windows hosts: fixed crashes if driver verifier is enabled

Download / Install Virtualbox:

The official Linux binaries (i386 for 32-bit, amd64 for 64-bit) for Ubuntu 12.04, Ubuntu 14.04, Ubuntu 16.04, Ubuntu 17.04 are available for download at the link below:

Virtualbox Linux Download

If you have a previous 5.1 series installed, and enabled the Virtualbox Linux repository, you can simply upgrade Virtualbox via Software Updater:

upgrade virtualbox

To manually add the VirtualBox Linux repository, do:

1. Open terminal via Ctrl+Alt+T or by searching it from app launcher, when it opens, run command:

sudo sh -c 'echo "deb http://download.virtualbox.org/virtualbox/debian $(lsb_release -cs) contrib" >> /etc/apt/sources.list.d/virtualbox.list'

for Linux Mint 18.x, replace $(lsb_release -cs) in the code with xenial

Virtualbox Official Linux repository

2. Download and install the gpg key:

wget -q https://www.virtualbox.org/download/oracle_vbox_2016.asc -O- | sudo apt-key add -

To install virtualbox 5.1 for the first time, run command:

sudo apt-get update && sudo apt-get install virtualbox-5.1

GnuCash

GnuCash 2.6.17, the seventeenth maintenance release in the 2.6-stable series of the free financial-accounting software, was released 2 weeks ago. Now you can install it via GetDeb repository in Ubuntu 16.04, Ubuntu 17.04, and Linux Mint 18.x.

GnuCash 2.6.17 fixed following bugs:

  • Relax the account type change restrictions. Prevent changing some Account Options if it has transactions.
  • Improve the styling of the table element used for foreign currencies in the Balance sheet report so they end up aligned with the other currencies.
  • link in github repo README file needs correction/editing
  • Add ‘transaction’ to the schema and document it in gnc-pricedb.h.
  • Fix that Online Banking Wizard Crashes for Windows (gnucash-on-windows)
  • Also separate translatable commodity namespace strings from those used in storage.
  • Transactions produced by Transfer Funds or Process Payment dialogs sort to beginning of day and do not honor NUM field for custom sorting.
  • Fix Stock Split Assistant crashes if you enter a New Price and that already exists in the Price DB
  • Fix gnucash-2.6.16 segfaults on startup
  • Fix typo in ‘import customers or vendors from text file’ dialog

How to Install GnuCash 2.6.17 in Ubuntu:

Open terminal via Ctrl+Alt+T or by searching for “terminal” from app launcher. When it opens, run following commands one by one:

1. Add the GetDeb repository via command:

sudo sh -c 'echo "deb http://archive.getdeb.net/ubuntu $(lsb_release -sc)-getdeb apps" >> /etc/apt/sources.list.d/getdeb.list'

For Linux Mint 18.x, run following command instead to add the repository:

sudo sh -c 'echo "deb http://archive.getdeb.net/ubuntu xenial-getdeb apps" >> /etc/apt/sources.list.d/getdeb.list'

2. Upgrade GnuCash via Software Updater utility if you have a previous release installed:

upgrade GnuCash

Or install it via commands:

sudo apt-get update

sudo apt-get install gnucash

Uninstall:

To remove GnuCash, either use your system package manager or run command:

sudo apt-get remove --autoremove gnucash

The GetDeb repository can be removed via Software & Updates utility under Other Software tab.

WeChat is one of the most popular Chinese social media (instant messaging and payment services) mobile application developed by Tencent.

For desktop computers, there’s an open-source project, electronic-wechat, allows you to run WeChat on Linux, Mac OS.

The application features:

  • Modern UI and all features from Web WeChat.
  • Block message recall.
  • Stickers showing support.
  • Share subscribed passages on Weibo, Qzone, Facebook, Twitter, Evernote, and email.
  • Mention users in a group chat.
  • Drag and drop to send photos.
  • Behaves like a native app, based on dozens of optimization.
  • Removes URL link redirects and takes you directly to blocked websites.
  • Press Esc to hide application windows.

wechat for Linux

The app is available via Snappy store for all Linux distributions. For Ubuntu 14.04, Ubuntu 16.04, and higher, do following steps to install it:

1. Open terminal via Ctrl+Alt+T or by searching it from app launcher. When it opens, run command to install snapd daemon and snapd-xdg-open if you don’t already have them installed:

sudo apt install snapd snapd-xdg-open

Type in your password (no visual feedback while typing due to security reason) and hit Enter.

2. Then install the wechat app via command:

sudo snap install electronic-wechat

install wechat snap

Once installed, launch the desktop app from your app launcher and enjoy!

Uninstall:

To remove the app, run following command in a terminal window:

sudo snap remove electronic-wechat

This quick tutorial is going to show you how to install the IntelliJ IDEA IDE, both community and ultimate editions, via PPA in all current Ubuntu releases.

IntelliJ IDEA is a Java IDE developed by JetBrains. So far the latest is version 2017.1.5 that was released more than a week ago with some bug-fixes and performance updates.

intelliJ IDEA ultimate

While the official Linux binaries lack application launcher integration, Marcel Kapfer made an installer script that automatically downloads the source tarball from JetBrains server, installs it to /opt/, and finally creates an app launcher.

Install the script:

For all current Ubuntu releases, including Ubuntu 14.04, Ubuntu 16.04, Ubuntu 16.10, Ubuntu 17.04, and derivatives, I’ve made the new script into PPA since the original maintainer does not update the latest release at the moment.

Download the latest script from the link below:

intellij-idea-community_xxxx.xx-1_all.deb (community version)

intellij-idea-ultimate_xxxx.xx_all.deb (ultimate edition)

Then open terminal via Ctrl+Alt+T or by searching for it from app launcher, and run command to install the script:

sudo dpkg -i ~/Downloads/intellij-idea-community_*_all.deb

replace community in the command with ultimate for ultimate version.

Once installed, launch the IDE from your app launcher and enjoy!

For those who want to upgrade the IDE through Software Updater (Update Manager), add the PPA repository via command:

sudo add-apt-repository ppa:ubuntuhandbook1/apps

LibreOffice 5.3.4

LibreOffice 5.3.4, the fourth release for LibreOffice 5.3 family, was announced more than 2 weeks ago. It’s finally made into PPA for Ubuntu 14.04, Ubuntu 16.04, Ubuntu 16.10, Ubuntu 17.04, and Ubuntu 17.10.

LibreOffice 5.3.4 integrates over 100 patches, with a significant number of fixes for interoperability with Microsoft Office RTF and OOXML documents. See HERE for details.

LibreOffice 5.3.4

Install LibreOffice 5.3.4 via PPA in Ubuntu:

1. Open terminal via Ctrl+Alt+T or by searching for “terminal” from app launcher. When it opens, run command to add the PPA:

sudo add-apt-repository ppa:libreoffice/ppa

Type in your password (no visual feedback when typing due to security reason) when prompts and hit Enter.

LibreOffice Fresh PPA

2. Then launch Software Updater and upgrade LibreOffice after checking for updates:

How to restore:

To revert back to the stock version of LibreOffice in your Ubuntu, purge the PPA via command:

sudo apt-get install ppa-purge && sudo ppa-purge ppa:libreoffice/ppa

Visual Studio Code IDE

Microsoft Visual Studio Code has reached the 1.14 release earlier today with many great new features.

VS Code 1.14 release highlights:

  • Integrated terminal improvements – Find support, select/copy multiple pages
  • Command Palette MRU list – Quickly find and run your recently used commands
  • New Tasks menu in top-level menu bar.
  • Automatic indentation – Auto indent while typing, moving, and pasting source code.
  • Emmet abbreviation enhancements – Add Emmet to any language. Multi-cursor support.
  • New Diff review pane – Navigate Diff editor changes quickly with F7, displayed in patch format.
  • Angular debugging recipe – Debug your Angular client in VS Code.
  • Better screen reader support – Aria properties to better present list and drop-down items
  • Preview: 64 bit Windows build – Try out the Windows 64 bit version (Insiders build).
  • Preview: Multi-root workspaces – Open multiple projects in the same editor (Insiders build).

Download / Install VS Code in Ubuntu:

Visual Studio Code is available as Snap app for Ubuntu Linux, though it’s version 1.13.1 at the moment of writing.

Also the official .deb installer is available for download at the link below:

VS Code Download Page

Download the .deb package and click install via Ubuntu Software or Gdebi package manager.

Add Visual Studio repository:

For those who want to add VS code Linux repository so to receive updates via Software Updater along with other system updates:

1. Open terminal via Ctrl+Alt+T or by searching for “terminal” from app launcher. When it opens, run command to add the repository:

sudo sh -c 'echo "deb [arch=amd64] https://packages.microsoft.com/repos/vscode stable main" > /etc/apt/sources.list.d/vscode.list'

2. Then download and install the key (need curl installed) via 2 commands:

curl https://packages.microsoft.com/keys/microsoft.asc | gpg --dearmor > microsoft.gpg

sudo mv microsoft.gpg /etc/apt/trusted.gpg.d/microsoft.gpg

The Hugin panorama photo stitcher has reached the 2017.0.0 release. The official Ubuntu binary packages are now available via its PPA repository for Ubuntu 14.04, Ubuntu 16.04, Ubuntu 16.10, Ubuntu 17.04, Ubuntu 17.10, and derivatives.

Hugin is an easy to use cross-platform panoramic imaging toolchain based on Panorama Tools. With it, you can assemble a mosaic of photographs into a complete immersive panorama, stitch any series of overlapping pictures and much more.

The latest version 2017.0.0 is mainly a bug fix release. Changes include:

  • Several fixes for working with HDR images
  • Fixes handling of masks in cpfind when images needs remapping for cp finding.
  • Sometimes unsaved changes were disregarded without asking the user. Unsaved changes should now always require user confirmation.
  • Added special assistant variant for single image projects.
  • Display of final panorama dimensions on stitcher tab.
  • Extended the user defined output sequences
  • Use wxWidgets help windows instead of default browser
  • Other small improvements and translation updates.

How to install Hugin 2017 via PPA in Ubuntu:

1. Open terminal via Ctrl+Alt+T or by searching for “Terminal” from app launcher. When it opens, run command to add the official PPA:

sudo add-apt-repository ppa:hugin/hugin-builds

Type in your password when prompts and hit Enter

2. Then launch Software Updater and upgrade the software after checking for updates.

How to Restore:

To revert back to the stock version of Hugin packages in your Ubuntu, purge the PPA via command:

sudo apt install ppa-purge && sudo ppa-purge ppa:hugin/hugin-builds