Archives For Howtos

The Grub Customizer PPA now is available for Ubuntu 13.10 Saucy Salamander and its derivatives.

grub customizer

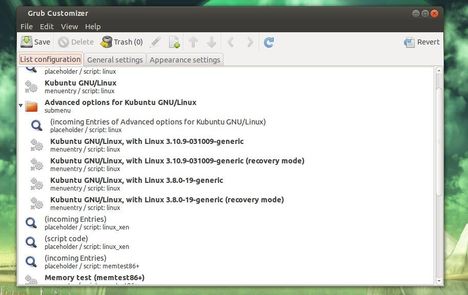
As you may know, Grub Customizer is a graphical interface to configure the GRUB2/BURG settings and menu entries. It allows to move, remove, rename and edit the bootloader menu entries, set the default operating system, reinstallation of the bootloader to MBR, etc.

Install Grub Customizer:

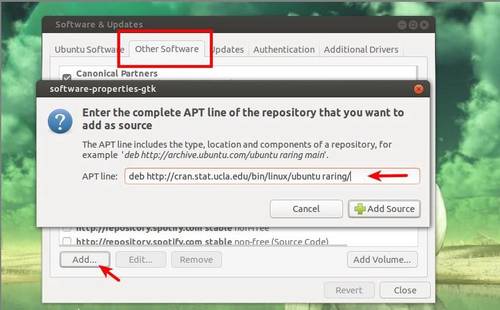
Press Ctrl+Alt+T on your keyboard to open terminal. When it opens, run below command to add the PPA:

sudo add-apt-repository ppa:danielrichter2007/grub-customizer

add grub customizer ppa

Then update package lists and install grub-customizer:

sudo apt-get update; sudo apt-get install grub-customizer

Once installed, open it from Unity Dash and enjoy!

grub customizer ubuntu

Gnome Subtitles is a subtitle editor for the GNOME desktop (also works in Unity). It supports the most common text-based subtitle formats, video previewing, timings synchronization and subtitle translation.

Some supported subtitle formats are: Advanced Sub Station Alpha, FAB Subtitler, MicroDVD, Mplayer 1/2, MPSub, SubRip, SubViewer 1/2.

Gnome Subtitles

The latest version has reached 1.3 which allows to set the gap between subtitles, to be used when inserting or splitting subtitles. Also there are a lot of bug fixes and other improvements.

Install Gnome Subtitles 1.3 via PPA

For Ubuntu 13.04, Ubuntu 12.04, Ubuntu 12.10 and their derivatives, such as Linux Mint and Elementary OS. Press Ctrl+Alt+T and run below commands one by one in pop-up terminal:

sudo add-apt-repository ppa:pedrocastro/ppa

sudo apt-get update

sudo apt-get install gnome-subtitles

For Ubuntu 13.10 Saucy, run below commands instead:

sudo add-apt-repository ppa:nilarimogard/webupd8

sudo apt-get update

sudo apt-get install gnome-subtitles

Once installed, open it from Unity Dash and Enjoy!

Are you using the Elementary OS instead of Ubuntu? Well, here I’ll show you how to add the ‘Open in terminal’ option to the Pantheon file manager right-click menu. So that you can quickly open terminal and automatically navigate to the current directory in Pantheon.

open in terminal for pantheon

To get started, use your favorite editor to create the config file /usr/share/contractor/openinterminal.contract and edit it. I prefer Gedit, so I install it and edit the file via below commands:

sudo apt-get install gedit

sudo gedit /usr/share/contractor/openinterminal.contract

Copy and paste below lines into the file and save it.

[Contractor Entry]
Name=Open in terminal
Icon=terminal
Description=Open in terminal
MimeType=inode;application/x-sh;application/x-executable;
Exec=pantheon-terminal -d %U
Gettext-Domain=pantheon-terminal

Log out and back in and done! Or you need a restart if it doesn’t work properly.

Light Locker is a simple session-locker for Lightdm forked from gnome-screensaver that aims to have simple, sane, secure defaults and be well integrated with the desktop while not carrying any desktop-specific dependencies.

With it, the lock screen will look identical to the LightDM greeter – the Unity default login screen.

LightDM locker

Requirements:

To use light-locker with systemd, you need at least lightdm 1.7.0. light-locker doesn’t work with lightdm version 1.7.5-1.7.9

I’ve tested in Ubuntu 13.04 with default lightdm 1.6.0. The light locker works when my laptop wakes up from suspend. But the Lock/Switch Account option in shutdown menu doesn’t work! Use it at your own risk!

Install LightDM Locker:

The Stable PPA has been created for Ubuntu 13.10 Saucy and Ubuntu 13.04 Raring.

Before getting started installing it, press Ctrl+Alt+T on your keyboard to open terminal. When it opens, run command to remove the gnome-screensaver:

sudo apt-get remove gnome-screensaver

The you can add the ppa via command:

sudo add-apt-repository ppa:light-locker/release

Finally install LightDM locker. Log out and back in to take effect.

sudo apt-get update; sudo apt-get install light-locker

As you may know, sView is a stereoscopic 3D media player which plays 3D images, videos, CAD models. For each sort of media sView provides independent application with customized user-friendly interface.

The 3D Image Viewer displays images and photos in most popular formats including JPEG, PNG, MPO, BMP, EXR, TGA, WebP and many others. Actual decoding performed by FFmpeg framework, and, optionally, DevIL and FreeImage libraries.

The supported formats of 3D Movie Player is very large thanks to FFmpeg framework including MKV, WebM, OGM, AVI, FLAC, RMVB and many others.

sview movie player

The Tiny CAD Viewer loads and displays CAD models supported by OpenCASCADE Technology framework (BREP, IGES, STEP). Viewer supports different presentation modes including orthogonal and perspective projection matrices as well as stereoscopic output.

Install sView via PPA

The official ppa repository supports Ubuntu 13.04, Ubuntu 12.04, Ubuntu 12.10, Ubuntu 10.04, Ubuntu 11.10 and their derivatives, such as Linux Mint and Elementary OS.

To install it, press Ctrl+Alt+T on your keyboard to open terminal. Run below commands one by one:

sudo add-apt-repository ppa:sview/stable

sudo apt-get update

sudo apt-get install sview

Once installed, you can open the app from Unity Dash. Or choose open with sview in files’ right-click menu.

This simple tutorial shows you how to easily change the CPU frequency via indicator applet in Ubuntu 13.10, Ubuntu 13.04, Ubuntu 12.10, Ubuntu 12.04 and their derivatives, such as Linux Mint and Elementary OS.

cpu frequency indicator

Indicator-freq is an applet for displaying and change cpu frequency on the fly. Also it allows to choose powersaving mode to save power.

To install this indicator, open Ubuntu Software Center and search for and install the indicator-cpufreq package.

install cpu frequency indicator

That’s it. Enjoy!

Want GCC 4.8 with c++11 complete feature? Well here’s how to install it in Ubuntu 12.04, Ubuntu 13.04, Ubuntu 12.10 via the PPA.

The PPA provides both GCC 4.7.3 and GCC 4.8.1 for Ubuntu users. In this tutorial, you can follow below steps to upgrade gcc version in your system.

1.) Press Ctrl+Alt+T on your keyboard to open terminal. When it opens, run below commands to add the ppa:

sudo add-apt-repository ppa:ubuntu-toolchain-r/test

2.) Then install gcc 4.8 and g++ 4.8:

sudo apt-get update; sudo apt-get install gcc-4.8 g++-4.8

3.) Once installed, run following commands one by one to use gcc 4.8 instead of previous version.

sudo update-alternatives --remove-all gcc 

sudo update-alternatives --remove-all g++

sudo update-alternatives --install /usr/bin/gcc gcc /usr/bin/gcc-4.8 20

sudo update-alternatives --install /usr/bin/g++ g++ /usr/bin/g++-4.8 20

sudo update-alternatives --config gcc

sudo update-alternatives --config g++

Now you have the gcc 4.8 with c++11 complete feature in your system. Check out by:

gcc --version

gcc (Ubuntu 4.8.1-2ubuntu1~13.04) 4.8.1
Copyright (C) 2013 Free Software Foundation, Inc.
This is free software; see the source for copying conditions. There is NO
warranty; not even for MERCHANTABILITY or FITNESS FOR A PARTICULAR PURPOSE.

R Statistical PackageIf you have problem installing R statistical package via the official document. Here’s easy guide with pictures shows you how to install R package in Ubuntu 13.04, Ubuntu 12.04, Ubuntu 12.10, Ubuntu 10.04.

R Package is available in Ubuntu Software Center by default, but it’s old. This tutorial will install the latest verson – so far it is 3.0.1 – in Ubuntu via the via official repository.

Add R Statistical Package Repository:

Search for and open Software & Updates from unity dash home.

software&updates

Navigate to Other Software tab, click Add and paste below line in pop-up window.

For Ubuntu 12.04: deb http://cran.stat.ucla.edu/bin/linux/ubuntu precise/

For Ubuntu 13.04: deb http://cran.stat.ucla.edu/bin/linux/ubuntu raring/

For Ubuntu 12.10: deb http://cran.stat.ucla.edu/bin/linux/ubuntu quantal/

For Ubuntu 10.04: deb http://cran.stat.ucla.edu/bin/linux/ubuntu lucid/

add r package repository

You can change “cran.stat.ucla.edu” to other mirrors.

Install R Statistical Package:

After added the repository, press Ctrl+Alt+T on your keyboard to open terminal. When it opens, run below command to get the key:

sudo apt-key adv --keyserver keyserver.ubuntu.com --recv-keys E084DAB9

add r package keyring

Finally, you can use Synaptic Package Manager (install it from Ubuntu Software Center) to install R Package.

install r package ubuntu

This tutorial shows how to install older & newer versions of python in Ubuntu. Felix Krull has created a PPA that contains multiple python versions:

  • python 2.4.6 for Ubuntu 10.04, Ubuntu 12.04, Ubuntu 12.10, Ubuntu 13.04, Ubuntu 11.10, Ubuntu 11.04
  • python 2.5.6 for Ubuntu 10.04, Ubuntu 12.04, Ubuntu 12.10, Ubuntu 13.04, Ubuntu 11.10, Ubuntu 11.04
  • python 2.6.8 for Ubuntu 13.04, Ubuntu 12.04, Ubuntu 12.10
  • python 2.7 for Ubuntu 10.04, Ubuntu 10.10
  • python 3.1 for Ubuntu 13.04, Ubuntu 12.10, Ubuntu 12.04, Ubuntu 11.10
  • python 3.2 for Ubuntu 13.04, Ubuntu 10.04
  • python 3.3 for Ubuntu 12.04, Ubuntu 11.10, Ubuntu 10.04

To add the ppa, run below command in terminal:

sudo add-apt-repository ppa:fkrull/deadsnakes

Then update package lists:

sudo apt-get update

To install python 2.4 in Ubuntu 12.04, etc. run below command:

sudo apt-get install python2.4

To install python 2.5 in Ubuntu 12.04, etc. run:

sudo apt-get install python2.5

To install python 2.6 in Ubuntu 12.10, Ubuntu 12.04, run:

sudo apt-get install python2.6

To install python 2.7 in Ubuntu 10.04, Ubuntu 10.10

sudo apt-get install python2.7

To install Python 3.2 in Ubuntu 12.04:

sudo apt-get install python3.2

To install Python 3.3 in Ubuntu 12.04:

sudo apt-get install python3.3

Want to customize the notification bubbles? Well, here I’ll tell you how to move its location, change text color, enable close bubble on click in Ubuntu 13.04 Raring, Ubuntu 13.10 Saucy.

change location of notification bubble

The default Notification Bubbles – NotifyOSD – is not customizable in Ubuntu. Leolik provides a patched (configurable) NotifyOSD in his PPA which allows to change:

  • colors
  • size of the bubbles, font size, icon size, corner radius
  • opacity
  • timeout
  • position on the screen (top-right, middle-right, bottom-right, bottom-left, middle-left, top-left)
  • disable fade out
  • click anywhere on the notification to close it

To install this customizable notification bubbles in Ubuntu 13.04, Ubuntu 12.10, Ubuntu 12.04, Ubuntu 11.10, Ubuntu 11.04. Press Ctrl+Alt+T to open terminal, run below commands one by one:

sudo add-apt-repository ppa:leolik/leolik 

sudo apt-get update

sudo apt-get install notify-osd

Once installed, run command to restart the service:

pkill notify-osd

Now install a graphical tool to configure NotifyOSD. Run below commands one by one in terminal:

sudo add-apt-repository ppa:nilarimogard/webupd8

sudo apt-get update

sudo apt-get install notifyosdconfig

After that, you can use this tool to customize your notifications:

configure notification

To change the location, run below command in terminal:

gsettings set com.canonical.notify-osd gravity NUMBER

Where the NUMBER can be:

1 – top-right corner
2 – middle-right
3 – bottom-right corner
4 – bottom-left corner
5 – middle-left
6 – top-left corner