Archives For jimingkui

This simple tutorial shows you how to install the latest RawTherapee 4.0.11 on Ubuntu 13.04 Raring, 12.10 Quantal, 12.04 Precise using PPA repository.

RawTherapee main window

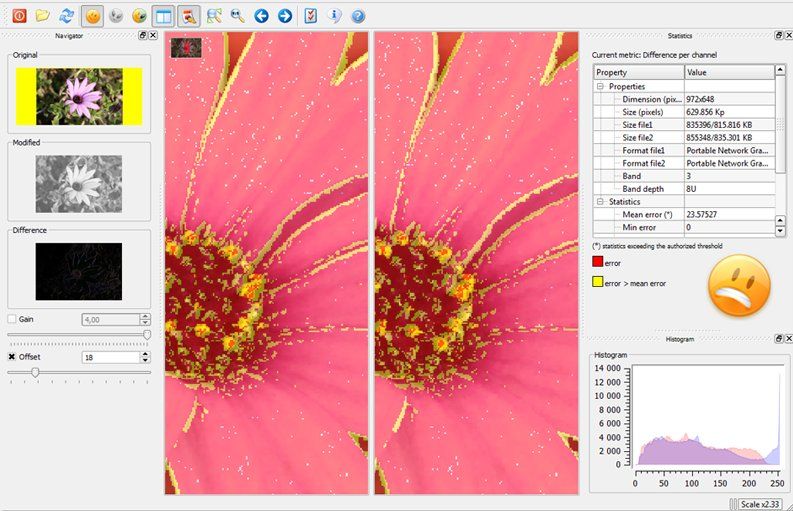
RawTherapee is a cross-platform raw image processing program written in C++, using a GTK+ front-end and a patched version of dcraw for reading raw files. It is notable for the advanced control it gives the user over the demosaicing and developing process.

“The 4.0.11 release includes a number of new features which you can read about below, but just as importantly it contains a large number of speed improvements and bug fixes, so we recommend you update straight away!”

New features:

  • CIECAM02 “Adaptation scene luminosity” now calculated automatically
  • CIECAM02 hot/bad pixel fixer to prevent bright pixels from appearing
  • The Defringe tool is now able to target a range of specific colors without touching others
  • New bundled processing profiles
  • New keyboard shortcuts to apply rank and color labels and a new direct popup menu for color labels, all in the File Browser
  • “Profile Fill Mode” button controls whether to replace missing processing profile values with default ones or not
  • Keyboard shortcuts to open the next/previous image and to synchronize the File Browser strip with the currently opened image
  • New demosaicing algorithms for noisy photos:
    • LMMSE
    • IGV
  • More zoom levels
  • Redesigned save window
  • New functionality of the minima/maxima control points curves editor, see the RawTherapee Manual
  • Support for TIFFfiles with alpha channels
  • Support for 32-bit TIFF files (HDR)
  • Preferences/Batch processing options: all to ‘Add’ and all to ‘Set’
  • Support for
    • Nikon D5200
    • Nikon D7100
    • Nikon COOLPIX A
    • Panasonic Lumix DMC-G5

Install RawTherapee:

The latest release is available for Ubuntu 13.04 Raring, 12.10 Quantal, Ubuntu 12.04 Precise from the ppa repository.

To add the ppa, press Ctrl+Alt+T on your keyboard to open a terminal window. When it opens, run below command:

sudo add-apt-repository ppa:dhor/myway

Then update package lists and install via Synaptic Package Manager. Or you can run below command instead:

sudo apt-get update; sudo apt-get install rawtherapee

RawTherapee unity dash

DiffImg is a simple image comparison tool which take two images with the same size as input. Some statitics are computed and the positions where pixel differ are displayed as a color mask.

diffimag image comparison tool

There are very few image difference tools for Ubuntu Linux. DiffImg is one of them which has a user friendly GUI. It uses OpenCV as backend so it can read and compare 8/16/24/32 bits images without problem but only single channel and RGB image has been take into account, so alpha channel isn’t supported.

Because DiffImg is written with Qt, it runs on Windows and Linux (MacOSX isn’t tested yet) and OS/2. It can read basic formats as BMP, PNG, JPG but also Tiff and OpenExR.

Current Features:

  • Image difference display : a yellow/red mask can overlay the original/modified images.
  • Single/Dual panels mode.
  • Statistic computation: Mean error, RMS error and min/max are computed.
  • Several metrics can be used for computing image difference.
  • Histogram of error.
  • “Slideshow” : DiffImg can compare directory of image, so you can switch to the previous/next comparison if you have two folders with the same image list.
  • Supported files :DifffImg uses Qt plugins to load images, so by default it can read basic formats as BMP, PNG, JPG and OpenCV supported formats (Tiff, OpenExR).
  • Basic batch mode

Install DiffImg:

A PPA repository has been created to make it easy to install for Ubuntu and Linux Mint users. So far, it supports Ubuntu 13.04 Raring, 12.10 Quantal, 12.04 Precise and Linux Mint 13 Maya, 14 Nadia, 15 Olivia.

To add the ppa, press Ctrl+Alt+T on your keyboard to open terminal. When it opens, run below commands:

sudo add-apt-repository ppa:dhor/myway

Then you can update package lists and install the tool via Synaptic Package Manager, or run below command:

sudo apt-get update; sudo apt-get install diffimg

That’s it.

For other systems, Diffimg source code and exe file can be download from SourceForge.

diffimg on ubuntu unity

The HotShots screenshot tool 1.2.0 has been released. This simple tutorial shows you how to install or upgrade to this version on Ubuntu 13.04 Raring, 12.04 Precise and 12.10 Quantal.

hotshot screenshot tool

HotShots is an application for capturing screens and saving them in a variety of image formats as well as adding annotations and graphical data (arrows, lines, texts, …). Because HotShots is written with Qt, it runs on Windows and Linux

The new release has some layout changes. The editor has multi-selection, the ability to select shadows on each item, the ability to edit some items (polygon, polyline, and curve) more easily, and the ability to add post-effects to the image background. The uploader adds a user field to define the output template for FTP uploader. The ability to send a document directly to the printer has been added. Slovak, Turkish, Russian, Sinhala, Serbian, Czech, Vietnamese, Basque, Spanish, and Chinese translations have been added.

hotshots snapshot editor

Install HotShots:

A PPA repository has been created to make it easy to install for Ubuntu and Linux Mint users. So far it supports Ubuntu 13.04 Raring Ringtal, 12.10 Quantal Quetzal, and Ubuntu 12.04 LTS Precise Pangolin.

Press Ctrl+Alt+T on your keyboard to open terminal. When it opens, run below commands to add the ppa:

sudo add-apt-repository ppa:dhor/myway

After that, update package lists and install HotShots screenshot tool via below command:

sudo apt-get update; sudo apt-get install hotshots

Once installed, you can open it from the Unity Dash.

hotshots-unity-dash

Pogo is an ultra lightweight music player for Ubuntu Linux. It is a fork of Decibel Audio Player and supports most common audio formats. Pogo is written in Python and uses GTK+ and gstreamer.

pogo ultra lightweight audio player

Pogo plays your music. Nothing else. It is both fast and easy-to-use. The clear interface uses the screen real-estate very efficiently. Other features include: Fast search on the harddrive and in the playlist, smart album grouping, cover display, desktop notifications and no music library.

pogo-notifications

Install Pogo Audio Player:

The developer has created a ppa repository to make it easy to install for Ubuntu and Linux Mint users. So far it supports Ubuntu 13.10 Saucy, 13.04 Raring, 12.10 Quantal, 12.04 Precise, 10.04 Lucid.

To add the ppa, press Ctrl+Alt+T on your keyboard to open terminal. When it opens, run below commands:

sudo add-apt-repository ppa:pogo-dev/daily

After that, update package lists and install Pogo via command below:

sudo apt-get update; sudo apt-get install pogo

This brief tutorial shows you how to change your laptop touchpad tap actions in Ubuntu, including single tap, two and three finger tap as well as tap on corners..

touchpad tap actions

I’m only using single tap and touchpad scrolling feature on my laptop. As you may know, Ubuntu acts as middle click when tapping on top-right corner of touchpad. It is annoying that I was always ‘corner-tapping’ on my Google Chrome tabs, and they vanished all of a sudden. More over, two finger tap brings up righ-click menu, quick tapping twice on title-bar, browser tabs allows to move items. Due to these useless and annoying tap actions (only for me), I’m determined to tweak my touchpad settings. That’s why I’m writting this tutorial.

The default Mouse & Touchpad utility in Ubuntu Unity is getting better now, but it’s not powerful enough. So far it only has the ability to switch on / off touchpad, Tap to click, Disable while typing, Two finger scroll, Contents sticks to fingers as well as point speed settings.

default touchpad tapping utility

I found synaptiks, which is a simple utility that covers almost all settings of Synaptics Touchpad, including multi-tapping, tapping on corners. It is available on Ubuntu Software Center by default since Ubuntu 12.04 Precise. Click link below to install it:

Install Synaptiks Touchpad Configuration

When installed, open the tool and go to Touchpad Configuration -> Tapping. There provides options to change tapping on 4 corners, single tap, two finger tap, three finger tap, drag items by tapping, etc.

synaptiks touchpad tap configurations tool

This latest stable Kernel 3.10.2 has been released. All users of the 3.10 kernel series are urged to upgrade as soon as possible. This tutorial shows how to install / Upgrade Kernel 3.10.2 for Ubuntu 13.04, 12.04, 12.10 and Linux Mint users.

kernel 3.10.2 ubuntu

Linux Kernel 3.10.2 is also a small release that includes a few updated drivers, fixes for the ext3 and ext4 file systems, as well as other small changes. Read the announcement.

Install / Upgrade Kernel 3.10.2

The Kernel PPA has updated with latest DEBs for Ubuntu and Linux Mint users.

Press Ctrl+Alt+T on your keyboard to open a terminal window. When it opens, run below commands to download the Debs.
For 32-bit system:

wget http://kernel.ubuntu.com/~kernel-ppa/mainline/v3.10.2-saucy/linux-headers-3.10.2-031002-generic_3.10.2-031002.201307212216_i386.deb http://kernel.ubuntu.com/~kernel-ppa/mainline/v3.10.2-saucy/linux-headers-3.10.2-031002_3.10.2-031002.201307212216_all.deb http://kernel.ubuntu.com/~kernel-ppa/mainline/v3.10.2-saucy/linux-image-3.10.2-031002-generic_3.10.2-031002.201307212216_i386.deb

For 64-bit system

wget http://kernel.ubuntu.com/~kernel-ppa/mainline/v3.10.2-saucy/linux-headers-3.10.2-031002-generic_3.10.2-031002.201307212216_amd64.deb http://kernel.ubuntu.com/~kernel-ppa/mainline/v3.10.2-saucy/linux-headers-3.10.2-031002_3.10.2-031002.201307212216_all.deb http://kernel.ubuntu.com/~kernel-ppa/mainline/v3.10.2-saucy/linux-image-3.10.2-031002-generic_3.10.2-031002.201307212216_amd64.deb

After downloading, both 32-bit and 64-bit use below command to install them:

sudo dpkg -i linux-headers-3.10.2*.deb linux-image-3.10.2*.deb

Finally, remember to update grub to apply changes. To do so, run below command:

sudo update-grub

Once done, restart your computer and you should see the entry with Linux Kernel 3.10.2.

This simple tutorial shows you how to install Rockbox Utility on Ubuntu 22.04, Ubuntu 22.04, and Ubuntu 20.04.

Rockbox Utility on Ubuntu

What is Rockbox:

As you may know, Rockbox is a free and open source replacement for the standard firmware in various forms of digital audio players (DAPs). It offers an alternative to the player’s operating system, in many cases without removing the original firmware, which provides a plug-in architecture for adding various enhancements and functions. Enhancements include personal digital assistant (PDA) functions, applications, utilities, and games. Rockbox can also retrofit video playback functions on players first released in mid-2000. Rockbox includes a voice-driven user-interface suitable for operation by visually impaired users.

Rockbox iPod

What is Rockbox Utility

Rockbox Utility is a free computer application that is used to install and manage Rockbox on DAPs. It provides automatic installation of Rockbox, as well as themes and voice files, directly onto a DAP with minimal user interaction.

Rockbox Utility is updated frequently as support for new devices is added. Currently supported devices include iPod, iPod Mini, iPod Nano, Archos Jukebox series, Cowon X5, M5, M3, iRiver H10/H100/H300, Mpio HD200, Packard Bell Vibe 500, Philips GoGear, Samsung YH, SanDisk, Toshiba, Olympus. Read more

Features:

  • Base
    • Bootloader installation
    • Rockbox installation
  • Extras
    • Fontpack installation
    • Theme installation
    • Game files installation (i.e. freedoom)
  • Accessibility
    • Install voice file (from the webpage)
    • Create voicefile
    • Create .talk clips
  • Uninstallation
    • Uninstall bootloader
    • Uninstall Rockbox (partial, or full)
  • Manual
    • Access to the Manual of your device
  • Info
    • Shows all installed parts of Rockbox

Install Rockbox Utility:

The Rockbox Utility now provides universal AppImage package for Linux users.

Just go to the download page via the link below:

Then click the link to download the package for Linux. At the moment of writing, the latest is RockboxUtility-v1.5.1.AppImage.

After downloaded the package, right-click on it in file manager, go to “Properties”, and enable “Executable as Program” option (under Permissions tab for 22.04 and earlier). Finally, click Run the AppImage will launch the app.

NOTE: Ubuntu 22.04 and higher does NOT support AppImage out-of-the-box. You need to press Ctrl+Alt+T on keyboard to open terminal, then run command to get it support:

sudo apt install libfuse2

This simple tutorial is going to show you how to install Subsonic Music Streamer 4.8 on Ubuntu 13.04 Raring, 12.10 Quantal, 12.04 Precise.

Subsonic is open-source, web-based media streamer, providing ubiquitous access to your music and video collection. It supports most media formats, such as MP3, OGG, AAC and any other audio or video format that streams over HTTP.

Features:

  • Enjoy your music and movies no matter where you are. Share with family and friends.
  • Browse and manage your media collection with the user-friendly web interface.
  • Stream music to Android, iPhone and Windows Phone.
  • Subsonic apps available for Roku, BlackBerry Playbook and many more.
  • Convert and stream lossless music on the fly.
  • Manage 100,000+ files in your music collection without hassle.
  • Download and listen to Podcasts.
  • Get cover art, lyrics, reviews and other album info from Google, Chartlyrics, allmusic and Wikipedia.

Install Subsonic:

The official website provides the DEB installer for Ubuntu users. It can be download by clicking the below link:

Subsonic-4.8.deb

Subsonic requires Java, so first install OpenJDK from Ubuntu Software Center or Oracle Java from ppa.

Then double-click on the downloaded DEB package and select install on Ubuntu Software Center. Click ‘Ignore and install’ if you get the below dialog.

ignore Subsonic bad quality

Change user:

By default the Subsonic process is run as the root user. To improve security it is strongly advised that you run it as a dedicated user with less powerful privileges. You can specify this user by setting the SUBSONIC_USER variable in /etc/default/subsonic.

To do so, press Alt+F2, type in gksudo nautilus to open file browser with root permission. Then change username to yours in the picture.

subsonic-user

Note that non-root users are by default not allowed to use ports below 1024. Also make sure to grant the user write permissions in the music directories, otherwise changing album art and tags will fail.

After all, restart your computer and open the Subsonic web page on http://localhost:4040.

This simple tutorial shows how to install SoundConverter on Ubuntu 13.04 Raring, 12.10 Quantal, 12.04 Precise and Linux Mint via GetDeb repository.

soundconverter

SoundConverter is a simple sound converter application for the GNOME environment. It reads sound files in any format supported by GStreamer and outputs them in Ogg Vorbis, FLAC, or WAV format, or MP3 format if you have the GStreamer LAME plugin.

SoundConverter aims to be simple to use, and very fast. Thanks to its multithreaded design, it will use as many cores as possible to speed up the conversion. It can also extract the audio from videos.

Tutorial Objectives:

  • Install SoundConverter 2.1.1 on Ubuntu 13.04, 12.10, 12.04
  • Enjoy!

To get started, add the GetDeb repository. To do so, press Ctrl+Alt+T to open terminal. When it opens, run below commands to add the repository:

wget http://archive.getdeb.net/install_deb/getdeb-repository_0.1-1~getdeb1_all.deb

sudo dpkg -i getdeb-repository_0.1-1~getdeb1_all.deb

Then you can search for and install soundconverter via synaptic package manager. Or run below commands to update package lists and install:

sudo apt-get update; sudo apt-get install soundconverter

Once installed, open it from Unity Dash.

soundconverter in unity

Klest-crossword is a game for professional compiling, editing and easy guessing american and classic the crossword puzzles.

Klest Crossword Puzzle Game

It contains more than 1,000 crossword puzzles to guess and provides a lot of tools for creating a crossword puzzle. It a dictionary of 31 000 Russian words and a dictionary of 41 000 English words.

All functions:

  • Creating and guessing a crossword puzzle;
  • Check correctness of guessing a crossword puzzle;
  • Save state incompletely guessed crossword puzzle;
  • Automatic creation of crossword puzzle grid (beta)
  • Automatic compiling;
  • Semi-automatic compiling;
  • Creating and editing a dictionary;
  • Adding / removing words from the dictionary;
  • Saving created a crossword puzzle grid, as a template for the new;
  • Editing the font crossword;
  • Editing the grid of crossword puzzle;
  • Export crossword: RTF, PDF, PostScript(*.ps), HTML, Text format across Lite, JPG, JPEG, TIFF, BMP, XPM, PNG, XBM, PPM, OpenKlest(*.ok);
  • Import crossword: Texthttp://qt-apps.org/content/show.php/Klest-crossword?content=144254 format AcrossLite, OpenKlest(*.ok);
  • Print crossword;
  • Statistics;

Install Klest-crossword:

The source code and Deb installer are available from SourceForge.